

Every bite of creamy orange dreamsicle fudge brings back summer memories. It turns a childhood ice cream treat into a delicious homemade dessert. It’s a sweet masterpiece that captures the essence of orange and vanilla flavors in a rich fudge.
This candy isn’t just a recipe; it’s a trip back to carefree summer days. With a few simple ingredients and some kitchen magic, you can make a beloved treat. Our easy orange creamsicle fudge recipe is sure to become your new favorite dessert.
Table of Contents
Understanding Orange Dreamsicle Fudge
Explore the world of citrus fudge, a summer favorite. Orange Dreamsicle Fudge combines orange and vanilla in a delicious treat. It’s a twist on traditional desserts.
Origins of Dreamsicle Flavored Treats
The creamsicle was first enjoyed in the 1930s. It became a summer favorite. Orange chocolate fudge turns this childhood treat into a sophisticated dessert for all ages.
Why This Recipe Is Special
This Orange Dreamsicle recipe is a summer highlight. It stands out from regular fudge:
- Vibrant orange flavor
- Creamy white chocolate base
- Nostalgic flavor profile
- Simple preparation method
Key Characteristics of Perfect Fudge
Making the best orange chocolate fudge needs focus on a few things. The ideal fudge is:
| Characteristic | Description |
|---|---|
| Consistency | Smooth and creamy |
| Flavor Balance | Harmonious orange and vanilla notes |
| Sweetness Level | Rich but not overwhelming |
| Mouthfeel | Soft, melts easily on tongue |
“A great fudge is like a culinary symphony – every ingredient plays a perfect note.” – Pastry Chef Recommendation
This Orange Dreamsicle Fudge is a unique mix of flavors and textures. It turns a simple dessert into a summer celebration.
Essential Ingredients and Equipment
To make delicious orange creamsicle sweets, you need the right ingredients and tools. The perfect mix of quality ingredients and the right equipment will bring your fruity fudge bites to life.
Key Ingredients
- Granulated sugar
- Unsalted butter
- Evaporated milk
- High-quality white baking chips
- Marshmallow creme
- Vanilla extract
- Orange extract
- Orange gel food coloring
Essential Equipment
| Equipment | Purpose |
|---|---|
| 8×8 or 9×13 baking dish | Fudge setting and shaping |
| Heavy-bottomed saucepan | Even heat distribution |
| Parchment paper | Easy removal of fudge |
| Candy thermometer | Precise temperature control |
When making your orange creamsicle sweets, choose the best ingredients for the tastiest fruity fudge bites. The right tools will turn your kitchen into a pro confectionery space.
Pro tip: Always use fresh, high-quality ingredients for the most authentic orange creamsicle flavor!
Your careful choice of ingredients and equipment will help you make amazing orange creamsicle fudge. It will impress your family and friends.
Kitchen Tools and Preparation Steps
Making dreamsicle desserts needs precision and the right tools. Your journey to orange dreamsicle fudge starts with careful prep and the right kitchen tools.
Required Utensils for Success
Having the right tools makes fudge-making smooth. Your must-have tools include:
- Heavy-bottomed saucepan with thick base
- Wooden spoon or silicone spatula
- Accurate candy thermometer
- Measuring cups and spoons
- 9×9 inch baking pan
- Parchment paper
- Sharp knife or toothpick for swirling
Workspace Preparation Strategies
Set up your workspace for easy orange dreamsicle fudge making. Line your baking pan with parchment paper, leaving extra for easy removal. Keep all ingredients within reach to make the process smoother.
Critical Temperature Considerations
Temperature control is key for perfect fudge. Use a candy thermometer to check your mixture’s temperature. Aim for 234-238°F, the soft-ball stage, for the best results.
“Precision is the secret ingredient in creating spectacular fudge.” – Culinary Expert
Keep the heat steady and avoid sudden changes. Slow heating leads to creamy, dreamy orange dreamsicle fudge that’s irresistible.
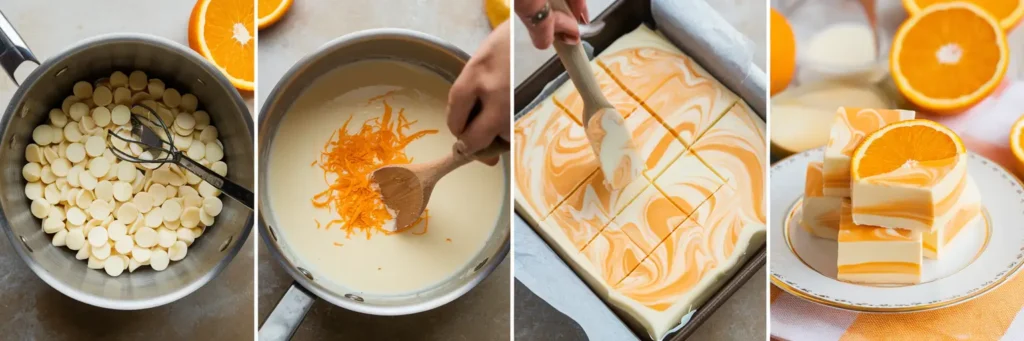
Base Fudge Mixture Instructions
Making creamy orange fudge starts with a solid base mixture. Your journey to making citrus fudge begins with picking the right ingredients and following cooking steps carefully. Knowing each step is key to making delicious fudge.
- Choose a heavy-bottomed saucepan for even heat.
- Put together the main ingredients with care:
- White baking chips (4 cups)
- Sugar (1 cup granulated)
- Unsalted butter (cubed)
- Evaporated milk
- Cook over low heat, stirring constantly.
- Mix until the sugar dissolves.
- Heat until it starts to boil gently.
“The secret to perfect fudge is patience and precise temperature control.” – Pastry Chef Recommendation
Keeping the temperature right is key for your fudge. Watch for these important moments:
- Low and slow heating stops sugar crystals.
- Stir every 30 seconds while boiling.
- Cook for about 4-5 minutes.
- Stop cooking when it reaches the soft-ball stage.
After heating stops, mix in marshmallow creme and white chocolate chips until smooth. This makes a rich base for your fudge, ensuring it melts in your mouth.
Creating the Orange Dreamsicle Flavor
To make your orange chocolate fudge into a dreamsicle-flavored candy, you need to be precise and creative. It’s all about blending ingredients right to get that nostalgic creamsicle taste.
Making the perfect orange dreamsicle flavor is all about a few key techniques. These steps will take your fudge from good to amazing.
Adding Orange Extract
Orange extract is key to getting that real dreamsicle taste. Here are some tips for choosing the right extract:
- Go for pure orange extract for the strongest flavor
- Start with 1-2 teaspoons and adjust as needed
- Orange juice can also work (use 2 teaspoons for every 1 teaspoon of extract)
Color Enhancement Techniques
The look of your orange chocolate fudge is just as important as its taste. Here’s what pros suggest:
- Use gel food coloring for bright orange colors
- Add color slowly to control the shade
- Shoot for a soft, creamy orange color
Achieving the Perfect Swirl
Getting a beautiful marbled look needs a gentle touch. Set aside about 1½ cups of white fudge base. Mix in orange extract and coloring. Pour the white fudge into a 9×9-inch pan, then add the orange mixture in layers.
Pro tip: Use a butter knife or toothpick to make smooth swirls. This ensures the orange mixes well into the fudge for a beautiful look and taste.
With these steps, you’ll turn a simple fudge recipe into a dreamy, creamsicle-inspired treat. It’s a childhood memory in every bite.
Setting and Cooling Process
Making the perfect summer fudge treats needs patience. Your orange creamsicle sweets need careful attention. This ensures they have a smooth texture and strong flavor.
- Let the fudge cool at room temperature first
- Move it to the fridge for 2-4 hours to set
- Keep the fridge at 40°F for the best results
“The magic happens when temperature and time work together to create the perfect summer fudge treats.” – Pastry Chef Recommendation
Chilling your fudge is key for its texture. Chilling overnight often produces the most consistent and delightful results. When set, lift the fudge from the dish using parchment paper edges.
Pro tip: Use a sharp knife warmed under hot water for clean cuts. This makes your fudge look as good as it tastes.
- Cut into 1-inch cubes for perfect bite-sized portions
- Store in an airtight container
- Refrigerate for up to four days
By following these cooling steps, you’ll make a summer dessert that wows everyone.
Storage and Shelf Life Tips
Keeping your fruity fudge bites fresh is key. The right storage can keep your Orange Dreamsicle Fudge tasting great for longer.
Proper Storage Methods
Here’s how to keep your dreamsicle desserts fresh:
- Store in an airtight container to prevent moisture and flavor loss
- Place in the refrigerator for optimal preservation
- Keep away from strong-smelling foods that might affect the flavor
Freezing Instructions
Freezing your fudge bites is a great way to keep them longer. Pro tip: Wrap each piece in wax paper before freezing. This stops them from sticking together and makes it easy to control how much you eat.
Freezing details:
- Wrap fudge pieces individually
- Place in a freezer-safe container
- Store for up to 3 months
Thawing Guidelines
“The secret to perfect dreamsicle desserts is patience during thawing.”
Here’s how to thaw your frozen treat:
- Transfer from freezer to refrigerator
- Allow 2-3 hours for gradual thawing
- Let sit at room temperature for 10-15 minutes before serving
Remember, stored properly, Orange Dreamsicle Fudge stays delicious for up to two weeks in the fridge or three months in the freezer.
Troubleshooting Common Issues
Making creamy orange fudge can be tricky. But with expert tips, you’ll get it right soon. Knowing common problems helps you avoid them and make perfect fudge.
Several issues can happen when making orange dreamsicle fudge. Let’s look at the most common problems and how to fix them:
- Grainy Texture: This happens when sugar crystallizes. To avoid it:
- Use a heavy-bottomed saucepan
- Stir gently and consistently
- Avoid scraping pan sides while cooking
- Inconsistent Setting: Getting the right consistency is key for creamy fudge
- Use a candy thermometer
- Cook to exactly 235°F
- Allow proper cooling time
“Perfect fudge is about precision and patience” – Culinary Experts
Temperature control is key for orange dreamsicle fudge. If it’s too hot, it becomes hard and brittle. If it’s too cold, it’s soft and runny.
| Issue | Potential Cause | Solution |
|---|---|---|
| Grainy Texture | Improper Sugar Dissolution | Slow, steady heating |
| Too Soft | Insufficient Cooking | Extend cooking time |
| Too Hard | Excessive Heating | Reduce cooking duration |
Pro tip: Always use fresh ingredients and measure precisely. This way, your orange dreamsicle fudge will be smooth and delicious every time.
Conclusion
Making the perfect citrus fudge is a fun journey. It combines the tasty flavors of orange and chocolate. Your homemade orange chocolate fudge shows off your cooking skills and creativity.
This orange dreamsicle fudge is great for many events. It’s perfect for summer parties, holiday gifts, or just a special treat. It looks and tastes amazing, impressing everyone.
Remember, getting better at making fudge takes time. Each batch you make will get better as you learn. The mix of orange zest and creamy vanilla makes a dessert that’s unforgettable.
With hard work, attention to detail, and love, you’ve turned a simple recipe into a delicious masterpiece. Enjoy every bite of your orange dreamsicle fudge!
FAQ
How long does Orange Dreamsicle Fudge take to prepare?
It takes about 20 minutes to prepare. You’ll need 2 hours to chill it for the best texture.
Can I store Orange Dreamsicle Fudge for later?
Yes, store it in an airtight container in the fridge for up to 2 weeks. Freeze it for up to 3 months in a freezer-safe bag.
What are the key ingredients for Orange Dreamsicle Fudge?
You’ll need sugar, butter, evaporated milk, white baking chips, marshmallow creme, vanilla, orange extract, and orange gel food coloring.
What size pan should I use for this recipe?
Use an 8×8 or 9×13 baking dish. Line it with parchment paper for easy removal.
How do I prevent my fudge from becoming grainy?
Avoid overcooking to prevent graininess. Use a heavy saucepan, stir constantly, and check with a candy thermometer.
Can I make this recipe without a candy thermometer?
While a thermometer is best, you can use the cold water test if you’re experienced. But a thermometer gives the most reliable results.
How many servings does this recipe yield?
You’ll get 20-48 servings, depending on the size of your pieces. Smaller pieces mean more servings.
Is this fudge suitable for special occasions?
Yes! It’s great for summer gatherings, holiday parties, potlucks, or as a homemade gift. Its orange-white swirl is a hit.
Can I modify the orange flavor intensity?
Yes, adjust the orange extract to your liking. Start with the recommended amount and add more as needed.
What’s the best way to cut the fudge?
Use a sharp knife and wipe it clean between cuts. Make sure the fudge is fully set for clean, precise squares.
Source Links
- Orange Creamsicle Fudge
- Orange Creamsicle Fudge
- Creamy Orange Fudge Recipe
- Orange Creamsicle Sorbet – Colorful Superfoodie
- Orange Creamsicle Cupcakes

Ingredients
- 2 1/2 cups granulated sugar
- 1/2 cup unsalted butter, cubed
- 3/4 cup heavy cream
- 1 (10 oz) package white chocolate chips
- 1 (7 oz) jar marshmallow creme
- 1 tsp vanilla extract
- 2 tsp orange extract
- Orange gel food coloring
- 1/4 cup orange zest (optional, for garnish)
Instructions
Prepare the Pan:
Line an 8x8-inch pan with aluminum foil or parchment paper, leaving enough overhang for easy removal. Lightly grease the foil with butter or cooking spray.
Heat the Mixture:
In a medium saucepan over medium heat, combine the sugar, butter, and heavy cream. Stir continuously and bring the mixture to a boil. Once boiling, cook for 4 minutes while stirring occasionally to prevent sticking.
Add the Chocolate and Marshmallow:
Remove the pan from heat and quickly stir in the white chocolate chips and marshmallow creme until fully melted and smooth.
Flavor and Color:
Stir in the vanilla and orange extracts until well combined. Divide the mixture into two bowls. Add a few drops of orange gel food coloring to one bowl and leave the other plain.
Layer the Fudge:
Pour the white mixture into the prepared pan, smoothing it out with a spatula. Pour the orange mixture on top and gently swirl the two layers with a knife to create a marbled effect.
Set the Fudge:
Allow the fudge to cool at room temperature for 2-3 hours or place it in the refrigerator for 1-2 hours until completely set.
Slice and Serve:
Once set, lift the fudge out of the pan using the overhanging foil. Slice into 36 small pieces and serve.
Notes
- For an extra citrusy kick, sprinkle the top with orange zest before the fudge sets.
- Store the fudge in an airtight container at room temperature for up to a week or in the refrigerator for up to 2 weeks.
- This recipe is perfect for gifting during the holidays or as a bright, summery treat.