

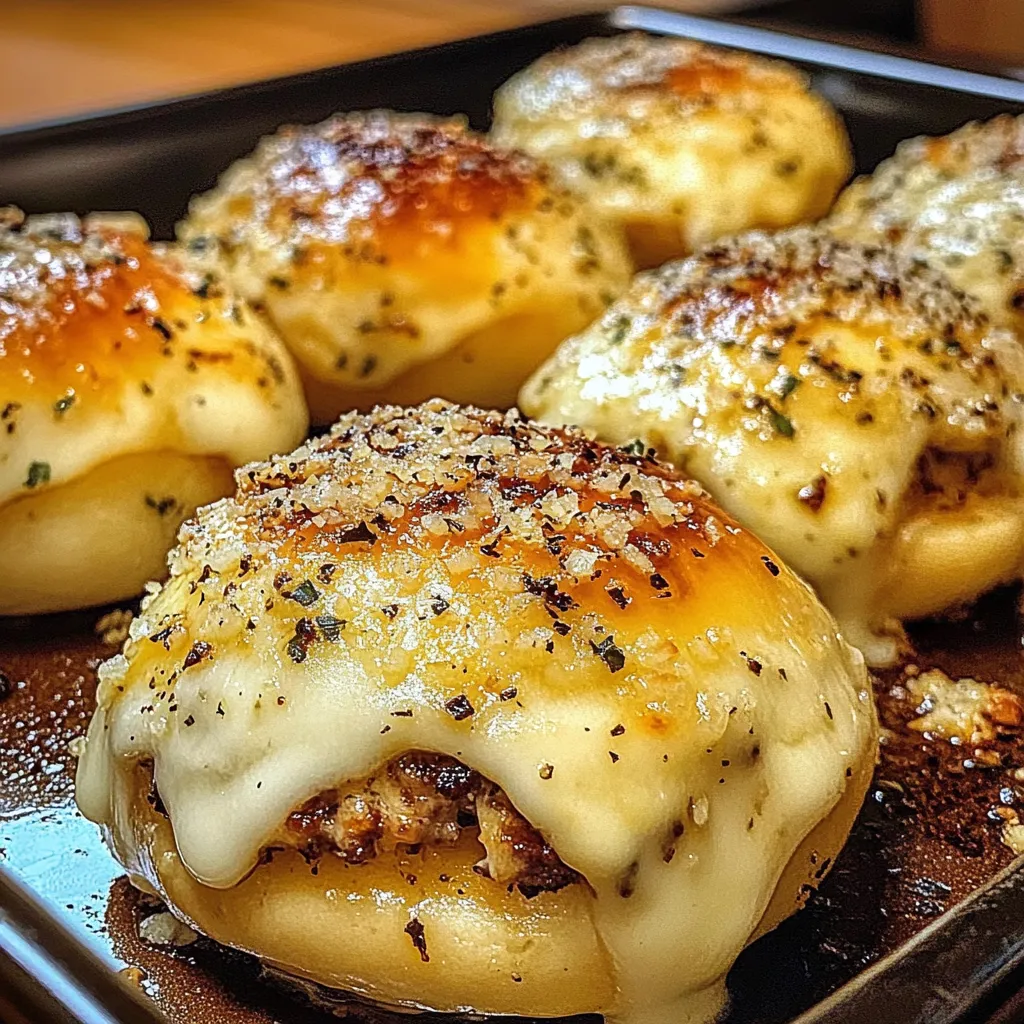
These extraordinary Irresistible Garlic Parmesan Cheeseburger Bombs represent the ultimate fusion of classic American comfort food and sophisticated flavor enhancement, combining the beloved satisfaction of juicy cheeseburgers with the aromatic luxury of garlic and Parmesan in perfectly portioned, golden-brown parcels that deliver restaurant-quality indulgence while showcasing the magical harmony between savory beef, melted cheese, and Italian-inspired seasonings in their most craveable form. The recipe expertly balances the rich, meaty satisfaction of seasoned ground beef with the sharp, nutty complexity of aged Parmesan cheese, all encased in fluffy, buttery bread dough that becomes beautifully golden and crispy when baked, topped with aromatic garlic butter and herb seasonings that create visual appeal and flavor enhancement, resulting in cheeseburger bombs so expertly crafted they transform any gathering into a celebration while delivering the kind of memorable taste experience that defines exceptional comfort food artistry. Every bite provides pure flavor explosion—the tender, pillowy bread exterior gives way to the molten, cheesy interior filled with perfectly seasoned beef that delivers all the satisfaction of a classic cheeseburger in convenient, handheld form, and the combination of soft bread with savory filling creates a sensory experience that delights both adults and children, delivering the kind of irresistible satisfaction that elevates simple ingredients into culinary poetry worthy of game day celebrations and family gatherings. The visual appeal showcases stunning golden-brown tops that glisten with garlic butter and sparkle with Parmesan cheese, each bomb perfectly uniform and invitingly plump, with the promise of molten cheese and savory beef hidden within the beautiful bread exterior, proving that comfort food can be as visually stunning as it is delicious while highlighting the natural beauty of expertly baked bread products. These show-stopping cheeseburger bombs embody the essence of crowd-pleasing entertainment—perfect for game day parties, casual gatherings, family dinners, or anytime you want to create a food experience that brings people together while delivering the kind of unforgettable indulgence that guests will request at every future gathering.
Why You’ll Love This Recipe
- Game day perfection: Creates ultimate party food that combines convenience with restaurant-quality flavor
- Explosive flavor combination: Perfect marriage of classic cheeseburger taste with Italian garlic Parmesan enhancement
- Handheld convenience: All the satisfaction of a cheeseburger in easy-to-eat, mess-free portion
- Crowd-pleasing appeal: Universal favorite that satisfies both comfort food lovers and flavor adventurers
- Make-ahead friendly: Can be assembled in advance and baked fresh when guests arrive
- Visual drama: Beautiful golden appearance with aromatic garlic butter that creates anticipation
- Customizable filling: Easy to adjust ingredients based on preferences and dietary needs
- Family bonding: Fun recipe for cooking together and creating shared food memories
- Impressive presentation: Restaurant-quality appearance that looks professionally made
- Unforgettable experience: Creates lasting memories through pure comfort food satisfaction and shared enjoyment
Ingredients
For the Savory Beef Filling
- Ground beef – Choose 80/20 blend for optimal flavor and moisture content throughout cooking
- Yellow onion – Provides sweet, savory base that enhances beef flavor and adds aromatic depth
- Garlic cloves – Fresh garlic creates authentic flavor foundation for Italian-inspired enhancement
- Worcestershire sauce – Adds umami depth and complexity that elevates simple beef mixture
- Salt – Essential seasoning that enhances all flavors and balances richness throughout filling
- Black pepper – Provides gentle heat and classic seasoning that complements beef beautifully
- Paprika – Adds color and mild smokiness that enhances overall flavor profile appeal
For the Melted Cheese Component
- Sharp cheddar cheese – Provides classic American cheeseburger flavor with bold, tangy richness
- Mozzarella cheese – Creates excellent melting properties and stretchy, satisfying cheese pulls
- American cheese – Optional addition for authentic cheeseburger flavor and smooth melting
- Cream cheese – Small amount adds richness and helps bind cheese mixture together
- Parmesan cheese – Grated cheese for filling plus extra for topping creates Italian enhancement
- Monterey Jack – Alternative option that provides mild flavor and excellent melting characteristics
For the Perfect Bread Dough
- Refrigerated biscuit dough – Convenient option that provides fluffy texture and golden-brown exterior
- Pizza dough – Alternative that creates chewier texture and more substantial bread component
- Dinner roll dough – Creates smaller, more elegant portions perfect for appetizer presentations
- Frozen bread dough – Budget-friendly option that requires thawing but provides excellent results
- Homemade bread dough – Ultimate customization for those preferring from-scratch preparation
- Crescent roll dough – Creates flaky, buttery exterior with lighter texture appeal
For the Garlic Parmesan Topping
- Unsalted butter – Creates rich base for garlic mixture and promotes beautiful golden browning
- Fresh garlic – Minced garlic provides intense flavor that permeates bread during baking
- Grated Parmesan cheese – Aged cheese that creates crispy, flavorful topping with nutty complexity
- Fresh parsley – Adds color contrast and fresh herb flavor that brightens rich combination
- Italian seasoning – Herb blend that enhances Mediterranean flavor profile throughout
- Garlic powder – Backup flavoring that ensures consistent garlic taste in every bite
- Sea salt – Finishing salt that enhances all flavors and adds textural contrast
For Enhanced Flavor Development
- Dijon mustard – Small amount adds tangy depth that complements beef and cheese beautifully
- Ketchup – Classic condiment that provides sweetness and familiar cheeseburger flavor
- Pickle juice – Adds brightness and acidity that cuts through richness effectively
- Onion powder – Enhances fresh onion flavor and ensures consistent seasoning distribution
- Smoked paprika – Upgrades regular paprika with sophisticated smokiness and deeper color
- Beef bouillon – Powder form adds concentrated beef flavor to enhance filling richness
For Professional Presentation
- Egg wash – Beaten egg with water creates beautiful golden-brown, shiny exterior
- Sesame seeds – Optional topping that adds visual appeal and subtle nutty flavor
- Fresh herbs – Oregano, thyme, or basil for enhanced aromatics and visual presentation
- Coarse salt – Finishing touch that adds texture and enhances flavor complexity
- Olive oil – Alternative to butter for lighter flavor and different browning characteristics
- Everything bagel seasoning – Modern twist that adds complex flavor and visual interest
Optional Gourmet Enhancements
- Bacon bits – Crispy addition that provides smoky richness and textural contrast
- Caramelized onions – Sweet, jammy onions that add sophisticated flavor depth
- Mushrooms – Sautéed mushrooms provide earthy flavor and additional moisture
- Jalapeños – Diced peppers add heat and flavor complexity for spice enthusiasts
- Sun-dried tomatoes – Mediterranean element that adds concentrated flavor and visual appeal
- Fresh herbs – Chives, oregano, or thyme for enhanced aromatics and sophistication
Step-by-Step Instructions
Preparing the Perfect Beef Filling
- Heat large skillet over medium-high heat and add 1 pound ground beef, breaking into small pieces.
- Cook beef until browned and crispy in spots, approximately 6-8 minutes, stirring occasionally.
- Add 1 diced yellow onion and 3 minced garlic cloves, cooking until softened and fragrant.
- Season with 1 teaspoon salt, ½ teaspoon black pepper, and ½ teaspoon paprika for flavor enhancement.
- Add 1 tablespoon Worcestershire sauce and cook additional 2 minutes to develop flavors.
- Remove from heat and cool slightly before adding cheese to prevent immediate melting.
Creating the Cheese Mixture
- In large bowl, combine 1 cup shredded sharp cheddar with ½ cup shredded mozzarella cheese.
- Add ¼ cup grated Parmesan cheese and 2 tablespoons softened cream cheese for binding.
- Mix cheese combination thoroughly to ensure even distribution throughout filling mixture.
- For extra richness, include 2 tablespoons American cheese for authentic cheeseburger flavor.
- Season cheese mixture lightly with black pepper and garlic powder for enhanced taste.
- Combine cooled beef mixture with cheese blend, stirring gently to maintain cheese integrity.
Preparing the Bread Dough
- Remove refrigerated biscuit dough from packaging and separate into individual portions carefully.
- On lightly floured surface, roll each biscuit into 4-inch circle for optimal filling capacity.
- For pizza dough alternative, divide into 8-10 equal portions and roll into circles.
- Keep unused dough covered with damp towel to prevent drying during assembly process.
- Work with one piece at a time to maintain proper dough temperature and handling ease.
- Ensure circles are thin enough to wrap but thick enough to contain filling securely.
Mastering the Assembly Technique
- Place 2-3 tablespoons beef and cheese mixture in center of each dough circle.
- Avoid overfilling which can cause bursting during baking and create messy results.
- Gather dough edges around filling, pinching seams tightly to create secure seal.
- Place seam-side down on parchment-lined baking sheet to prevent opening during baking.
- Ensure all seams are well-sealed to prevent filling leakage and maintain bomb shape.
- Space bombs 2 inches apart on baking sheet to allow for expansion during cooking.
Creating the Garlic Parmesan Topping
- In small bowl, melt ¼ cup butter and mix with 3 minced garlic cloves thoroughly.
- Add ½ cup grated Parmesan cheese, 2 tablespoons chopped parsley, and 1 teaspoon Italian seasoning.
- Season mixture with pinch of salt and black pepper for balanced flavor enhancement.
- Brush each assembled bomb generously with garlic butter mixture for optimal flavor coating.
- Sprinkle additional Parmesan cheese on top for extra flavor and beautiful golden presentation.
- For enhanced browning, brush with egg wash before applying garlic butter mixture.
Achieving Perfect Baking Results
- Preheat oven to 375°F and position rack in center for even heat distribution.
- Bake bombs for 18-22 minutes until golden brown and cooked through completely.
- Internal temperature should reach 165°F to ensure food safety and optimal texture.
- Rotate baking sheet halfway through cooking for even browning on all sides.
- For extra golden color, broil for final 1-2 minutes while watching carefully.
- Cool for 5 minutes before serving to allow filling to set slightly and prevent burns.
Pro Tips
- Use 80/20 ground beef for optimal flavor and moisture without excessive grease
- Cook beef until slightly crispy for enhanced texture and flavor development
- Cool beef mixture before adding cheese to prevent immediate melting and separation
- Don’t overfill bombs as this causes bursting and uneven cooking during baking
- Seal seams tightly and place seam-side down to prevent filling leakage
- Brush with garlic butter while bombs are still warm for maximum absorption
- Use fresh garlic for superior flavor compared to pre-minced alternatives
- Grate Parmesan cheese fresh for better melting and superior flavor quality
- Space bombs adequately on baking sheet to allow for proper expansion
- Monitor closely during final minutes to prevent over-browning of delicate tops
- Let cool briefly before serving to prevent tongue burns from molten filling
- Make extra garlic butter mixture for dipping and enhanced flavor experience
- Use parchment paper to prevent sticking and ensure easy removal from pan
- Test one bomb for doneness before removing entire batch from oven
- Fresh herbs added after baking maintain color and provide aromatic enhancement
- Quality cheese makes enormous difference in final flavor and melting characteristics
- Room temperature dough handles more easily and creates better texture results
- Sharp knife helps achieve clean cuts when serving to showcase beautiful interior
- Serve immediately while cheese is molten for optimal texture and visual appeal
- Consider making different sizes for appetizers versus main course servings
Variations and Creative Ideas
Flavor Profile Variations
- BBQ Ranch: Add barbecue sauce and ranch seasoning to beef mixture for tangy Southern appeal.
- Mexican Fiesta: Include taco seasoning, jalapeños, and Mexican cheese blend for spicy variation.
- Mushroom Swiss: Sautéed mushrooms with Swiss cheese for sophisticated, earthy flavor profile.
- Bacon Cheeseburger: Add crispy bacon bits to filling for extra smoky richness and texture.
International Inspiration
- Italian Meatball: Replace beef with Italian sausage and marinara for Mediterranean twist.
- Greek Style: Add feta cheese, olives, and oregano for authentic Greek flavor combination.
- Asian Fusion: Include ginger, soy sauce, and sesame oil for unique flavor adventure.
- French Onion: Caramelized onions with Gruyère cheese for sophisticated European appeal.
Bread Dough Alternatives
- Pretzel Dough: Creates chewy exterior with classic pretzel flavor and appearance.
- Focaccia Base: Italian bread dough with herbs for Mediterranean-inspired presentation.
- Sourdough: Tangy bread option that complements rich filling with acidic contrast.
- Whole Wheat: Healthier option that adds nutty flavor and increased nutritional value.
Dietary Modification Options
- Turkey Version: Ground turkey for lighter option while maintaining satisfying flavor.
- Vegetarian: Plant-based ground meat with same seasonings for meatless alternative.
- Gluten-Free: Use gluten-free dough alternative for celiac-friendly version.
- Dairy-Free: Substitute plant-based cheeses for lactose-intolerant guests.
Creative Presentation Ideas
- Mini Appetizers: Use smaller dough portions for bite-sized party presentations.
- Slider Style: Flatten slightly and serve with pickles for authentic burger experience.
- Breakfast Version: Add scrambled eggs for morning meal adaptation.
- Pizza Bomb: Include pizza sauce and pepperoni for Italian-American fusion.
Frequently Asked Questions
How do I prevent the bombs from bursting open during baking?
The key is proper sealing and not overfilling. Use 2-3 tablespoons of filling maximum, gather the dough edges tightly, and pinch the seams securely. Place them seam-side down on the baking sheet and make sure the dough isn’t stretched too thin. Also, avoid opening the oven door frequently, which can cause temperature fluctuations.
Can I make these cheeseburger bombs ahead of time?
Absolutely! You can assemble the bombs up to 24 hours in advance and store them covered in the refrigerator. You can also freeze assembled bombs for up to 3 months. For refrigerated bombs, add 2-3 minutes to the baking time. For frozen bombs, bake directly from frozen, adding 5-8 minutes to the cooking time.
What’s the best way to ensure the filling is properly cooked?
Cook the beef mixture completely before assembling the bombs, as the baking time is primarily for cooking the dough and melting the cheese. Use a meat thermometer to check that the internal temperature reaches 165°F. The bombs are done when they’re golden brown and the dough springs back when lightly touched.
How do I get the perfect golden-brown color on top?
Use an egg wash (beaten egg with a tablespoon of water) before applying the garlic butter mixture for extra shine and browning. Bake at 375°F for even browning, and if you want extra color, broil for 1-2 minutes at the end while watching carefully to prevent burning.

Ingredients
For the Beef Filling:
- 1 pound ground beef (80/20 blend)
- 1 medium yellow onion, diced
- 3 garlic cloves, minced
- 1 tablespoon Worcestershire sauce
- 1 teaspoon salt
- ½ teaspoon black pepper
- ½ teaspoon paprika
For the Cheese Mixture:
- 1 cup sharp cheddar cheese, shredded
- ½ cup mozzarella cheese, shredded
- ¼ cup Parmesan cheese, grated
- 2 tablespoons cream cheese, softened
For the Bread Component:
- 1 tube refrigerated biscuit dough (8-10 count)
- OR 1 pound pizza dough, divided into portions
For the Garlic Parmesan Topping:
- ¼ cup unsalted butter, melted
- 3 garlic cloves, minced
- ½ cup Parmesan cheese, grated
- 2 tablespoons fresh parsley, chopped
- 1 teaspoon Italian seasoning
- Salt and pepper to taste
Optional for Enhanced Browning:
- 1 egg beaten with 1 tablespoon water (egg wash)
Instructions
- Preheat oven to 375°F and line baking sheet with parchment paper for easy cleanup.
- Cook ground beef in large skillet until browned, breaking into small pieces as it cooks.
- Add diced onion and minced garlic, cooking until softened and fragrant throughout.
- Season with Worcestershire sauce, salt, pepper, and paprika, then cool slightly.
- Combine all cheeses in large bowl, then mix with cooled beef mixture.
- Roll each biscuit into 4-inch circle on lightly floured surface for optimal size.
- Place 2-3 tablespoons filling in center of each circle, avoiding overfilling.
- Gather dough edges around filling and pinch seams tightly to seal completely.
- Place seam-side down on prepared baking sheet, spacing 2 inches apart.
- Mix melted butter with garlic, Parmesan, parsley, and seasonings for topping.
- Brush each bomb with garlic butter mixture and sprinkle with extra Parmesan.
- Bake 18-22 minutes until golden brown and internal temperature reaches 165°F.
- Cool for 5 minutes before serving to allow filling to set slightly.
Notes
- Use 80/20 ground beef for optimal flavor and moisture without excessive grease during cooking
- Cook beef until slightly crispy for enhanced texture and deeper flavor development throughout
- Cool beef mixture before adding cheese to prevent immediate melting and mixture separation
- Don't overfill bombs as this causes bursting and uneven cooking during the baking process
- Seal seams tightly and place seam-side down to prevent filling leakage and maintain shape
- Brush with garlic butter while bombs are still warm for maximum flavor absorption
- Use fresh garlic for superior flavor compared to pre-minced alternatives for best results
- Grate Parmesan cheese fresh for better melting properties and superior flavor quality
- Space bombs adequately on baking sheet to allow for proper expansion during cooking
- Monitor closely during final minutes to prevent over-browning of delicate golden tops
- Let cool briefly before serving to prevent tongue burns from molten cheese filling
- Make extra garlic butter mixture for dipping and enhanced flavor experience throughout meal
- Use parchment paper to prevent sticking and ensure easy removal from baking pan
- Test one bomb for doneness before removing entire batch from oven for consistency
- Fresh herbs added after baking maintain vibrant color and provide aromatic enhancement
- Quality cheese makes enormous difference in final flavor and optimal melting characteristics
- Room temperature dough handles more easily and creates better texture results overall
- Sharp knife helps achieve clean cuts when serving to showcase beautiful filled interior
- Serve immediately while cheese is molten for optimal texture and maximum visual appeal
- Consider making different sizes for appetizers versus main course serving preferences