

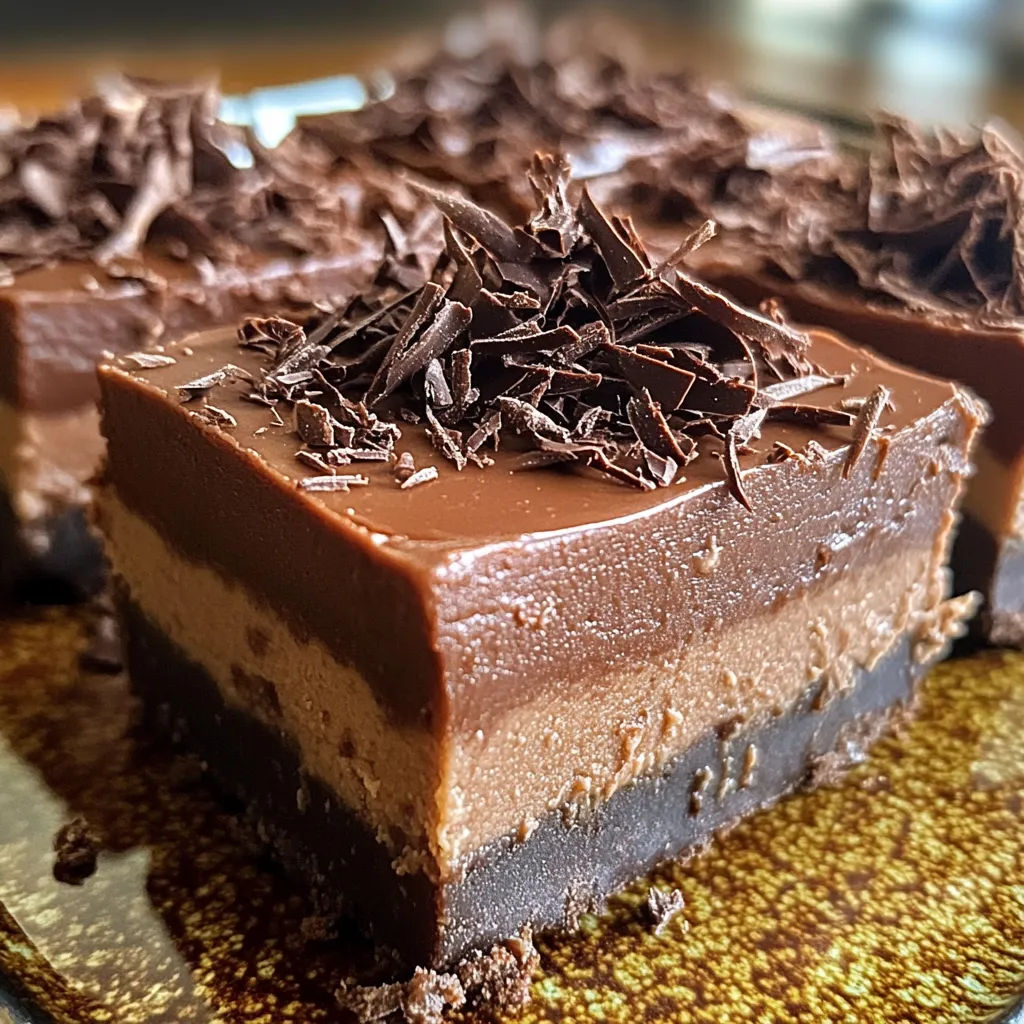
These spectacular Death-By-Chocolate No Bake Cheesecake Bars represent the pinnacle of indulgent dessert artistry, featuring rich layers of chocolate heaven that build from a dark chocolate cookie crust through velvety chocolate cheesecake filling to a glossy chocolate ganache topping crowned with elegant chocolate shavings, creating an extraordinary symphony of textures and intensities that transforms any ordinary moment into a celebration of pure chocolate bliss, making these no-bake masterpieces not only the ultimate expression of chocolate devotion but also a testament to the magic that happens when premium ingredients unite in perfect harmony to create dessert perfection that satisfies the deepest chocolate cravings with every decadent, soul-stirring bite.
Why You’ll Love This Recipe
- No-bake convenience: Requires no oven time while delivering bakery-quality results
- Triple chocolate layers: Multiple chocolate elements create complex depth and satisfaction
- Make-ahead perfection: Improves with chilling time making it ideal for entertaining
- Foolproof technique: Simple assembly ensures success even for novice bakers
- Stunning presentation: Professional-looking bars that impress at any gathering
- Customizable intensity: Adjustable chocolate levels accommodate different preferences
- Stable structure: Bars hold their shape perfectly for clean, beautiful slicing
- Premium ingredients: Quality chocolate creates restaurant-worthy dessert experience
- Temperature versatility: Delicious served chilled or at room temperature
- Crowd-pleasing appeal: Universal chocolate love makes these bars instant favorites
Ingredients
For the Decadent Chocolate Crust Foundation
- Chocolate sandwich cookies – Classic base that provides structure and intense flavor
- Chocolate graham crackers – Alternative that offers lighter texture and complementary taste
- Chocolate wafer cookies – Crispy option that creates sturdy foundation and pure chocolate essence
- Oreo cookies – Popular choice that adds familiar flavor and reliable texture
- Chocolate gingersnaps – Spiced variation that provides warmth and complexity
- Fudge-striped cookies – Rich option that intensifies chocolate flavor throughout
- Chocolate biscotti – Italian cookies that add sophistication and interesting texture
- Homemade chocolate cookies – Premium choice that allows complete flavor control
For the Essential Binding Elements
- Unsalted butter – Premium fat that creates proper binding and rich mouthfeel
- Salted butter – Convenient option that adds flavor enhancement and time savings
- Coconut oil – Dairy-free alternative that provides tropical notes and solid structure
- Ghee – Clarified butter that offers nutty flavor and superior binding properties
- Vegan butter substitute – Plant-based option that accommodates dietary restrictions
- Cream cheese – Additional binding that adds richness and tangy contrast
- Heavy cream – Liquid fat that creates silky texture and luxurious mouthfeel
- Condensed milk – Sweet binding agent that adds richness and convenience
For the Luxurious Cheesecake Filling Base
- Full-fat cream cheese – Essential foundation that provides signature tangy richness
- Mascarpone cheese – Italian luxury that adds silky texture and delicate sweetness
- Greek yogurt – Lighter alternative that maintains creaminess with added protein
- Ricotta cheese – Traditional option that provides unique texture and mild flavor
- Neufchâtel cheese – Lower-fat alternative that maintains essential cheesecake character
- Cottage cheese – Budget-friendly base that creates surprisingly smooth results when blended
- Cashew cream – Vegan option that provides richness and neutral flavor base
- Silken tofu – Plant-based alternative that creates smooth texture and protein boost
For the Premium Chocolate Components
- Dark chocolate bars – High-quality foundation that provides intense flavor and smooth melting
- Semi-sweet chocolate chips – Convenient option that offers balanced sweetness and reliability
- Cocoa powder – Pure chocolate essence that intensifies flavor without added sweetness
- Dutch-processed cocoa – Premium powder that provides deep color and refined taste
- Melting chocolate wafers – Specially formulated for smooth melting and easy handling
- Chocolate ganache – Ready-made luxury that adds professional finish and convenience
- White chocolate – Contrasting element that creates visual interest and flavor balance
- Milk chocolate – Milder option that appeals to those preferring gentler chocolate intensity
For the Perfect Sweetening Balance
- Powdered sugar – Fine texture that incorporates smoothly without grittiness
- Granulated sugar – Classic sweetener that dissolves completely with proper mixing
- Brown sugar – Complex option that adds molasses depth and caramel notes
- Coconut sugar – Natural alternative that provides subtle complexity and lower glycemic impact
- Honey – Liquid sweetener that adds floral complexity and binding properties
- Maple syrup – Rich option that complements chocolate with natural depth
- Agave nectar – Neutral sweetener that provides smooth integration and plant-based appeal
- Stevia blend – Low-calorie alternative that reduces sugar content for dietary needs
For the Textural Enhancement Collection
- Heavy whipping cream – Essential liquid that creates proper consistency and richness
- Sour cream – Tangy addition that balances sweetness and adds complexity
- Vanilla extract – Classic flavoring that enhances all other ingredients harmoniously
- Almond extract – Complementary taste that brings out chocolate’s natural depth
- Coffee extract – Intensity booster that amplifies chocolate flavor without obvious coffee taste
- Rum extract – Sophisticated addition that adds warmth and adult complexity
- Orange extract – Citrus enhancement that provides bright contrast to rich chocolate
- Mint extract – Refreshing option that creates popular flavor combination appeal
For the Elegant Topping Options
- Chocolate shavings – Classic garnish that provides texture and visual elegance
- Cocoa powder dusting – Simple finish that adds professional appearance and flavor boost
- Chocolate chips – Easy decoration that provides textural interest and convenience
- Crushed cookies – Creative topping that adds crunch and thematic consistency
- Candied nuts – Luxury garnish that provides contrast and sophisticated appeal
- Fresh berries – Colorful accent that adds freshness and natural sweetness balance
- Whipped cream rosettes – Elegant piping that creates bakery-style presentation
- Gold leaf flakes – Ultimate luxury finish for special occasion presentations
For the Professional Equipment Collection
- 9×13-inch baking pan – Standard size that accommodates family portions perfectly
- Food processor – Essential tool for creating smooth cookie crumbs and filling
- Electric mixer – Power equipment that ensures proper cream cheese incorporation
- Rubber spatulas – Flexible tools that ensure complete mixing and minimal waste
- Offset spatula – Professional tool for smooth spreading and elegant finishing
- Sharp knife – Precision cutting tool for clean, professional bar presentation
- Measuring cups – Accurate tools that ensure proper proportions and consistent results
- Fine-mesh sieve – Straining tool that removes lumps for perfectly smooth filling
For the Beautiful Presentation Elements
- Parchment paper – Non-stick lining that ensures easy removal and clean presentation
- Plastic wrap – Protective covering that prevents drying during chilling process
- Decorative doilies – Elegant underlining that enhances presentation appeal
- Dessert plates – Appropriate dishes that showcase the bars’ layered beauty
- Silver cake server – Professional tool that creates clean cuts and elegant service
- Cloth napkins – Quality linens that enhance the dining experience
- Individual boxes – Gift packaging that makes bars perfect for sharing
- Recipe cards – Accompanying information that shares preparation secrets with recipients
Step-by-Step Instructions
Creating the Perfect Chocolate Crust
- Line 9×13-inch pan with parchment paper, leaving overhang for easy removal.
- Process 30 chocolate sandwich cookies in food processor until fine crumbs form.
- Measure 3 cups cookie crumbs and reserve any extra for garnish.
- Melt 6 tablespoons butter and drizzle over crumbs while processor runs.
- Process until mixture holds together when pressed but isn’t overly wet.
- Press crumb mixture firmly into prepared pan using flat-bottomed measuring cup.
Preparing the Silky Cheesecake Filling
- Soften 24 ounces cream cheese at room temperature for easier mixing.
- Beat cream cheese with electric mixer until completely smooth and fluffy.
- Gradually add 1 cup powdered sugar, beating until fully incorporated.
- Melt 8 ounces dark chocolate and cool slightly before adding to mixture.
- Beat in melted chocolate, 1 cup heavy cream, and 2 teaspoons vanilla extract.
- Mix until filling is completely smooth with no visible streaks or lumps.
Mastering the Assembly Technique
- Pour chocolate cheesecake filling over prepared crust in even layer.
- Use offset spatula to smooth surface completely and eliminate air bubbles.
- Gently tap pan on counter to release any trapped air bubbles.
- Cover tightly with plastic wrap, ensuring wrap doesn’t touch surface.
- Refrigerate for minimum 4 hours or overnight for best texture development.
- Proper chilling ensures clean cutting and optimal flavor development.
Creating the Glossy Ganache Topping
- Heat ½ cup heavy cream in small saucepan until just beginning to simmer.
- Pour hot cream over 6 ounces chopped dark chocolate in bowl.
- Let stand 2 minutes, then whisk from center outward until smooth.
- Cool ganache 10-15 minutes until slightly thickened but still pourable.
- Pour over chilled cheesecake layer and spread evenly with offset spatula.
- Return to refrigerator for additional 2 hours to set ganache completely.
Achieving Professional Presentation
- Remove bars from refrigerator 10 minutes before cutting for easier slicing.
- Use sharp knife dipped in warm water and wiped clean between cuts.
- Cut into uniform rectangles using steady, downward pressure motion.
- Garnish each bar with chocolate shavings or cocoa powder dusting.
- Arrange on serving platter with space between bars for elegant presentation.
- Serve chilled for best texture and flavor contrast between layers.
Storage and Quality Maintenance
- Store cut bars in airtight container with parchment between layers.
- Refrigerate for up to one week with minimal quality loss.
- Freeze individual bars wrapped in plastic for up to 3 months.
- Thaw frozen bars in refrigerator overnight before serving.
- Bring to desired serving temperature 15-30 minutes before presentation.
- Quality bars maintain distinct layers and smooth textures when stored properly.
Pro Tips
- Use room temperature cream cheese to prevent lumps in filling
- Process cookie crumbs until uniformly fine for best crust texture
- Don’t overmix filling once chocolate is added to prevent grittiness
- Chill between each layer for distinct separation and clean presentation
- Use high-quality chocolate for superior flavor and smooth melting
- Line pan with parchment for foolproof removal and professional appearance
- Warm knife blade for clean cuts through multiple layers
- Allow proper chilling time – rushing results in messy, unstable bars
- Taste filling before chilling and adjust sweetness if needed
- Use offset spatula for smooth, even layer distribution
- Cover tightly during chilling to prevent surface drying
- Bring to slight room temperature before serving for optimal texture
- Make ganache when ready to use for best consistency and shine
- Reserve some cookie crumbs for garnish to tie flavors together
- Use measuring cup bottom to press crust evenly and prevent cracks
- Check chocolate temperature before adding to prevent seizing
- Plan timing carefully as bars require several hours chilling time
- Store serving utensils in refrigerator for clean cuts
- Double-wrap for freezing to prevent flavor absorption
- Let ganache cool properly to prevent melting bottom layers
Variations and Creative Ideas
Gourmet Flavor Enhancements
- Espresso Chocolate Bars: Add instant espresso powder for coffee shop sophistication.
- Salted Caramel Chocolate: Layer salted caramel between chocolate elements.
- Orange Chocolate Bars: Include orange zest for bright citrus contrast.
- Mint Chocolate Bars: Add peppermint extract for refreshing coolness.
Texture Variation Options
- Chunky Chocolate Bars: Fold chocolate chips into filling for textural interest.
- Smooth Mousse Style: Increase cream for lighter, airier texture.
- Crunchy Top Bars: Add crushed cookies to ganache for textural contrast.
- Layered Chocolate: Alternate light and dark chocolate layers for visual drama.
Dietary Modification Versions
- Vegan Chocolate Bars: Use cashew cream and vegan chocolate throughout.
- Sugar-Free Bars: Substitute natural sweeteners and sugar-free chocolate.
- Gluten-Free Bars: Use certified gluten-free cookies for crust base.
- Keto-Friendly Bars: Replace sugars with approved sweeteners and increase fats.
Seasonal and Holiday Adaptations
- Peppermint Holiday Bars: Add crushed candy canes for festive appeal.
- Spiced Chocolate Bars: Include cinnamon and chili for warming complexity.
- White Chocolate Version: Create elegant variation using white chocolate throughout.
- Berry Chocolate Bars: Add freeze-dried berries for fruity contrast.
Individual Presentation Options
- Mini Chocolate Cups: Prepare in individual serving containers.
- Chocolate Parfait Style: Layer ingredients in clear glasses for visibility.
- Bite-Sized Squares: Cut into small pieces for party appetizers.
- Elegant Triangles: Cut diagonally for sophisticated geometric presentation.
Frequently Asked Questions
Can I make these bars without a food processor?
Yes, you can crush cookies in a sealed plastic bag using a rolling pin, though the texture won’t be as uniform. You can also use pre-made chocolate cookie crumbs from the store.
How long do these bars need to chill?
Minimum 4 hours for the initial set, plus 2 more hours after adding ganache. Overnight chilling produces the best texture and makes cutting much easier.
Can I use milk chocolate instead of dark chocolate?
Yes, but the flavor will be milder and sweeter. You may want to reduce other sweeteners slightly to maintain balance. Dark chocolate provides more intense flavor and better structural integrity.
Why is my ganache not smooth?
Ganache can seize if the chocolate is too hot when cream is added, or if water gets into the mixture. Make sure chocolate is chopped finely and cream is hot but not boiling for best results.

Ingredients
For the Chocolate Cookie Crust:
- 30 chocolate sandwich cookies (like Oreos)
- 6 tablespoons unsalted butter, melted
- 2 tablespoons granulated sugar
- Pinch of salt
For the Chocolate Cheesecake Filling:
- 24 ounces cream cheese, room temperature
- 1 cup powdered sugar
- 8 ounces dark chocolate, melted and cooled
- 1 cup heavy whipping cream
- 2 teaspoons vanilla extract
- ¼ teaspoon salt
For the Chocolate Ganache Topping:
- 6 ounces dark chocolate, finely chopped
- ½ cup heavy cream
- 1 tablespoon butter
- 1 teaspoon vanilla extract
For Garnish:
- Chocolate shavings or curls
- Cocoa powder for dusting
- Additional cookie crumbs
Instructions
- Line 9x13-inch pan with parchment paper, leaving 2-inch overhang on all sides.
- Process cookies in food processor until fine crumbs form, about 1 minute.
- Add melted butter, sugar, and salt; process until mixture holds together.
- Press crumb mixture firmly into prepared pan using flat-bottomed measuring cup.
- Refrigerate crust while preparing filling.
- Beat cream cheese with electric mixer until completely smooth and fluffy, about 3 minutes.
- Gradually add powdered sugar, beating until fully incorporated.
- Melt chocolate in microwave or double boiler; cool 5 minutes.
- Beat melted chocolate into cream cheese mixture until smooth.
- Add heavy cream, vanilla, and salt; beat until filling is completely smooth.
- Pour filling over crust and smooth with offset spatula.
- Cover with plastic wrap and refrigerate 4 hours minimum.
- For ganache, heat cream until just simmering; pour over chopped chocolate.
- Let stand 2 minutes, then whisk from center outward until smooth.
- Stir in butter and vanilla until glossy and smooth.
- Cool ganache 10-15 minutes until slightly thickened but pourable.
- Pour over chilled cheesecake layer and spread evenly.
- Refrigerate additional 2 hours until ganache is set.
- Remove from refrigerator 10 minutes before cutting.
- Cut into bars using sharp knife dipped in warm water between cuts.
- Garnish with chocolate shavings and serve chilled.
Notes
- Use room temperature cream cheese to prevent lumps in filling
- Process cookie crumbs until uniformly fine for best crust texture
- Don't overmix filling once chocolate is added to prevent grittiness
- Chill between each layer for distinct separation and clean presentation
- Use high-quality chocolate for superior flavor and smooth melting
- Line pan with parchment for foolproof removal and professional appearance
- Warm knife blade for clean cuts through multiple layers
- Allow proper chilling time - rushing results in messy, unstable bars
- Taste filling before chilling and adjust sweetness if needed
- Use offset spatula for smooth, even layer distribution
- Cover tightly during chilling to prevent surface drying
- Bring to slight room temperature before serving for optimal texture
- Make ganache when ready to use for best consistency and shine
- Reserve some cookie crumbs for garnish to tie flavors together
- Use measuring cup bottom to press crust evenly and prevent cracks
- Check chocolate temperature before adding to prevent seizing
- Plan timing carefully as bars require several hours chilling time
- Store serving utensils in refrigerator for clean cuts
- Double-wrap for freezing to prevent flavor absorption
- Let ganache cool properly to prevent melting bottom layers