
")
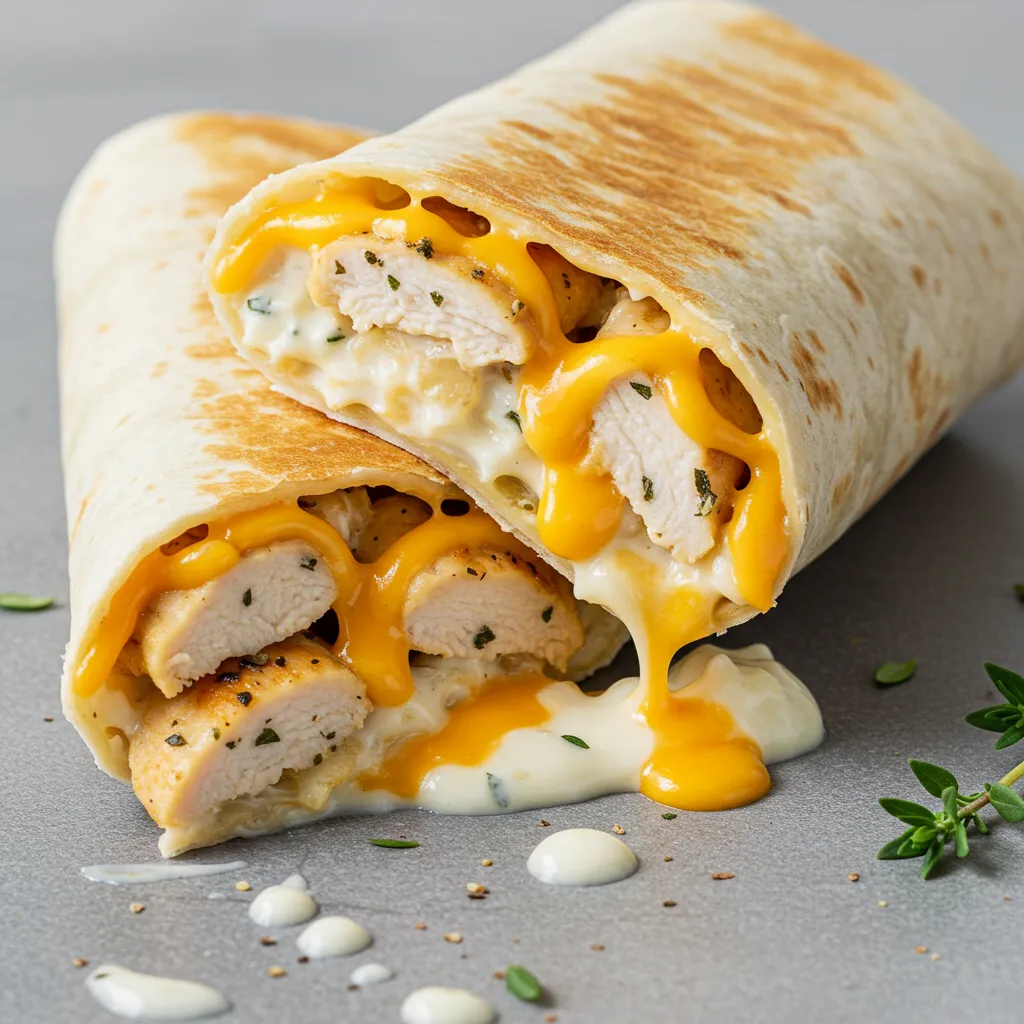
These irresistible Cheesy Chicken Garlic Wraps combine tender chunks of seasoned chicken, gooey melted cheese, and a rich, creamy garlic sauce—all wrapped in a warm, lightly toasted tortilla. Perfect for quick lunches, weeknight dinners, or casual entertaining, these wraps deliver maximum flavor with minimal effort. The contrast between the crispy exterior of the tortilla and the creamy, cheesy filling creates a satisfying texture experience in every bite. Easy to customize and ready in under 30 minutes, these wraps are sure to become a new family favorite.
Why You’ll Love This Recipe
- Quick and easy: Ready in under 30 minutes from start to finish
- Versatile: Perfect for lunch, dinner, or cut into pinwheels for appetizers
- Kid-friendly: A guaranteed hit with even picky eaters
- Make-ahead friendly: Components can be prepared in advance
- Customizable: Easy to adapt with different proteins, cheeses, or additions
- Portable: Great for lunches on-the-go or picnics
- Restaurant quality: Creates that perfect cheese pull you’d expect from a gourmet wrap
Ingredients
For the Chicken Filling
- Boneless, skinless chicken breasts – Provides lean protein and the foundation of the wrap
- Garlic powder – Adds aromatic depth to the chicken
- Onion powder – Contributes savory notes without texture
- Salt and pepper – Enhances all other flavors
- Italian seasoning – Adds herbal complexity
- Cooking oil – For sautéing the chicken to golden perfection
For the Creamy Garlic Sauce
- Cream cheese – Creates a rich, tangy base
- Mayonnaise – Adds smooth creaminess
- Sour cream – Provides tanginess to balance richness
- Fresh garlic – Delivers essential aromatic flavor
- Parmesan cheese – Contributes savory, salty notes
- Fresh herbs (parsley, chives, or dill) – Brightens the sauce
- Lemon juice – Adds acidity to balance the richness
- Salt and pepper – Enhances all flavors
For Assembly
- Flour tortillas – Large size (10-12 inch) works best as the wrap base
- Shredded cheddar cheese – Creates that perfect melty cheese pull
- Shredded mozzarella cheese – Adds stretch and mild flavor
- Butter – For toasting the assembled wraps to golden perfection
Optional Add-ins
- Bacon bits – Adds smoky crunch
- Diced jalapeños – For heat lovers
- Caramelized onions – For sweet depth of flavor
- Sliced green onions – For fresh, mild onion flavor
- Diced red bell pepper – For color and sweetness
- Baby spinach – To add nutrients and color
Step-by-Step Instructions
Preparing the Chicken
Begin by prepping your workspace and ingredients. Having everything ready before cooking ensures the process goes smoothly and the chicken cooks evenly.
Cut 1.5 pounds of boneless, skinless chicken breasts into ½-inch cubes. Uniform pieces ensure even cooking. Pat the chicken dry with paper towels to promote better browning.
In a bowl, combine 1 teaspoon garlic powder, 1 teaspoon onion powder, 1 teaspoon Italian seasoning, ½ teaspoon salt, and ¼ teaspoon black pepper. Toss the chicken pieces in this seasoning mixture until evenly coated.
Heat 2 tablespoons of cooking oil in a large skillet over medium-high heat until shimmering. Add the seasoned chicken in a single layer, being careful not to overcrowd the pan. Cook in batches if necessary for better browning.
Cook the chicken for 4-5 minutes, stirring occasionally, until golden brown on the outside and no longer pink in the center (internal temperature of 165°F/74°C). The chicken should have some caramelized edges for maximum flavor.
Remove the cooked chicken from the pan and set aside. If preparing in advance, let the chicken cool completely before refrigerating in an airtight container for up to 2 days.
Making the Creamy Garlic Sauce
In a medium bowl, combine 8 ounces of softened cream cheese, ¼ cup mayonnaise, and ¼ cup sour cream. Using a hand mixer or wooden spoon, blend until smooth and well combined.
Add 3 cloves of minced fresh garlic, ¼ cup grated Parmesan cheese, 2 tablespoons chopped fresh herbs (parsley, chives, or dill), 1 teaspoon fresh lemon juice, ¼ teaspoon salt, and a pinch of black pepper.
Mix until all ingredients are thoroughly incorporated. The sauce should be creamy and spreadable but not runny. If too thick, add a splash of milk to thin to desired consistency.
For the best flavor development, make the sauce at least 30 minutes ahead of time and refrigerate to allow the flavors to meld. The sauce can be made up to 3 days in advance and stored in an airtight container in the refrigerator.
Assembling and Cooking the Wraps
Lay out a large flour tortilla on a clean work surface. Spread about 2-3 tablespoons of the creamy garlic sauce evenly over the center of the tortilla, leaving a 1-inch border around the edges.
Place about ½ cup of the cooked chicken pieces in the center of the tortilla, on top of the sauce.
Sprinkle ¼ cup shredded cheddar cheese and ¼ cup shredded mozzarella cheese over the chicken. The combination of cheeses creates the perfect melt and stretch.
If using any optional add-ins, sprinkle them over the cheese layer now.
To fold the wrap, fold in the sides of the tortilla first, then fold up the bottom, and finally roll tightly from the bottom to the top, creating a sealed burrito-like package. This folding technique helps keep the fillings from falling out during cooking.
For the crispiest exterior, heat 1 tablespoon of butter in a large skillet or griddle over medium heat until melted. Place the wraps seam-side down first to seal them shut, then cook for about 2 minutes per side until golden brown and crispy, and the cheese inside has melted.
For a healthier option, you can skip the butter and toast the wraps in a dry skillet, or use a panini press if available.
Cut each wrap diagonally in half before serving to showcase the gooey, cheesy interior.
Serving Suggestions
Serve these cheesy chicken wraps immediately while still warm and the cheese is at its meltiest.
These versatile wraps pair wonderfully with:
- Fresh green salad with light vinaigrette
- Crispy potato wedges or french fries
- Tortilla chips with salsa or guacamole
- Pickle spears for a tangy contrast
- Tomato soup for a classic sandwich-and-soup combination
For a complete meal, serve with a side of:
- Roasted vegetables like broccoli or bell peppers
- Coleslaw for a crunchy, refreshing side
- Mexican-style rice
- Black bean salad with corn and avocado
To elevate your presentation, serve with small bowls of additional sauce for dipping, garnish plates with fresh herbs, and include lemon wedges on the side.
Pro Tips
- Use rotisserie chicken for an even quicker preparation
- Allow cream cheese to fully soften at room temperature for the smoothest sauce
- Grate your own cheese rather than using pre-shredded for better melting
- For extra flavor, marinate the chicken cubes in a tablespoon of olive oil and seasonings for 30 minutes before cooking
- Toast the tortillas for 30 seconds per side in a dry skillet before assembly for improved structure
- For a spicier version, add a pinch of cayenne pepper or red pepper flakes to the chicken seasoning
- Use a pizza cutter to easily slice the finished wraps
- If making multiple wraps, keep them warm in a 200°F (95°C) oven until ready to serve
- For the perfect cheese pull, use a combination of mozzarella (for stretch) and a more flavorful cheese like cheddar
Variations and Creative Ideas
Flavor Variations
Buffalo Chicken Wraps: Add buffalo sauce to the chicken and replace the garlic sauce with a blue cheese or ranch dressing. Top with celery and carrot slivers for crunch.
Mediterranean Chicken Wraps: Season the chicken with oregano and lemon zest, use feta instead of cheddar, and add diced cucumber, olives, and cherry tomatoes. Use tzatziki sauce in place of the garlic sauce.
BBQ Chicken Wraps: Toss the cooked chicken with barbecue sauce, use a mixture of cheddar and gouda cheeses, and add caramelized onions and a dollop of coleslaw for crunch.
Pesto Chicken Wraps: Mix pesto into the cream cheese base, add sun-dried tomatoes, and use a mixture of mozzarella and provolone cheeses for an Italian-inspired variation.
Dietary Adaptations
Gluten-Free Option: Substitute regular flour tortillas with gluten-free tortillas or large gluten-free flatbreads. Ensure all other ingredients, especially pre-made seasonings, are certified gluten-free.
Lower-Carb Alternative: Use low-carb tortillas or large lettuce leaves instead of flour tortillas. You can also make a “bowl” version with the filling served over cauliflower rice.
Dairy-Free Version: Use dairy-free cream cheese, mayonnaise, and plant-based cheese alternatives. The texture won’t be identical, but it can still create a flavorful wrap.
Vegetarian Adaptation: Replace chicken with sautéed portobello mushrooms, crumbled firm tofu, or roasted cauliflower florets seasoned with the same spice blend.
Presentation Variations
Pinwheel Appetizers: Assemble as directed but don’t fold. Instead, roll up tightly, refrigerate for 30 minutes, then slice into 1-inch pinwheels. Secure with toothpicks for party-friendly bites.
Quesadilla Style: Instead of rolling, fold the tortilla in half after adding fillings and cook until crispy on both sides. Cut into wedges for easier eating.
Bowl Version: Skip the tortilla entirely and serve the chicken and cheese mixture over rice, quinoa, or a salad for a fork-friendly meal.
Stuffed Baked Tortilla Cups: Press tortillas into a muffin tin to form cups, add fillings, and bake until the edges are crispy and the cheese is melted for an attractive presentation.
Storage and Make-Ahead Advice
Refrigerator Storage: Store assembled but uncooked wraps tightly wrapped in plastic wrap for up to 24 hours. For longer storage, keep components separate:
- Cooked chicken: 3-4 days in an airtight container
- Creamy garlic sauce: 4-5 days in an airtight container
- Grated cheese: up to 1 week
Freezer Storage:
- Cooked and cooled chicken can be frozen for up to 3 months
- The cream cheese sauce does not freeze well due to separation upon thawing
- Assembled wraps can be frozen before cooking, wrapped individually in plastic wrap then aluminum foil, for up to 1 month
Make-Ahead Strategies:
- Prepare chicken and sauce up to 3 days ahead and store separately
- Pre-grate cheese and store in the refrigerator
- Assemble wraps in the morning for same-day dinner
- Create a wrap assembly line for meal prep, making several at once
Reheating Tips:
- Refrigerated wraps: Reheat in a dry skillet over medium-low heat for 2-3 minutes per side
- From frozen: Thaw overnight in the refrigerator, then heat in a skillet
- For crispy texture, avoid microwaving if possible, but if necessary, wrap in a paper towel and microwave on 50% power
Not Recommended: Storing fully cooked wraps for more than 24 hours, as the tortillas tend to become soggy.
Kid-Friendly Involvement
This recipe offers several opportunities for children to help in the kitchen:
Seasoning the Chicken: Kids can help measure spices and toss the chicken in the seasoning mix, learning about different herbs and spices.
Making the Sauce: Older children can measure and mix the sauce ingredients, practicing math skills and learning about flavor combinations.
Cheese Grating: With supervision, kids can help grate cheese (using a box grater with a hand guard for safety).
Assembly Station: Create a wrap assembly line where children can add their chosen ingredients to personalize their wraps.
Folding Technique: Teaching children how to properly fold a wrap is a useful skill that builds fine motor coordination.
Garnish Artists: Let kids arrange the cut wraps on plates and add garnishes for presentation skills.
Learning Opportunity: Use this recipe to teach about protein, dairy, and the science behind why cheese melts the way it does.
Frequently Asked Questions
How do I prevent my wraps from getting soggy? Ensure your fillings aren’t too wet by properly draining any ingredients that contain excess moisture. Also, allow hot fillings to cool slightly before assembly, and consider toasting the tortillas briefly before adding fillings.
Can I make these wraps ahead for lunch meal prep? Yes, but for best results, prepare all components and store separately, then assemble the wraps the night before. Alternatively, assemble completely but cook the morning of or right before eating.
What’s the best way to reheat these wraps? For the crispiest exterior, reheat in a dry skillet over medium-low heat for 2-3 minutes per side. A toaster oven also works well at 350°F for about 5-7 minutes.
What can I use instead of cream cheese in the sauce? Greek yogurt makes a good substitute, though the flavor will be tangier. You can also use mascarpone for a richer alternative or a dairy-free cream cheese for a non-dairy option.
How do I get that perfect cheese pull? Use a combination of mozzarella (which is known for its stretchiness) with a more flavorful cheese like cheddar or Monterey Jack. Also, be sure to serve the wraps while they’re still hot – the cheese sets as it cools.
")
Ingredients
For the Chicken:
- 1½ pounds boneless, skinless chicken breasts, cut into ½-inch cubes
- 1 teaspoon garlic powder
- 1 teaspoon onion powder
- 1 teaspoon Italian seasoning
- ½ teaspoon salt
- ¼ teaspoon black pepper
- 2 tablespoons cooking oil
For the Creamy Garlic Sauce:
- 8 ounces cream cheese, softened
- ¼ cup mayonnaise
- ¼ cup sour cream
- 3 cloves garlic, minced
- ¼ cup grated Parmesan cheese
- 2 tablespoons fresh herbs (parsley, chives, or dill), chopped
- 1 teaspoon fresh lemon juice
- ¼ teaspoon salt
- Pinch of black pepper
For Assembly:
- 4 large (10-12 inch) flour tortillas
- 1 cup shredded cheddar cheese
- 1 cup shredded mozzarella cheese
- 2 tablespoons butter for cooking
Optional Add-ins:
- ¼ cup cooked bacon bits
- ¼ cup diced jalapeños
- ½ cup caramelized onions
- ¼ cup sliced green onions
Instructions
- Season diced chicken with garlic powder, onion powder, Italian seasoning, salt, and pepper.
- Heat oil in a skillet over medium-high heat and cook chicken 4-5 minutes until golden and cooked through.
- Mix cream cheese, mayonnaise, sour cream, minced garlic, Parmesan, herbs, lemon juice, salt, and pepper until smooth.
- Lay out tortillas and spread each with 2-3 tablespoons of cream sauce.
- Top each with about ½ cup cooked chicken and ½ cup mixed cheeses.
- Fold sides of tortilla in, then bottom up, and roll tightly to close.
- Melt butter in a skillet over medium heat and cook wraps 2 minutes per side until golden and crispy.
- Cut diagonally and serve immediately.
Notes
- Use a thermometer to check chicken reaches 165°F (74°C) for food safety
- Warming tortillas for 10-15 seconds in the microwave makes them more pliable
- Don't overfill the wraps or they'll be difficult to roll and may burst during cooking
- After adding fillings, tuck and roll the tortilla tightly for a secure wrap
- Press down gently with a spatula while cooking to ensure even browning
- Let wraps rest for 1-2 minutes before cutting to allow the cheese to set slightly
- If tortillas crack when folding, they're likely too dry or cold; warming briefly helps
- For extra flavor, add a thin layer of mustard, pesto, or hot sauce before the cheese
- Serve with a small side of the creamy sauce for dipping