

This soul-warming Classic Pot Roast transforms humble ingredients into a masterpiece of comfort cuisine with its fork-tender beef, caramelized vegetables, and rich, savory gravy. The dish showcases a perfectly braised centerpiece of beef that yields to the slightest touch, surrounded by colorful carrots and potatoes that have absorbed the flavorful essence of the meat. Fresh herbs provide bright accents against the deep brown sauce that ties everything together, creating a beautiful symphony of colors and textures. Every bite delivers a perfect balance of robust meat flavor, earthy vegetables, and aromatic herbs—a timeless combination that satisfies deep cravings while offering familiar nostalgia. This pot roast exemplifies home-style comfort food at its finest—ideal for Sunday family dinners, special gatherings, or whenever you desire a meal that fills both stomach and spirit.
Why You’ll Love This Recipe
- Complete meal in one dish: Protein, vegetables, and sauce all cooked together
- Economical excellence: Transforms affordable cuts of beef into restaurant-quality meals
- Make-ahead friendly: Actually improves in flavor when made a day ahead
- Minimal hands-on time: Perfect for busy households despite long cooking time
- Customizable: Easily adapts to different vegetables and flavor profiles
- Special occasion worthy: Elevates ordinary gatherings to memorable experiences
- Crowd-pleaser: Universally beloved across generations
- Textural delight: Combines meltingly tender meat with perfectly cooked vegetables
- Simple ingredients: Creates spectacular results with everyday pantry staples
- Aromatic experience: Fills your home with irresistible cooking aromas for hours
Ingredients
For the Pot Roast
- Chuck roast – Perfect balance of lean meat and marbling for tender results
- Salt and pepper – Essential for developing a flavorful crust
- Olive oil – Creates the perfect searing medium for the meat
- Onions – Provides aromatic foundation and sweetness as they caramelize
- Garlic – Adds depth and complexity to the flavor profile
- Carrots – Offers natural sweetness and vibrant color
- Potatoes – Absorbs flavors while maintaining texture
- Beef broth – Forms the base of the rich, savory sauce
- Tomato paste – Adds umami and helps thicken the sauce
- Worcestershire sauce – Enhances the beefy flavor with its complex profile
- Fresh herbs – Brightens and elevates the earthy flavors
For the Sauce and Aromatics
- Red wine – Provides acidity and depth to balance richness
- Bay leaves – Infuses subtle aromatic notes throughout cooking
- Fresh thyme – Adds herbal complexity that complements beef
- Rosemary – Contributes pine-like aromatics that withstand long cooking
- Flour – Creates perfect texture for the gravy
- Butter – Enriches sauce with silky mouthfeel
- Fresh parsley – Adds bright color and fresh flavor as garnish
Optional Add-ins
- Mushrooms – Adds earthy umami notes
- Celery – Provides aromatic foundation and textural contrast
- Pearl onions – Creates elegant visual appeal with sweet onion flavor
- Parsnips – Adds sweet, nutty elements to vegetable medley
- Red pepper flakes – Introduces gentle heat to counterbalance richness
- Horseradish – Provides subtle heat and complexity when added to sauce
- Balsamic vinegar – Brings sweet-tart notes and helps tenderize
- Dijon mustard – Adds tangy complexity to sauce
- Cognac or brandy – Creates sophisticated flavor dimension
- Fresh leeks – Subtle onion flavor with elegant presentation
Step-by-Step Instructions
Preparing the Roast
Begin by selecting a well-marbled chuck roast weighing approximately 3-4 pounds. The marbling of fat throughout this cut breaks down during slow cooking, resulting in exceptional tenderness and flavor. For best results, remove the roast from refrigeration 30-45 minutes before cooking to allow it to come to room temperature.
Pat the roast thoroughly dry with paper towels to ensure proper searing. Moisture is the enemy of a good sear, so take your time with this step. Season generously on all sides with 2 teaspoons of kosher salt and 1 teaspoon of freshly ground black pepper, pressing the seasonings firmly into the meat to adhere.
Heat 2 tablespoons of olive oil in a large Dutch oven over medium-high heat until it shimmers. Carefully place the seasoned roast in the hot oil and sear undisturbed for 4-5 minutes per side until a deep brown crust forms on all surfaces. This critical step creates the foundation of flavor through the Maillard reaction—don’t rush it.
Once seared, transfer the roast to a plate and set aside while preparing the aromatics. Don’t discard any of the flavorful brown bits (fond) that have developed on the bottom of the pot—these will be incorporated into the sauce.
Creating the Aromatic Base
Reduce the heat to medium and add 1 large diced onion to the same pot, stirring occasionally for 3-4 minutes until it begins to soften and turn translucent. The onion will release moisture that helps deglaze the pot, incorporating the flavorful fond from searing the meat.
Add 4 cloves of minced garlic and cook for an additional 30-60 seconds until fragrant, being careful not to burn the garlic, which would introduce bitterness to the dish. Stir continuously during this brief cooking period.
Pour in 1 cup of good-quality dry red wine (such as Cabernet Sauvignon or Merlot), using a wooden spoon to scrape up any remaining brown bits from the bottom of the pot. Allow the wine to simmer for 2-3 minutes, reducing slightly while alcohol evaporates, leaving behind concentrated flavor.
Stir in 2 tablespoons of tomato paste and cook for 1-2 minutes to caramelize slightly, enhancing its rich umami qualities. This brief cooking of tomato paste transforms its flavor from bright and acidic to deep and complex.
Add 2 cups of beef broth, 2 tablespoons of Worcestershire sauce, 2 bay leaves, 2 sprigs of fresh thyme, and 1 sprig of fresh rosemary to the pot. Stir to combine all ingredients into a harmonious base for braising.
Adding the Vegetables
Return the seared roast to the pot, nestling it into the liquid mixture. The liquid should come about halfway up the sides of the meat—not completely covering it—to achieve proper braising rather than boiling.
Prepare 4 large carrots by peeling and cutting into 2-inch chunks on a slight diagonal for visual appeal and even cooking. Similarly, prepare 1 pound of baby potatoes (or larger potatoes cut into 2-inch pieces), leaving the skins on for texture and nutritional value.
Arrange the prepared vegetables around the roast, partially submerging them in the cooking liquid while allowing some to rest on top of the meat. This arrangement ensures the vegetables cook evenly while absorbing the developing flavors.
For enhanced flavor, sprinkle an additional teaspoon of fresh thyme leaves over the vegetables and meat before covering the pot. This layer of herbs will infuse into the dish during the long cooking process.
The Slow Cooking Process
Cover the Dutch oven with a tight-fitting lid to create an enclosed environment that traps moisture and heat. This is essential for breaking down the tough collagen in the chuck roast into gelatin, resulting in the desired fork-tender texture.
Place the covered pot in a preheated 325°F (165°C) oven to begin the slow cooking process. Using the oven rather than stovetop provides consistent, even heat from all directions, preventing scorching and ensuring uniform cooking.
Allow the pot roast to cook undisturbed for 3 hours, at which point check for tenderness by inserting a fork into the center of the meat. The fork should meet very little resistance, almost as if the meat wishes to fall apart. If any resistance is felt, return to the oven for additional 30-minute intervals until perfectly tender.
For the most developed flavor and texture, consider cooking even longer—up to 4 hours total—as long as there is sufficient liquid in the pot. The extended cooking time allows flavors to meld more completely and the meat to reach its most tender state.
Finishing the Sauce
Once the meat has reached optimal tenderness, carefully remove the Dutch oven from the oven. Transfer the roast and vegetables to a serving platter, tenting loosely with foil to keep warm while finishing the sauce.
Remove and discard the bay leaves, thyme stems, and rosemary stems from the cooking liquid. These aromatic elements have already imparted their flavor and their job is complete.
To create a more refined sauce, optional but recommended, strain the cooking liquid through a fine-mesh sieve into a saucepan, pressing on any solids to extract maximum flavor. Return the strained liquid to medium heat on the stovetop.
For a thicker gravy-style sauce, create a slurry by whisking together 2 tablespoons of all-purpose flour with ¼ cup of cold water until smooth. Gradually whisk this slurry into the simmering cooking liquid, allowing it to cook for 3-5 minutes until it reaches your desired consistency.
Finish the sauce by stirring in 1 tablespoon of cold butter, which adds a silky richness and beautiful sheen. Taste the sauce and adjust seasoning with additional salt and pepper as needed.
Serving
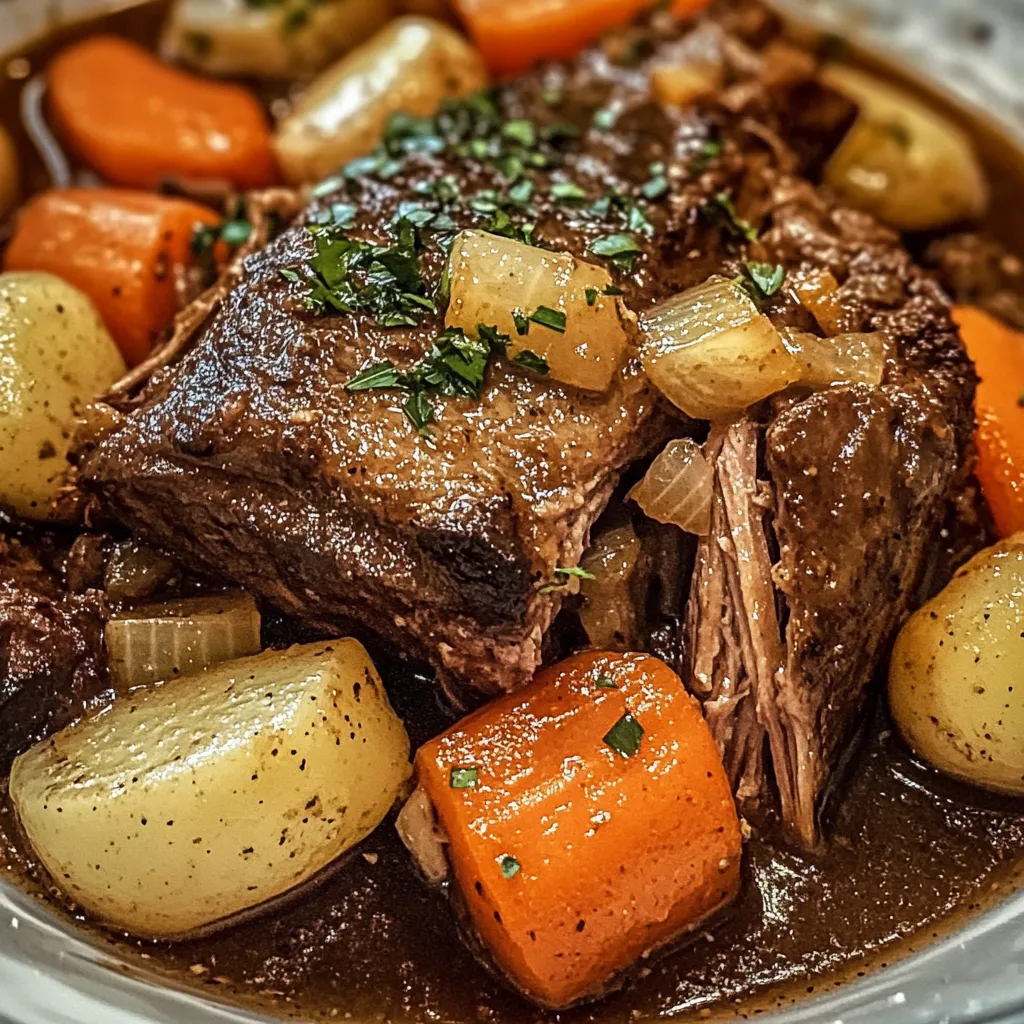
Transfer the pot roast to a serving platter large enough to accommodate both the meat and surrounding vegetables. For an elegant presentation, slice the roast across the grain into half-inch thick portions, though many prefer to gently pull it apart to showcase its fork-tender quality.
Arrange the carrots and potatoes around the meat, creating a colorful frame that highlights the central protein. Pour a generous amount of the finished sauce over the meat and vegetables, allowing it to pool slightly at the base.
Garnish the entire dish with 2 tablespoons of freshly chopped parsley, which adds bright color and a fresh flavor contrast to the rich, deeply savory nature of the dish. The vibrant green against the deep browns and oranges creates a visually striking presentation.
Serve additional sauce in a gravy boat on the side, allowing guests to add more to their individual portions according to preference. The sauce is the culminating element that ties all components together.
For a complete meal, consider serving alongside simple, complementary sides such as a mixed green salad with light vinaigrette to cut through the richness, or warm crusty bread ideal for sopping up the delicious sauce.
Pro Tips
- Choose a chuck roast with good marbling for the most flavorful and tender results
- For deeper flavor, season the roast with salt the night before and refrigerate uncovered
- Sear the meat properly—don’t flip too soon; wait for a dark crust to form
- Use a heavy-bottomed Dutch oven that retains and distributes heat evenly
- Deglaze thoroughly to capture all the flavorful fond from searing
- Cut vegetables in uniform sizes to ensure even cooking throughout
- Position the meat fat-side up so it self-bastes during the long cooking process
- Keep the cooking temperature low—boiling will toughen rather than tenderize
- For enhanced moisture, add a few cubes of beef bone marrow to the cooking liquid
- Let the finished pot roast rest for 20 minutes before serving for optimal juiciness
- Cut meat across the grain for the most tender texture when serving
- For convenience, make a day ahead and refrigerate—flavors improve and fat is easily removed
- Use homemade beef stock if possible for superior depth of flavor
- Add umami boosters like anchovy paste or fish sauce (no one will detect them)
- For richest color in vegetables, add them halfway through cooking time
- Test doneness with a fork, not a knife—fork should slide in with almost no resistance
- For special occasions, use individual herbs tied in bundles for easy removal
- Reduce oven temperature by 25°F if using a convection setting
- Rest the meat for at least 20 minutes before slicing to maintain juiciness
- For best results, use a heavy cast iron or enameled cast iron Dutch oven
Variations and Creative Ideas
Flavor Variations
Red Wine & Herb: Increase red wine to 2 cups and double the fresh herbs for a more sophisticated, wine-forward flavor profile suitable for special occasions.
Mediterranean Style: Add olives, sun-dried tomatoes, and a hint of orange zest for a Mediterranean-inspired variation that brightens the traditionally heavy dish.
Beer-Braised: Substitute dark beer for wine, add whole grain mustard, and include turnips among the vegetables for a rustic, pub-style variation with complex malt notes.
Asian-Inspired: Replace wine with beef broth infused with star anise, cinnamon, and soy sauce, finishing with a touch of fresh ginger for an unexpected but delicious fusion approach.
Cooking Method Alternatives
Slow Cooker: Transfer seared meat and sautéed aromatics to a slow cooker, add remaining ingredients, and cook on low for 8-10 hours for a convenient hands-off approach.
Pressure Cooker: Adapt the recipe for an electric pressure cooker by reducing liquid slightly and cooking under high pressure for 70 minutes with natural release for a weeknight-friendly version.
Stovetop Method: Maintain a gentle simmer on the stovetop for 3-4 hours, checking occasionally and adding liquid if needed, if oven space is unavailable.
Outdoor Cooking: For a unique smoky dimension, cook covered on a grill with indirect heat at 300°F, adding a few wood chips for subtle smoke flavor.
Structural Variations
Individual Portions: Use smaller 1-pound roasts or thick-cut chuck steaks to create individual servings for elegant plating options at dinner parties.
Shredded Style: Cook slightly longer, then shred the meat completely to create a ragout-style dish served over polenta, pasta, or mashed potatoes.
Stuffed Variation: Create pockets in the roast before cooking and stuff with a mixture of minced garlic, herbs, and pancetta for flavor from the inside out.
Layered Approach: Cook meat and vegetables separately, then arrange in visually stunning layers on a platter with sauce poured over just before serving.
Side Dish Pairings
Root Vegetable Medley: Expand beyond traditional carrots and potatoes to include turnips, parsnips, and rutabaga for a colorful, sophisticated vegetable assortment.
Horseradish Cream: Serve with a side of freshly made horseradish cream sauce that offers a zesty counterpoint to the rich meat.
Herb-Infused Polenta: Pair with creamy polenta enriched with fresh herbs and Parmesan cheese instead of potatoes for an Italian-inspired accompaniment.
Roasted Garlic Mashed Potatoes: Serve alongside cloud-like roasted garlic mashed potatoes that complement the sauce beautifully.
Storage and Make-Ahead Advice
Complete Dish Storage:
- Store cooled pot roast with vegetables and sauce in an airtight container in the refrigerator for up to 3 days.
- The flavors actually improve after a day of refrigeration as they continue to meld together.
- For easiest fat removal, refrigerate overnight, then remove and discard the solidified fat layer from the top before reheating.
- Keep meat submerged in sauce during storage to prevent it from drying out.
Reheating Guidelines:
- Reheat gently in a covered container in a 325°F oven for about 30 minutes until warmed through.
- Alternatively, reheat on the stovetop over medium-low heat, stirring occasionally to prevent sticking.
- Add a splash of beef broth when reheating if the sauce has thickened too much during storage.
- For best results, slice the meat after reheating rather than before to retain moisture.
Make-Ahead Strategy:
- Prepare the entire dish 1-2 days in advance and refrigerate for superior flavor development.
- The pot roast can be fully cooked, cooled, and refrigerated, then reheated just before serving.
- For best results when making ahead, slightly undercook the vegetables as they will continue cooking during reheating.
- Store the sauce separately from the meat and vegetables if you prefer to refine it just before serving.
- For events, reheat meat in sauce first, then add briefly reheated vegetables just before serving to prevent overcooking.
Freezing Guidelines:
- Freeze pot roast with sauce (without potatoes) in airtight containers for up to 3 months.
- Potatoes don’t freeze well, so add freshly cooked ones when reheating if freezing the dish.
- Thaw frozen pot roast overnight in the refrigerator before reheating for best texture.
- Freeze in portion-sized containers for convenient future meals.
- For best quality after freezing, add a splash of fresh stock and a pinch of herbs when reheating.
Party Prep Tips:
- For large gatherings, consider cooking two smaller roasts instead of one large one for more even cooking.
- Prepare up to three days ahead for stress-free entertaining and improved flavor.
- Transport in the cooking vessel if taking to a potluck, as it retains heat best.
- For buffet service, shred the meat and keep warm in a slow cooker with some of the sauce.
- Provide small rolls alongside for guests to make mini pot roast sandwiches as an option.
Kid-Friendly Involvement
This hearty recipe offers several opportunities for children to safely participate in the kitchen:
Vegetable Preparation: Kids can help wash potatoes and snap the ends off cleaned carrots.
Seasoning the Meat: Let children help measure and sprinkle salt and pepper onto the roast.
Herb Collection: Children can pick herb leaves from stems and count out bay leaves.
Arrangement: Kids can help arrange vegetables around the seared roast before cooking.
Taste Testing: Assign children the important role of sauce tasters (once cooled enough).
Gravy Whisking: Older children can help whisk the flour slurry for thickening the gravy.
Garnish Duties: Let kids sprinkle the chopped parsley garnish over the finished dish.
Setting the Table: Children can create a special table setting for the family pot roast dinner.
Menu Planning: Involve kids in selecting side dishes to accompany the main course.
Sensory Experience: Encourage children to note the changes in the meat’s texture before and after cooking.
Frequently Asked Questions
Which cut of beef makes the best pot roast? Chuck roast is ideal for pot roast due to its perfect balance of lean meat and marbling. This cut comes from the shoulder area of the cow, which gets plenty of exercise, developing strong flavor and connective tissues that break down during slow cooking to create unmatched tenderness. Other good options include brisket (which has a distinctive grain and slightly different texture) or round roast (leaner, requiring careful cooking to prevent dryness).
How do I know when my pot roast is done? The pot roast is done when a fork easily slides into the meat with almost no resistance, and the meat begins to fall apart with gentle pressure. This typically takes 3-4 hours in a 325°F oven, depending on the size of your roast. Don’t rely on time alone—use the fork test to ensure perfect doneness. Contrary to some concerns, you cannot “overcook” a pot roast in liquid as long as there’s sufficient braising liquid and the temperature remains low and steady.
My pot roast turned out tough. What went wrong? Tough pot roast usually indicates it hasn’t cooked long enough. The paradox of tough cuts like chuck is that they get more tender the longer they cook, as collagen breaks down into gelatin. If your roast seems tough, return it to the pot with the braising liquid and continue cooking for another 30-60 minutes. Other potential issues include cooking temperature too high (causing the muscle fibers to contract and toughen) or using a very lean cut lacking sufficient connective tissue.
Do I really need to sear the meat first? Yes, searing is crucial for developing flavor through the Maillard reaction, which creates hundreds of new flavor compounds. This step creates the deep, rich flavor that defines a great pot roast. While technically optional (the roast will still cook without searing), the dish will lack significant depth of flavor if this step is skipped. Take the time to sear thoroughly on all sides, including the edges.
Can I add the vegetables at the beginning of cooking? You can, but for optimal texture and appearance, many chefs recommend adding root vegetables about halfway through the cooking process. Early addition means very soft vegetables that have given much of their flavor to the sauce. If convenience is more important than vegetable texture, adding everything at once is acceptable. For a compromise, use larger vegetable chunks if adding at the beginning.
What’s the best liquid for braising pot roast? A combination of beef broth and red wine creates the most balanced and flavorful result. The wine adds acidity and depth, while the broth provides savory foundation. However, excellent pot roast can be made with all broth (preferably low-sodium to control saltiness), beer for a malty approach, or even water with added aromatics if necessary. Whatever liquid you choose, make sure it reaches about halfway up the meat—not fully submerging it.
Can I make pot roast in a slow cooker? Absolutely! Sear the meat and sauté aromatics as directed, then transfer everything to a slow cooker. Cook on low for 8-10 hours or high for 5-6 hours. The gentle, consistent heat of a slow cooker is perfect for pot roast. Note that slow cookers create more liquid during cooking due to excellent moisture retention, so you may want to reduce the initial amount of liquid by about 1/4 to prevent an overly thin sauce.
What can I do if my sauce is too thin? To thicken thin sauce, make a slurry with equal parts softened butter and flour (called beurre manié). Remove the meat and vegetables, bring the liquid to a simmer, and whisk in bits of the beurre manié until you reach your desired consistency, simmering for at least 2 minutes after each addition. Alternatively, make a cornstarch slurry (1 tablespoon cornstarch mixed with 2 tablespoons cold water) and add to the simmering liquid, which creates a glossier but somewhat different texture.

Ingredients
For the Pot Roast:
- 3-4 pound chuck roast
- 2 teaspoons kosher salt
- 1 teaspoon freshly ground black pepper
- 2 tablespoons olive oil
- 1 large onion, diced
- 4 cloves garlic, minced
- 1 cup dry red wine
- 2 cups beef broth
- 2 tablespoons tomato paste
- 2 tablespoons Worcestershire sauce
- 2 bay leaves
- 2 sprigs fresh thyme, plus 1 teaspoon thyme leaves
- 1 sprig fresh rosemary
- 4 large carrots, peeled and cut into 2-inch pieces
- 1 pound baby potatoes (or larger potatoes cut into 2-inch pieces)
For Finishing:
- 2 tablespoons all-purpose flour (optional, for thickening)
- 1 tablespoon cold butter
- 2 tablespoons fresh parsley, chopped
- Additional salt and pepper to taste
Instructions
- Preheat oven to 325°F (165°C).
- Pat roast dry, season generously with salt and pepper on all sides.
- Heat olive oil in Dutch oven over medium-high heat, sear roast 4-5 minutes per side.
- Remove roast, add onions to pot and cook until translucent, about 3-4 minutes.
- Add garlic and cook for 30-60 seconds until fragrant.
- Pour in wine, scraping up browned bits from bottom of pot.
- Stir in tomato paste and cook for 1-2 minutes.
- Add beef broth, Worcestershire sauce, bay leaves, thyme, and rosemary.
- Return roast to pot, arrange vegetables around meat.
- Cover and cook in oven for 3-4 hours until fork-tender.
- Remove meat and vegetables to a serving platter and tent with foil.
- Optional: Strain cooking liquid and return to stovetop.
- For thicker sauce, whisk flour with cold water to make slurry, then whisk into simmering liquid.
- Finish sauce with butter and adjust seasonings.
- Serve meat with vegetables, pour sauce over top, and garnish with fresh parsley.
Notes
- Choose a pot with a tight-fitting lid to trap moisture during braising
- Don't skip the searing step—it's crucial for developing deep flavor
- Cut vegetables into similar sizes for even cooking
- Check liquid levels halfway through cooking; add more broth if needed
- Allow meat to rest at room temperature for 30 minutes before searing
- Use a wooden spoon to scrape up flavorful browned bits when deglazing
- Resist the urge to peek frequently during cooking, which releases heat
- For best flavor, choose bone-in chuck roast if available
- Test several areas of the meat for tenderness as thickness can vary
- Always slice meat against the grain for maximum tenderness
- For maximum flavor development, make a day ahead and reheat
- Use fresh herbs rather than dried whenever possible
- Season in layers—both the meat and the sauce separately
- For best presentation, choose colorful, uniform carrots
- Keep vegetables chunky so they maintain structure during long cooking
- Use kitchen twine to tie the roast if it's falling apart before cooking
- Taste and adjust seasoning just before serving; flavors concentrate during cooking
- For leaner cuts, check moisture levels more frequently
- Use a splash of acid (vinegar or lemon juice) to brighten the finished dish
- Serve with additional fresh herbs to enhance visual appeal and flavor