

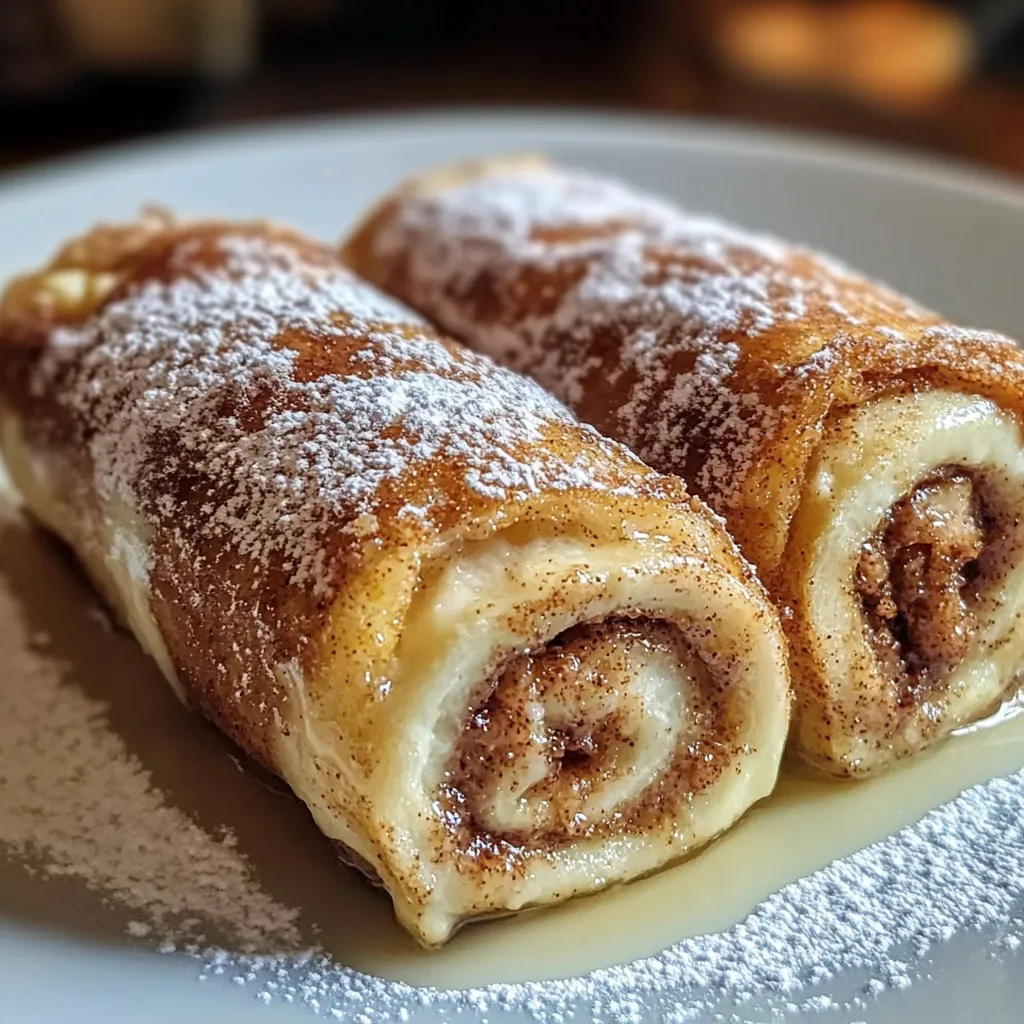
These extraordinary Cinnamon Roll French Toast Roll Ups transform ordinary sandwich bread into an irresistible breakfast treat that combines the beloved flavors of cinnamon rolls with the comforting familiarity of French toast. Each perfectly golden roll features a crisp, caramelized exterior giving way to a soft, custard-like interior wrapped around a luscious cinnamon-sugar filling that melts into warm, spiced perfection with every bite. The contrast between the slightly crunchy outer shell, tender bread interior, and sweet cinnamon filling creates a textural symphony, while the finishing touch of powdered sugar adds a delicate sweetness and visual appeal. Whether served as a special weekend breakfast, holiday morning indulgence, or unique dessert option, these rolls deliver the nostalgic comfort of traditional breakfast favorites reimagined in an innovative, hand-held form that delights both children and adults alike—proving that extraordinary morning moments can come from simple ingredients transformed with just a touch of creativity.
Why You’ll Love This Recipe
- Perfect breakfast indulgence: Combines two breakfast favorites into one irresistible treat
- No special ingredients: Made with pantry staples you likely already have on hand
- Kid-friendly format: Fun finger food that children love to both help make and eat
- Customizable filling: Easily adapts to different flavor preferences and additions
- Quick preparation: Comes together in under 30 minutes from start to finish
- Make-ahead friendly: Components can be prepped in advance for easy morning assembly
- Impressive presentation: Looks elaborate despite straightforward preparation
- Texture contrast: Delivers crispy exterior, soft interior, and gooey cinnamon filling
- Portable option: Can be enjoyed without utensils for breakfast on the go
- Crowd-pleasing appeal: Universally loved flavor profile that satisfies both adults and children
Ingredients
For the Roll Ups
- White sandwich bread – Provides perfect soft texture and neutral flavor base
- Butter – Creates rich flavor and helps achieve golden caramelization
- Granulated sugar – Sweetens filling and creates caramelized exterior
- Ground cinnamon – Delivers warm, aromatic spice essential to the flavor profile
- Cream cheese – Adds tangy richness and creamy texture to filling
- Vanilla extract – Enhances sweet flavors with aromatic depth
- Eggs – Form the base of the custard coating for classic French toast flavor
- Milk – Creates perfect custard texture when combined with eggs
- Salt – Balances sweetness and enhances overall flavor
- Powdered sugar – Provides beautiful finishing touch and additional sweetness
For Serving
- Maple syrup – Offers classic breakfast pairing with deep, complex sweetness
- Whipped cream – Adds luxurious, creamy contrast
- Fresh berries – Provide bright, acidic balance to rich flavors
- Cream cheese glaze – Creates authentic cinnamon roll experience
Optional Enhancements
- Orange zest – Adds bright citrus notes that complement cinnamon
- Nutmeg – Deepens warm spice profile with subtle complexity
- Brown sugar – Creates more caramel-like flavor in filling
- Chopped nuts – Add crunchy texture and nutty flavor dimension
- Mini chocolate chips – Create melty chocolate pockets throughout
- Cardamom – Introduces sophisticated, floral spice notes
- Vanilla bean paste – Elevates vanilla flavor with visual flecks
- Cinnamon chips – Intensify cinnamon flavor with melty texture
- Pumpkin pie spice – Creates seasonal flavor variation
- Fresh fruit pieces – Add natural sweetness and moisture
Step-by-Step Instructions
Preparing the Bread
- Begin by selecting a quality white sandwich bread—choose a fresh loaf that feels soft but still has enough structure to hold up to rolling. The soft texture of standard sandwich bread works perfectly for this recipe, as it compresses easily when rolled without cracking or breaking.
- Using a sharp bread knife, carefully trim the crusts from each slice of bread. The crusts would prevent proper rolling and could tear during the process, so this step is essential for creating smooth, uniform roll ups. Save the crusts for making breadcrumbs if desired.
- Take one slice of crustless bread and use a rolling pin to gently flatten it to approximately 1/4-inch thickness. Apply even, gentle pressure rather than aggressive rolling, which could tear the bread. The flattening creates a larger surface area for filling and ensures the bread will roll easily without breaking.
- Repeat the flattening process with all remaining bread slices, arranging them on a clean work surface with small gaps between each to prevent sticking together. For a standard recipe, prepare 8-10 slices of bread this way.
- Allow the flattened bread slices to sit uncovered for about 5 minutes. This brief air exposure helps the exterior dry slightly, which will actually improve the bread’s ability to absorb the egg mixture without becoming overly soggy.
Preparing the Filling
- In a small mixing bowl, combine 1/4 cup of granulated sugar with 1 tablespoon of ground cinnamon, mixing thoroughly to ensure even distribution of the cinnamon throughout the sugar. This classic combination forms the base of your filling.
- For a more complex flavor profile, consider adding 1/4 teaspoon of freshly grated nutmeg or a pinch of cardamom to the cinnamon-sugar mixture, though this is optional and depends on your flavor preferences.
- If using cream cheese in your filling, place 4 ounces of softened cream cheese in a separate bowl and beat until smooth and creamy. Add 2 tablespoons of powdered sugar and 1/2 teaspoon of vanilla extract, then mix until well combined and no lumps remain. The cream cheese adds a tangy richness that beautifully complements the sweet cinnamon flavor.
- Prepare any additional filling ingredients you may wish to include, such as finely chopped nuts, mini chocolate chips, or orange zest, keeping these ready in small bowls for easy access during the assembly process.
- For a simple variation without cream cheese, prepare 2 tablespoons of melted butter to brush on the bread before adding the cinnamon-sugar mixture, which will help the filling adhere to the bread and add richness.
Assembling the Roll Ups
- Working with one flattened bread slice at a time, either spread a thin layer (about 1 teaspoon) of the cream cheese mixture evenly over the entire surface, leaving a very small border around the edges, or brush lightly with melted butter if using the simpler variation.
- Sprinkle approximately 1 teaspoon of the cinnamon-sugar mixture evenly over the cream cheese or butter layer, making sure to distribute it all the way to the edges for consistent flavor throughout the roll. Add any optional ingredients like mini chocolate chips or finely chopped nuts at this stage, using no more than 1/2 teaspoon to avoid overfilling.
- Starting from one short end of the bread slice, carefully and tightly roll the bread over the filling, applying gentle but firm pressure as you roll to ensure the filling stays in place and the roll remains compact. The tight rolling is crucial for keeping the filling inside during cooking.
- Place the completed roll, seam-side down, on a clean plate or baking sheet while you finish assembling the remaining rolls. The seam-side-down position helps seal the edge and prevents unrolling.
- Continue the process with all remaining bread slices. If you find the rolls starting to unravel, you can secure them with toothpicks, though if properly rolled, this shouldn’t be necessary. The assembled rolls can be placed in the refrigerator for up to 30 minutes if you’re not ready to cook them immediately.
Creating the French Toast Coating
- In a shallow, wide bowl, whisk together 2 large eggs and 1/4 cup of milk until completely combined and slightly frothy. Add 1 teaspoon of vanilla extract and a pinch of salt, then whisk again to incorporate. The vanilla enhances the sweet flavors, while the salt balances the overall sweetness.
- For additional flavor depth, consider adding 1/4 teaspoon of ground cinnamon to the egg mixture, which will enhance the cinnamon notes in the filling and create a more cohesive flavor profile.
- Prepare a separate shallow dish containing 1/4 cup of granulated sugar mixed with 1 teaspoon of ground cinnamon. This exterior coating will caramelize during cooking, creating a crisp, sweet outer layer reminiscent of the exterior of a cinnamon roll.
- Position both the egg mixture and cinnamon-sugar dishes near your cooking surface for efficient workflow, along with a clean plate for transferring the coated rolls to the cooking surface.
- The egg mixture should be deep enough to allow the rolls to be half-submerged during coating, so adjust your bowl size or mixture quantity accordingly for proper coverage.
Cooking the Roll Ups
- Heat a large non-stick skillet or griddle over medium heat. Add 2 tablespoons of butter and allow it to melt completely, swirling to coat the cooking surface evenly. The butter should foam slightly but not brown or smoke, indicating the perfect temperature.
- Working with a few rolls at a time, carefully dip each roll in the egg mixture, turning gently with a fork to ensure all sides are evenly coated. Allow excess egg mixture to drip off briefly before transferring to the skillet. Overcrowding the egg mixture can lead to soggy bread, so work efficiently.
- Immediately after coating with the egg mixture, roll each soaked roll in the cinnamon-sugar mixture, ensuring even coverage on all sides. This creates the distinctive caramelized exterior that makes these roll ups special.
- Place the coated rolls in the heated skillet, seam-side down first to seal the edge, spacing them about 1 inch apart to allow for even cooking and easy turning. Cook in batches of 3-4 rolls at a time, depending on the size of your cooking surface.
- Cook the rolls for approximately 1-2 minutes per side, turning carefully with tongs or a spatula, until all sides are golden brown and caramelized. Watch carefully as the sugar coating can burn quickly if the heat is too high. The rolls should be evenly browned on all sides with a slightly crisp exterior.
- Transfer the cooked rolls to a clean plate lined with paper towels to absorb any excess butter. Continue the process with the remaining rolls, adding more butter to the skillet as needed between batches to prevent sticking and ensure proper caramelization.
- For the most even cooking, wipe out the skillet between batches if you notice any burnt sugar, and adjust the heat as necessary to maintain a consistent cooking temperature.
Serving and Presentation
- Arrange the hot roll ups on a serving platter, positioning them upright to display the spiral pattern and filling. For special presentation, consider arranging them in a circular pattern around a small bowl of maple syrup or cream cheese glaze.
- Dust generously with powdered sugar just before serving, using a fine-mesh sieve to ensure even distribution. The powdered sugar adds a beautiful contrast against the golden-brown exterior and provides an additional touch of sweetness.
- Serve immediately while still warm to enjoy the perfect contrast between the crisp exterior and soft, warm interior with melted filling. The roll ups are at their textural peak within the first 10 minutes after cooking.
- Offer a selection of dipping options or toppings such as warm maple syrup, cream cheese glaze, fresh berries, or whipped cream to allow customization. A drizzle of maple syrup over the top just before serving creates an appealing presentation with the syrup catching in the powdered sugar.
- For special occasions, consider garnishing the platter with fresh mint leaves, orange zest, or edible flowers to elevate the presentation.
Alternative Baking Method
- For a lower-maintenance cooking method that produces a more uniform finish, these roll ups can be baked instead of pan-fried. Preheat your oven to 375°F (190°C) and line a baking sheet with parchment paper.
- After coating the rolls in the egg mixture and cinnamon-sugar, place them seam-side down on the prepared baking sheet, spacing them at least 1 inch apart.
- Lightly spray or brush the rolls with melted butter to promote browning and caramelization in the oven.
- Bake for 12-15 minutes, turning halfway through, until the exterior is golden brown and slightly crisp, and the interior is heated through.
- This method allows you to cook all the rolls simultaneously with less hands-on attention, though the texture will be slightly different from the pan-fried version—still delicious but with a more uniform caramelization.
Make-Ahead Option
- To prepare these roll ups in advance for effortless morning cooking, complete all steps through assembly of the rolls, but do not dip in the egg mixture or cinnamon-sugar.
- Place the assembled rolls on a parchment-lined baking sheet, cover with plastic wrap, and refrigerate for up to 12 hours.
- Prepare the egg mixture and cinnamon-sugar coating, store in separate covered containers, and refrigerate alongside the rolls.
- In the morning, allow the rolls to sit at room temperature for 10 minutes while you heat your skillet, then proceed with the coating and cooking steps as directed.
- This preparation method is particularly convenient for holiday mornings or when entertaining overnight guests, allowing you to enjoy a special breakfast with minimal morning effort.
Pro Tips
- Use day-old bread for better structure when rolling
- Flatten bread gently but thoroughly for easier rolling
- Keep filling thin and even to prevent overflow during cooking
- Roll tightly starting from short end for most attractive spiral
- Place seam-side down when cooking to prevent unraveling
- Use moderate heat to prevent burning the sugar coating
- Cook in small batches for most even results
- Wipe skillet between batches to prevent burnt sugar buildup
- Add cinnamon to egg mixture for consistent flavor throughout
- Allow brief standing time before serving for filling to set slightly
- Pat bread dry if it seems too moist before adding filling
- Use powdered sugar rather than granulated for cream cheese filling
- Incorporate softened—not melted—butter into cinnamon-sugar for richer filling
- For cleaner slicing, chill filled rolls for 10 minutes before coating
- Use scissors to snip small holes in difficult spots if filling begins to leak
- Balance amount of egg coating—too much creates sogginess
- For crispier exterior, use less milk in egg mixture
- Gentle handling preserves the roll shape during cooking
- Fresh bread works better than frozen-then-thawed
- For picture-perfect rolls, trim bread edges straight before rolling
Storage and Make-Ahead Advice
Short-Term Storage
- Store leftover roll ups in an airtight container in the refrigerator for up to 2 days.
- Separate layers with parchment paper to prevent sticking and maintain shape.
- Allow refrigerated roll ups to come to room temperature for about 10 minutes before reheating for best texture results.
- For optimal freshness, store unfilled, flattened bread slices separately from prepared filling components if making partially ahead.
- If you’ve prepared the cinnamon-sugar mixture in advance, store in an airtight container at room temperature to prevent clumping from humidity.
- Cream cheese filling can be refrigerated separately in an airtight container for up to 3 days before use.
- Never store fully assembled but uncooked roll ups for more than 12 hours, as the bread will begin to break down from moisture in the filling.
- If making a large batch, consider cooking all roll ups, then refrigerating, as cooked rolls maintain their structure better in storage than uncooked ones.
Reheating Guidelines
- Revive refrigerated roll ups in a 325°F (165°C) oven for 5-7 minutes until heated through and crisp again.
- Microwave reheating is not recommended as it makes the exterior soggy, sacrificing the textural contrast that makes these special.
- For quickest reheating with good results, use a toaster oven at medium setting for 2-3 minutes.
- An air fryer set at 350°F (175°C) for 1-2 minutes provides excellent reheating results, restoring the crisp exterior.
- If using a skillet to reheat, warm over medium-low heat with a small amount of butter, turning frequently to crisp all sides without burning.
- After reheating, a fresh dusting of powdered sugar restores visual appeal and adds back any sweetness that may have dissolved.
- When reheating, the filling will become very hot before the exterior shows signs of heating—be cautious when taking first bites.
- For best results when planning to reheat, slightly undercook the roll ups during initial preparation by about 30 seconds per side.
Freezing Instructions
- These roll ups can be frozen either before or after cooking, though post-cooking freezing yields better results.
- To freeze cooked roll ups: Cool completely, arrange in a single layer on a baking sheet, freeze until solid (about 2 hours), then transfer to freezer bags or containers, separating layers with parchment paper.
- Frozen cooked roll ups will maintain quality for up to 1 month.
- To freeze uncooked, assembled roll ups: Place on a parchment-lined baking sheet, freeze until solid, then transfer to freezer bags. Do not freeze after coating in egg mixture.
- When cooking from frozen (uncooked rolls), thaw in refrigerator overnight before proceeding with egg coating and cooking steps.
- For frozen cooked roll ups, reheat in a 350°F (175°C) oven for 8-10 minutes directly from frozen until heated through and crisp.
- Individually wrap roll ups in plastic wrap before placing in freezer bags to prevent freezer burn and maintain individual portions.
- Label frozen packages with date and reheating instructions for convenience.
Make-Ahead Strategy
- This recipe offers several make-ahead options for convenient preparation:
- Prepare bread: Trim crusts and flatten bread up to 24 hours ahead, storing between layers of parchment paper in an airtight container.
- Mix fillings: Prepare cinnamon-sugar mixture and cream cheese filling up to 3 days ahead, storing separately.
- Partial assembly: Fill and roll bread up to 12 hours ahead, refrigerate without egg coating.
- Complete make-ahead: Cook roll ups completely, refrigerate, and reheat just before serving.
- For easiest morning preparation, measure and combine dry ingredients the night before, and prepare any special toppings or accompaniments.
- When making ahead, slightly increase cinnamon in both filling and coating, as the flavor mellows during storage.
- If assembling the night before, wrap rolled portions individually in plastic wrap to maintain shape and prevent drying.
- For the freshest result with advance preparation, prepare all components separately and assemble just before cooking.
Frequently Asked Questions
Why do my roll ups unravel during cooking?
Roll unraveling typically stems from three common issues. First, ensure you’re starting with the right bread—white sandwich bread that’s fresh but not too fresh (day-old is perfect) provides the ideal balance of flexibility and structure. Second, flattening technique matters significantly; use gentle, even pressure with a rolling pin until the bread is about 1/4-inch thick throughout—too thin and it tears, too thick and it resists rolling. Third, rolling technique is crucial—start from the short end and roll tightly, applying gentle pressure throughout the process rather than just at the end. For persistent unraveling issues, try refrigerating the assembled rolls for 15 minutes before dipping in egg mixture to help them set their shape. As a last resort, secure with toothpicks during cooking (remember to remove before serving). For immediate rescue of unraveling rolls during cooking, press gently with a spatula for a few seconds on the seam side while cooking to help “seal” the edge.
How do I prevent the filling from leaking out during cooking?
Filling leakage frustration can be eliminated with strategic adjustments. First, quantity control is essential—limit filling to approximately 1 teaspoon of spread and 1 teaspoon of cinnamon-sugar per bread slice, as overfilling is the primary cause of leakage. Second, distribution matters; spread filling evenly across the surface, leaving a 1/4-inch border around all edges to allow for natural spreading during rolling. Third, for cream cheese filling, ensure it’s at the proper consistency—softened but not warm or runny—and consider adding 1 tablespoon of flour to the mixture to help stabilize it during heating. Fourth, the temperature of your pan significantly impacts leakage; start with a medium-low heat and gradually increase to medium, allowing the egg coating to set before the filling melts completely. Finally, if you’ve experienced leakage issues previously, try chilling the assembled rolls for 30 minutes before cooking, which firms the filling and gives the exterior time to cook before the interior melts. For a foolproof method, consider using the baking technique instead of pan-frying, which provides more gradual, even heating.
Can I use whole wheat or gluten-free bread for this recipe?
While traditional white sandwich bread creates the most traditional texture, this recipe can be adapted for dietary needs with some modifications. For whole wheat bread, which is typically drier and less pliable, several adjustments help ensure success: select a soft-textured whole wheat variety (often labeled “smooth wheat” or “white whole wheat”), flatten a bit more aggressively to overcome the natural resistance, and increase the egg mixture by 25% to compensate for higher absorption rates. The nuttier flavor of whole wheat actually complements the cinnamon filling nicely. For gluten-free adaptation, choose a high-quality gluten-free sandwich bread with good flexibility—brands containing xanthan gum work best. Gluten-free bread benefits from a brief (5-second) steam treatment before flattening; simply hold each slice over boiling water or a steamer to increase pliability. Since gluten-free breads vary significantly in texture, expect to experiment with flattening pressure and cooking times. Both wheat and gluten-free varieties will produce slightly different but equally delicious results with these adjustments, though the classic white bread version remains the easiest to work with for beginners.
What’s the best way to flatten the bread without tearing it?
Achieving perfectly flattened bread requires technique refinement. Begin with bread that’s at cool room temperature—not straight from the refrigerator, which makes it brittle, or too warm, which makes it gummy. Place the bread slice between two sheets of wax paper or parchment, which prevents sticking to the rolling pin and work surface. Starting from the center of the slice, roll outward using gentle, even pressure, making small movements rather than long rolls across the entire slice. Rotate the bread 90 degrees after every few rolls to ensure even flattening in all directions. Target a thickness of approximately 1/4-inch—thin enough to roll easily but thick enough to maintain structural integrity. If you don’t have a rolling pin, a smooth-bottomed glass or can works well as an alternative. For stubborn bread that resists flattening, let it sit uncovered for 10 minutes to dry slightly, making it less elastic and easier to compress, or very lightly toast it for about 30 seconds to remove excess moisture without creating actual toast. With particularly fresh, soft bread, refrigerating for 30 minutes before flattening can help it hold its shape better during the rolling process.

Ingredients
For the Roll Ups:
10 slices white sandwich bread, crusts removed
1/4 cup granulated sugar
1 tablespoon ground cinnamon
4 ounces cream cheese, softened (optional)
2 tablespoons powdered sugar (for cream cheese filling)
1/2 teaspoon vanilla extract (for cream cheese filling)
2 tablespoons butter, melted (if not using cream cheese)
For the Coating:
2 large eggs
1/4 cup milk
1 teaspoon vanilla extract
Pinch of salt
1/4 cup granulated sugar
1 teaspoon ground cinnamon
2 tablespoons butter (for cooking)
For Serving:
Powdered sugar for dusting
Maple syrup
Fresh berries (optional)
Whipped cream (optional)
Instructions
Flatten each slice of bread using a rolling pin until approximately 1/4-inch thick.
In a small bowl, mix 1/4 cup granulated sugar with 1 tablespoon cinnamon.
If using cream cheese filling, mix softened cream cheese with 2 tablespoons powdered sugar and 1/2 teaspoon vanilla until smooth.
Spread each bread slice with either cream cheese mixture or brush with melted butter, then sprinkle with cinnamon-sugar mixture.
Roll up each bread slice tightly from the short end and place seam-side down.
In a shallow bowl, whisk together eggs, milk, vanilla extract, and salt.
In another shallow dish, combine 1/4 cup sugar and 1 teaspoon cinnamon.
Heat a skillet over medium heat and add butter.
Dip each roll in egg mixture, then roll in cinnamon-sugar mixture.
Cook rolls in the skillet for 1-2 minutes per side until golden brown all around.
Remove from skillet, dust with powdered sugar, and serve with maple syrup.
Notes
Use slightly stale bread for easier handling
Roll bread firmly but gently to avoid tearing
Keep filling thin to prevent leakage during cooking
Ensure seam is placed down first when cooking
Maintain medium heat to prevent burning the sugar coating
Work in small batches for most even cooking
Pat bread dry if it seems too moist before adding filling
Chill filled rolls briefly before cooking if filling seems soft
Use enough butter in the pan to prevent sticking
Apply powdered sugar just before serving for best appearance
Pre-mix egg coating thoroughly for consistent flavoring
Cut finished rolls in half to display the spiral for presentation
For crispier exterior, use less milk in egg mixture
Gentle handling preserves the roll shape during cooking
Wipe skillet between batches to prevent burnt sugar buildup
For picture-perfect rolls, trim bread edges straight before rolling
Allow brief standing time before serving for filling to set slightly
For extra richness, brush with butter after cooking
Fresh bread works better than frozen-then-thawed
Add a pinch of nutmeg to filling for depth of flavor