

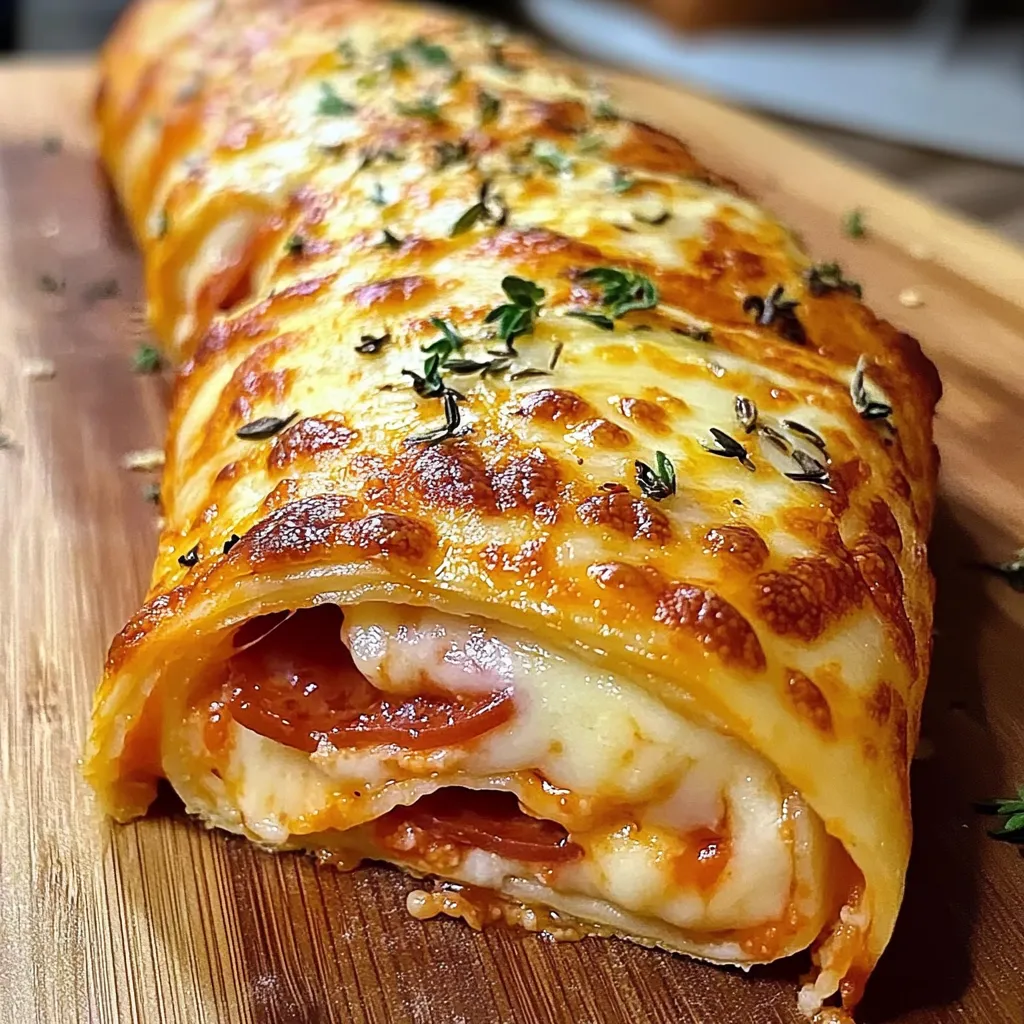
This golden-brown Cheesy Pepperoni Roll-Up transforms simple ingredients into an irresistible savory masterpiece with its perfect balance of crispy exterior, gooey cheese, and zesty pepperoni. The dish showcases a perfectly baked wrap encasing layers of melted cheese and premium pepperoni slices, all seasoned with aromatic herbs. Every bite delivers an exquisite contrast of textures—from the satisfying crunch of the toasted exterior to the stretchy, melted cheese and savory pepperoni within. This unique roll-up exemplifies comfort food at its finest—ideal for quick lunches, game-day gatherings, or whenever you crave a treat that perfectly balances convenience and indulgence in one beautiful, portable creation.
Why You’ll Love This Recipe
- Cheese-pepperoni perfection: Combines gooey cheese with savory pepperoni in every bite
- Make-ahead convenience: Perfect for busy households, can be prepped in advance
- Crowd-pleaser: Appeals to all ages with its pizza-inspired flavors
- Visually impressive: Creates beautiful, golden exterior with minimal effort
- Versatile occasions: Perfect for lunch boxes, game days, and casual dinners
- Textural delight: Offers crispy exterior and melty interior in one roll
- Simple ingredients: Creates spectacular results with everyday pantry staples
- Customizable: Easily adapts to different cheeses and fillings
- Transportable: Travels well when properly wrapped
- Convenient meal: Provides a complete, satisfying meal in one hand-held package
Ingredients
For the Roll-Up Base
- Flour tortillas or pizza dough – Creates the perfect wrapper with ideal texture
- Olive oil or butter – Helps achieve golden-brown exterior and rich flavor
- Garlic powder – Adds aromatic depth and pizza-like essence
- Italian seasoning – Provides classic herb flavors that complement the filling
For the Filling
- Mozzarella cheese – Creates that signature stretch and mild dairy flavor
- Pepperoni slices – Delivers savory, slightly spicy character
- Parmesan cheese – Adds sharp, nutty dimension to cheese blend
- Pizza sauce – Provides tangy tomato base and moisture
For the Exterior
- Butter or egg wash – Creates golden, glossy finish when baked
- Grated parmesan – Adds savory crust and extra flavor dimension
- Italian herbs – Provides aromatic finish and visual appeal
- Garlic salt – Enhances savory notes and adds flavor to the crust
Optional Enhancements
- Red pepper flakes – Adds pleasant heat and visual contrast
- Diced bell peppers – Introduces vegetable element and color
- Caramelized onions – Adds sweet depth and additional texture
- Ham or bacon – Creates meat variety and saltiness
- Provolone cheese – Introduces sharper cheese flavor profile
- Ricotta dollops – Adds creamy pockets within the filling
- Basil leaves – Provides fresh aromatic element
- Sun-dried tomatoes – Creates concentrated tomato flavor pockets
- Olive slices – Introduces briny, savory notes
- Pesto swirl – Adds herbal garlic richness throughout
Step-by-Step Instructions
Preparing the Base
Begin by preheating your oven to 375°F (190°C), ensuring it reaches the proper temperature before baking. This precise temperature is critical for achieving the perfect golden exterior while fully melting the cheese within.
If using pizza dough, roll it out into a thin rectangle approximately 14×10 inches on a lightly floured surface. For flour tortillas, select the largest size available (burrito size, approximately 12 inches in diameter) and warm them briefly in the microwave for 10-15 seconds to increase pliability.
In a small bowl, combine 2 tablespoons of olive oil or melted butter with ½ teaspoon garlic powder and ½ teaspoon Italian seasoning. This aromatic mixture will add flavor directly to the base and help achieve a golden finish.
Brush the prepared oil mixture lightly across the entire surface of your dough or tortilla, ensuring even coverage but avoiding excess that could make the final product greasy. Pay special attention to the edges, which will form the seam of your roll-up.
Creating the Perfect Filling
Spread a thin layer of pizza sauce over the prepared base, leaving a one-inch border around all edges. The sauce should be applied sparingly—approximately 3-4 tablespoons—as too much can make the roll-up soggy during baking.
Evenly distribute 1½ cups of shredded mozzarella cheese over the sauce, creating a complete layer that will become the molten core of your roll-up. For extra flavor complexity, mix the mozzarella with ¼ cup of grated parmesan before applying.
Arrange approximately 24-30 pepperoni slices in slightly overlapping rows across the cheese layer, ensuring even distribution. For optimal results, blot pepperoni slices with a paper towel before adding to remove excess oil that could make the final product greasy.
Sprinkle an additional ½ cup of mozzarella over the pepperoni layer to help bind the ingredients together during baking. This second cheese layer is crucial for achieving the signature cheese pull when eating.
If using optional ingredients like diced vegetables or additional meats, sprinkle them sparingly over the cheese at this stage, being careful not to overfill, which could cause tearing during rolling and baking.
Rolling and Sealing Technique
Starting from the edge closest to you, begin rolling the dough or tortilla away from yourself, keeping the roll as tight as possible without tearing the base. The tighter the roll, the more defined your spiral pattern will be when sliced.
When you reach the opposite edge, lightly brush the empty border with water (for tortillas) or egg wash (for pizza dough) to create a secure seal when pressed together. This sealing step is essential for preventing the roll-up from opening during baking.
Place the roll seam-side down on a parchment-lined baking sheet, which will prevent sticking and catch any cheese that may escape during baking. The seam-down position helps ensure the roll-up maintains its shape throughout the cooking process.
For added flavor and appearance, brush the entire exterior surface with a light coating of melted butter or egg wash. This will create a beautiful golden sheen during baking while adding a rich finish to every bite.
Sprinkle the exterior with a mixture of 2 tablespoons grated parmesan cheese, ¼ teaspoon garlic salt, and ½ teaspoon dried Italian herbs. This final coating adds tremendous flavor to the crust while creating an appealing visual texture.
Using a sharp knife, make 3-4 small diagonal slits across the top of the roll-up to allow steam to escape during baking, which prevents the filling from erupting through the sides and creates attractive venting that showcases the interior.
Baking to Perfection
Transfer the prepared roll-up to the preheated oven and bake for 15-18 minutes until the exterior reaches a deep golden brown and the cheese inside has completely melted. The exact timing may vary based on your oven and the thickness of your base.
For an extra crispy exterior, switch the oven to broil for the final 1-2 minutes, watching very carefully to prevent burning. This step creates additional textural contrast between the crisp exterior and molten interior.
Once baked, remove from the oven and allow to rest for 3-5 minutes before cutting. This brief resting period allows the cheese to set slightly while remaining stretchy, which makes for cleaner slices and prevents burn injuries from molten cheese.
For serving, use a sharp serrated knife to cut 1-inch thick slices, revealing the beautiful spiral pattern of cheese and pepperoni within. The spiral pattern not only looks impressive but ensures every bite contains the perfect balance of ingredients.
Serve immediately while hot, either on its own or with additional warm pizza sauce on the side for dipping. The contrast between the crispy exterior, melted cheese, and tangy dipping sauce creates a multi-dimensional flavor experience.
Final Presentation and Serving
Arrange slices at a slight angle on a serving platter, allowing guests to see the beautiful spiral pattern of pepperoni and cheese. This presentation showcases the craftsmanship of your creation.
Garnish the platter with fresh herbs such as basil, oregano, or parsley to add color contrast and a fresh aromatic element that complements the baked flavors.
Provide a small bowl of warmed pizza sauce for dipping, along with optional red pepper flakes or grated parmesan for customized heat and flavor enhancement.
For a complete meal presentation, accompany with a simple green salad dressed with Italian vinaigrette to balance the richness of the roll-up with fresh, crisp textures.
Consider presenting larger gatherings with variations on a theme—create multiple roll-ups with different fillings, sliced and arranged together for a crowd-pleasing display that accommodates various preferences.
Pro Tips
- Use room temperature cheese for better melting and distribution
- Pre-cook any vegetable additions to remove excess moisture
- Roll as tightly as possible without tearing for best spiral appearance
- Score the top before baking to prevent filling eruption
- Allow to cool 3-5 minutes before slicing for cleaner cuts
- Use a pizza cutter instead of a knife for easier slicing
- Blot pepperoni with paper towels to reduce greasiness
- For crispier texture, brush exterior with olive oil before baking
- Cover with foil if browning too quickly
- For make-ahead version, prepare up to point of baking and refrigerate
- Apply egg wash rather than butter for more golden, glossy finish
- Double the recipe and freeze one roll for future quick meals
- Cut smaller, bite-sized pieces for appetizer portions
- Keep filling at least one inch from edges to prevent leakage
- If using pizza dough, prick base with fork before adding toppings
- For gluten-free version, use gluten-free tortillas or pizza crust
- Sprinkle cornmeal on baking sheet for extra textural element
- Apply filling ingredients all the way to edges for maximum flavor
- Try baking in a cast-iron skillet for extra-crispy bottom crust
- Wrap in foil for the first half of baking to prevent over-browning
Variations and Creative Ideas
Filling Variations
Supreme Pizza Roll-Up: Incorporate diced bell peppers, onions, olives, and Italian sausage along with the pepperoni for a loaded supreme pizza experience in roll-up form.
Buffalo Chicken Version: Substitute shredded chicken tossed in buffalo sauce for the pepperoni, paired with mozzarella and blue cheese crumbles for a spicy game-day variation.
Mediterranean Style: Replace pepperoni with spinach, feta cheese, sun-dried tomatoes, and kalamata olives for a Greek-inspired flavor profile with bright, briny notes.
Breakfast Roll-Up: Create a morning version with scrambled eggs, crispy bacon, and cheddar cheese with a light brush of maple syrup on the exterior for a sweet-savory combination.
Structural Variations
Mini Individual Portions: Create smaller roll-ups using 6-inch tortillas for individual servings, perfect for lunch boxes or portion control at gatherings.
Braided Presentation: Instead of rolling, fold the edges of rectangular dough over the filling in an alternating pattern for an impressive braided appearance.
Pinwheel Slices: Roll and slice before baking to create pinwheels that puff up into individual servings, ideal for appetizers and potluck contributions.
Stuffed Crust Style: Place string cheese sticks along the final edge before rolling to create a stuffed-crust effect reminiscent of specialty pizzas.
Seasonal Adaptations
Fall Harvest Version: Incorporate thinly sliced apples, prosciutto, and brie cheese for an autumn-inspired variation with sweet-savory complexity.
Summer Garden: Add zucchini ribbons, fresh tomato slices, and basil during summer months for a lighter, produce-forward version.
Winter Comfort: Create a heartier variation with caramelized onions, mushrooms, and Gruyère cheese for rich, warming flavors during colder months.
Spring Celebration: Incorporate asparagus spears, ricotta, and lemon zest for a bright, seasonal twist that showcases spring vegetables.
Dietary Accommodations
Vegetarian Option: Omit pepperoni and substitute with a mixture of sautéed mushrooms, bell peppers, and black olives for a meat-free variation.
Low-Carb Version: Use a cauliflower-based pizza crust or low-carb tortilla as the base for those monitoring carbohydrate intake.
Dairy-Free Alternative: Substitute conventional cheese with plant-based mozzarella alternatives and nutritional yeast for a dairy-free option.
Protein-Packed Variation: Add a layer of scrambled eggs and turkey pepperoni for increased protein content and breakfast appeal.
Storage and Make-Ahead Advice
Short-Term Storage:
- Store completely cooled roll-up wrapped tightly in aluminum foil in the refrigerator for up to 3 days.
- For best texture, avoid plastic wrap which can trap moisture and make the exterior soggy.
- Keep sliced portions in airtight containers with parchment paper between layers to prevent sticking.
- Allow refrigerated portions to come to room temperature for 10 minutes before reheating for best texture results.
- Store any dipping sauce separately in a covered container to prevent the roll-up from becoming soggy.
Reheating Guidelines:
- Reheat individual slices in a 350°F (175°C) oven for 7-10 minutes until heated through and crispy.
- Avoid microwave reheating if possible, as it creates a soggy exterior and unevenly melted cheese.
- If microwave is the only option, use 50% power and reheat for 30-second intervals, then finish in a toaster oven if available.
- For whole leftover roll-ups, reheat covered with foil for the first 10 minutes, then uncover for the final 5 minutes to crisp the exterior.
- Add a sprinkle of fresh cheese during the last minute of reheating to refresh the melty cheese experience.
Make-Ahead Strategy:
- Prepare the entire roll-up up to the point of baking, then wrap tightly in plastic wrap and refrigerate for up to 24 hours.
- When ready to bake, allow the roll-up to sit at room temperature for 15 minutes while the oven preheats.
- Apply the egg wash or butter coating just before baking rather than before refrigeration for best results.
- Pre-measure and prepare all filling components up to 2 days ahead, storing separately in the refrigerator for quick assembly.
- For party planning, bake roll-ups 2 hours before serving, then reheat at 325°F (165°C) for 10 minutes just before guests arrive.
Freezing Guidelines:
- Unbaked roll-ups freeze exceptionally well for up to 3 months when wrapped tightly in plastic wrap, then aluminum foil.
- Thaw frozen unbaked roll-ups overnight in the refrigerator before baking as directed, adding 3-5 minutes to the baking time.
- Baked roll-ups can be frozen in individual slices, wrapped separately for grab-and-go lunch options.
- When freezing baked slices, reheat from frozen in a 350°F (175°C) oven for 12-15 minutes until heated through.
- For best quality, consume frozen roll-ups within 2 months, as longer storage can affect cheese texture.
Party Prep Tips:
- For large gatherings, prepare multiple roll-ups with varied fillings to accommodate different tastes.
- Slice and arrange on a warming tray to maintain temperature throughout your event.
- Create a dipping station with marinara, ranch, garlic butter, and pesto options for interactive serving.
- Pre-slice and arrange on a parchment-lined baking sheet, ready to quickly reheat when guests arrive.
- For outdoor events, transport in insulated carriers and serve at room temperature, or briefly reheat on a covered grill.
Kid-Friendly Involvement
This crowd-pleasing dish offers many opportunities for children to safely participate in the kitchen:
Base Preparation: Kids can help brush the oil or butter mixture onto the dough or tortillas.
Cheese Sprinkling: Children enjoy evenly distributing cheese across the surface.
Pepperoni Arranging: Let kids create patterns or rows with pepperoni slices.
Rolling Assistance: Older children can help with the rolling technique with supervision.
Exterior Decoration: Kids can brush the egg wash and sprinkle the herb-cheese mixture.
Sauce Stirring: Children can help mix and prepare simple dipping sauces.
Custom Creation: Allow each child to create a personal mini roll-up with preferred toppings.
Slicing Supervision: Older children can use a pizza cutter under close adult supervision.
Theme Creation: Let kids name their creative variations for family dinner menus.
Taste Testing: Assign children the important role of quality control testers.
Frequently Asked Questions
Why does my roll-up leak cheese during baking? The most common cause of cheese leakage is overfilling or not properly sealing the edges. Ensure you leave a one-inch border around all edges before rolling and firmly press the seam closed after rolling. Another prevention tip is to make small slits in the top of the roll-up before baking, which allows steam to escape without forcing cheese out the sides. If you’re using particularly moist ingredients like fresh tomatoes, consider pre-cooking or draining them to reduce excess moisture that can create steam pressure inside the roll.
Can I use different types of wraps or dough? Yes, this recipe adapts well to various bases. Besides flour tortillas and pizza dough, you can use lavash bread, puff pastry, crescent roll dough, or even sliced bread rolled thin with a rolling pin. Each alternative will create different textures—puff pastry delivers exceptional flakiness, while crescent roll dough offers richness. When using thinner alternatives like lavash, reduce the baking temperature to 350°F (175°C) and watch carefully to prevent burning. Regardless of your choice, ensure the base is large enough to contain your filling and create at least two complete spirals when rolled.
How do I prevent a soggy bottom crust? A soggy bottom is typically caused by excess moisture in the filling or insufficient bottom heat. For the crispiest results, use a preheated baking stone or inverted heavy baking sheet placed in the oven during preheating, then slide your roll-up (on its parchment) directly onto this hot surface. Additionally, avoid overapplying sauce and pre-cook any vegetables that have high water content. If using pizza dough, blind bake the rolled-out dough for 3-4 minutes before adding toppings. Finally, consider sprinkling a thin layer of grated parmesan directly on the dough before the sauce to create a moisture barrier.
Can I make this without dairy for lactose-intolerant guests? Yes, you can create dairy-free versions using plant-based cheese alternatives. For best melting results, choose brands specifically designed for pizza or melting applications. Nutritional yeast (2-3 tablespoons) mixed into the dairy-free cheese enhances the savory flavor profile. You might also consider adding a tablespoon of olive oil to the cheese substitute to improve the mouthfeel and melting qualities. For the exterior wash, substitute egg or butter with olive oil mixed with a pinch of turmeric for golden color. Be aware that dairy-free versions may not stretch in the same way as traditional cheese, but they can still deliver excellent flavor.
Why didn’t my roll-up get crispy on the outside? Several factors can prevent proper crisping. Ensure your oven is fully preheated before baking and consider using an oven thermometer to verify temperature accuracy. Excess moisture in the filling can create steam that inhibits crisping, so drain wet ingredients thoroughly before assembly. The egg wash or butter coating should be applied in a thin, even layer—too much can delay browning. Using a metal baking sheet rather than glass or ceramic promotes better bottom crisping. Finally, if your roll-up is browning but not crisping, your oven may be running humid; leave the door cracked open during the final 2-3 minutes of baking to release steam.
Can I prepare this for a large group? Yes, this recipe scales beautifully for crowds. For serving 20+ people, prepare multiple roll-ups rather than one extra-large version, which can be difficult to bake evenly. Assemble all roll-ups in advance and refrigerate, then bake in batches or simultaneously if your oven accommodates multiple baking sheets. For best results with large quantity preparation, slightly underbake (reducing time by 2 minutes), then refresh with a final 5-minute bake just before serving. Consider creating a variety of fillings for diverse options. For easy service, stand slices upright in a circular pattern on serving platters, showcasing the spiral design while maintaining optimal temperature longer.
How do I get clean slices without the filling falling out? Achieving clean slices requires proper cooling time and technique. Allow the baked roll-up to rest for 3-5 minutes before cutting to let the cheese set slightly. Use a sharp serrated knife or bread knife rather than a straight blade, and employ a gentle sawing motion rather than pressing down, which can compress the roll. For professional-looking presentation, wipe the knife clean between cuts. If serving at a gathering, consider pre-slicing halfway through the roll before the event, creating score lines that make final cutting easier while preserving heat. Finally, slightly chilling the roll-up (10 minutes in the refrigerator) before slicing can help maintain structural integrity, though you’ll want to reheat briefly before serving.

Ingredients
For the Base:
1 large flour tortilla (12-inch/burrito size) or rolled pizza dough (14×10 inches)
2 tablespoons olive oil or melted butter
½ teaspoon garlic powder
½ teaspoon Italian seasoning
For the Filling:
3-4 tablespoons pizza sauce
2 cups shredded mozzarella cheese, divided
24-30 pepperoni slices
¼ cup grated parmesan cheese
For the Exterior:
1 tablespoon melted butter or 1 beaten egg (for wash)
2 tablespoons grated parmesan cheese
¼ teaspoon garlic salt
½ teaspoon dried Italian herbs
For Serving:
½ cup warm pizza sauce for dipping
Fresh basil or parsley for garnish
Red pepper flakes (optional)
Instructions
Preheat oven to 375°F (190°C) and line a baking sheet with parchment paper.
Prepare base by warming tortilla or rolling out pizza dough to a rectangle.
Mix olive oil with garlic powder and Italian seasoning, then brush over the entire surface.
Spread a thin layer of pizza sauce, leaving a one-inch border around all edges.
Sprinkle 1½ cups of mozzarella cheese evenly over the sauce.
Arrange pepperoni slices in slightly overlapping rows across the cheese layer.
Top with remaining ½ cup mozzarella and parmesan cheese.
Starting from one end, tightly roll up the tortilla or dough, sealing the edge with water or egg wash.
Place seam-side down on the prepared baking sheet.
Brush exterior with melted butter or egg wash.
Combine parmesan, garlic salt, and Italian herbs; sprinkle over the exterior.
Cut 3-4 small diagonal slits in the top to vent steam.
Bake for 15-18 minutes until golden brown and cheese is fully melted.
Let rest 3-5 minutes before slicing into 1-inch thick pieces.
Garnish with fresh herbs and serve with warm pizza sauce for dipping.
Notes
Use freshly grated cheese for best melting properties
Blot pepperoni with paper towels to reduce excess grease
Ensure tight rolling for well-defined spiral pattern
Wait 3-5 minutes before cutting to allow filling to set
Use a serrated knife with gentle sawing motion for clean cuts
Apply egg wash for glossier finish, butter for richer taste
Score top before baking to prevent filling eruption
Prep ingredients before starting for efficient assembly
Use metal baking sheet for crispier bottom
Pre-shred cheese yourself for better melting than pre-packaged
Apply light pressure when rolling to maintain even thickness
Brush edges with water to ensure proper sealing
Rotate baking sheet halfway through for even browning
Use pizza cutter for easier slicing
Store leftover filling ingredients for quick future pizzas
Consider double-layering thin tortillas for sturdier base
Refrigerate briefly before slicing for cleaner cuts
Add fresh herbs after baking to maintain vibrant flavor
Experiment with cheese combinations for flavor complexity
Serve immediately after resting period for optimal texture