

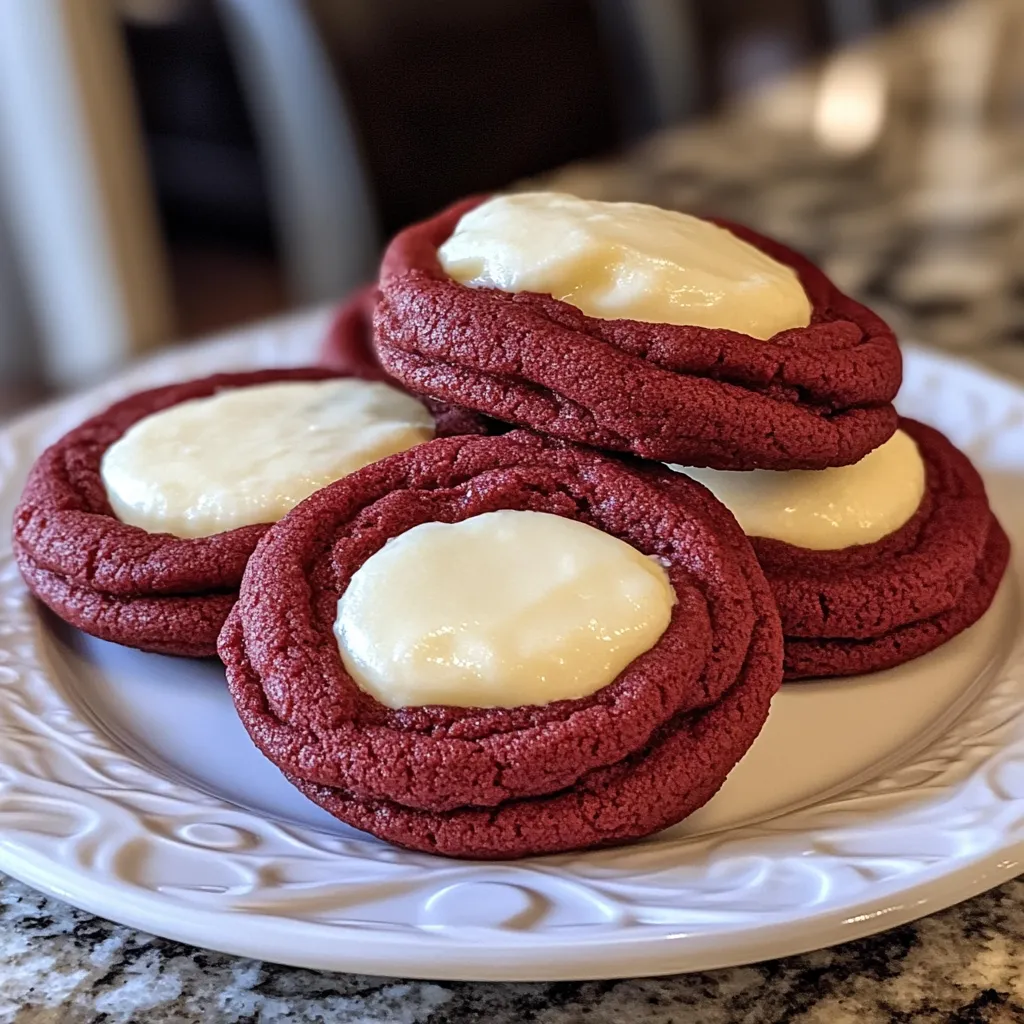
Do you remember that moment when a dessert blew your mind? These cheesecake stuffed red velvet cookies will do the same. They’re soft, velvety, and have a cream cheese center that melts in your mouth. It’s a dessert so good, it’ll become your favorite.
These cookies are not just any cookies. They’re a journey of flavors that turns a classic red velvet treat into something extraordinary. Every bite is a mix of rich chocolate and creamy cheesecake. It’s a taste that will make you smile.
Looking to impress someone or treat yourself? These cookies are perfect. They’re going to take your baking to the next level. You’ll make something beautiful and delicious.
Table of Contents
Key Takeaways
- Discover a unique twist on traditional red velvet cookies
- Learn how to create a creamy cheesecake-filled center
- Perfect for special occasions and everyday indulgence
- Easy to make with step-by-step guidance
- Impress friends and family with bakery-quality dessert
Essential Ingredients and Kitchen Setup for Perfect Red Velvet Cookies
To make delicious red velvet cookie dough, you need the right ingredients and tools. Knowing what to use will help you make tasty treats that everyone loves.
Cookie Base Components and Measurements
Your red velvet cookie base needs specific ingredients for its rich flavor and bright color. Here’s what you’ll need:
- 1 3/4 cups all-purpose flour
- 1 heaped tablespoon unsweetened cocoa powder
- 1/2 teaspoon baking soda
- 1/4 teaspoon sea salt
- 1/2 cup unsalted butter
- 3/4 cup granulated sugar
- 1 large egg
- 1 teaspoon vanilla extract
- 3-4 drops red gel food coloring
Cream Cheese Filling Requirements
The cream cheese filling makes these cookies special. Gather these ingredients:
- 4 ounces cream cheese
- 1/2 cup unsalted butter
- 3 cups powdered sugar
- 1/2 teaspoon vanilla extract
- 2-3 tablespoons heavy cream
Required Kitchen Tools and Equipment
Good baking starts with the right tools. Make sure you have these essentials:
- Stand mixer or hand mixer
- Baking sheets
- Parchment paper
- Cooling rack
- Measuring cups and spoons
- Rubber spatula
- Cookie scoop
“Baking is about precision and passion – the right ingredients make all the difference!”
Pro tip: Always use room temperature ingredients for the best red velvet cookie dough and cream cheese filling. This helps with smooth mixing and the perfect texture in your baked goods.
Step-by-Step Preparation of Cheesecake Stuffed Red Velvet Cookies
Get ready to make delicious cheesecake stuffed red velvet cookies that will wow everyone! The process needs careful attention. Start by getting all your ingredients, like cocoa powder, buttermilk, and cream cheese frosting.
- Use full-fat brick-style cream cheese at room temperature
- Beat cream cheese until smooth and creamy
- Add powdered sugar gradually
- Freeze filling for 30 minutes before use
Next, make the cookie dough. You’ll need a great red velvet base. Here’s a quick guide:
- Mix dry ingredients: flour, cocoa powder, salt
- Cream butter and sugars until light and fluffy
- Add buttermilk and vanilla extract
- Gradually incorporate dry ingredients
“Baking is an art that requires patience and precision” – Professional Baker’s Wisdom
To assemble your cookies, use a one-tablespoon scoop for the cream cheese and a two-tablespoon scoop for the dough. Place your cookie balls about 2 inches apart on a parchment-lined baking sheet.
Bake at 350°F for 15-17 minutes. Check at 10 minutes to make sure edges are firm and bottoms are golden. Let cookies cool on the baking sheet for 5 minutes before moving them to a wire rack.
Pro tip: For an extra touch, consider rolling your cookies in sanding sugar before baking for a crispy, sparkling finish!
Mastering the Cookie Assembly and Baking Process
Making the perfect cheesecake stuffed red velvet cookies needs precision and skill. Your baking journey will turn simple ingredients into tasty cookie cups. These will wow everyone at the table.
Creating these treats involves several key steps for the best results. Let’s look at the important techniques for assembling and baking your cookies.
Precise Dough Handling Techniques
Working with your red velvet cookie dough, consistency is essential. Use a #40 cookie scoop to portion exactly 21g of dough for each cookie. This ensures uniform size and even baking.
- Roll each dough portion in a mixture of granulated and confectioners’ sugar
- Space cookie dough balls 2 inches apart on the baking sheet
- Chill shaped dough for 15 minutes at 40°F before baking
Baking Temperature and Timing Guidelines
To get the perfect cream cheese frosting-filled cookie, baking is key. Set your oven to 350°F and follow these guidelines:
- Bake for 16-18 minutes
- Look for set edges with soft, gooey centers
- Ensure internal temperature reaches 175°F
Cooling and Setting Requirements
After baking, patience is key for your cookie cups. Let cookies cool on the baking sheet until set. This prevents breaking and keeps their delicate structure.
Pro tip: Transfer cookies to a wire rack only after they’ve cooled slightly on the baking sheet.
“Baking is an art, and these cookies are your masterpiece.” – Pastry Chef Secrets
With these techniques, you’ll make irresistible cheesecake stuffed red velvet cookies. They will become a family favorite!
Storage Tips and Creative Variations
Your cheesecake stuffed red velvet cookies are delightful treats that need care and creative presentation. Storing these cookies right is key to keeping their texture and taste perfect.
- Refrigerate in an airtight container for up to 5 days
- Place parchment paper between cookie layers to prevent sticking
- Maintain temperature around 40°F (4°C) for optimal freshness
Freezing your cookies can extend their delicious life even further. Wrap each cookie in plastic wrap before putting them in a freezer-safe container. Frozen cookies can stay fresh for up to 3 months.
“The secret to perfect cookie storage is protecting them from moisture and temperature fluctuations.” – Pastry Chef Expert
Get creative with your dessert recipe by exploring exciting variations:
- Add peppermint extract to the cream cheese filling for holiday flair
- Roll cookie edges in crushed nuts or colorful sprinkles
- Experiment with different food coloring for themed occasions
- Try white chocolate drizzle for extra decadence
When you’re ready to enjoy your frozen treats, thaw them in the fridge for several hours. This gentle thawing keeps them soft and flavorful.
Conclusion
Your journey into making cheesecake stuffed red velvet cookies is more than baking. You’ve learned to mix simple ingredients into amazing treats. These will wow your family and friends.
These cookies are great for any occasion. They mix cream cheese filling with rich red velvet dough perfectly. Each cookie has about 169 calories, making them a tasty and balanced snack.
Getting better at making these cookies takes practice. Try different chilling times and use Miyokos butter for a twist. Your baking will get better with each try.
We encourage you to share your cookie creations and tips. Start your baking journey with these cookies. It’s a delicious first step into making homemade treats.
FAQ
How long can I store cheesecake stuffed red velvet cookies?
Store them in an airtight container in the fridge for up to 5 days. For longer, freeze them for 3 months. Make sure they’re wrapped well in plastic wrap and in a freezer-safe container.
Can I make these cookies ahead of time?
Yes, you can! Prepare the dough and cream cheese filling ahead. The dough can chill for up to 3 days or freeze for 2 weeks. Just thaw it to room temperature before baking.
What type of food coloring works best for red velvet cookies?
Use professional-grade gel food coloring for a bright red color. It won’t change the cookie’s texture. Liquid food coloring can make the dough too thin, so gel is better.
Can I substitute ingredients in the cream cheese filling?
You can make some swaps, but it’s best to stick to the original recipe. Use full-fat cream cheese for the best texture. You can also swap powdered sugar with a sugar substitute. But, remember, different ingredients might change the taste and texture a bit.
Are these cookies difficult to make for beginners?
No, they’re not hard for beginners. Just follow the instructions carefully and make sure your ingredients are at the right temperature. Take your time with the assembly. With practice, you’ll get the hang of it.
How do I prevent my cookies from spreading too much during baking?
Chill the dough for at least 30 minutes before baking. Use a parchment-lined baking sheet and keep your butter cool. Also, preheat your oven correctly before baking.
Can I make these cookies gluten-free?
Yes, you can make them gluten-free. Use a gluten-free flour blend instead of all-purpose flour. If the blend doesn’t have xanthan gum, add it to help the ingredients stick together. The texture might be a bit different.
What’s the best way to store the cream cheese filling?
Keep it in an airtight container in the fridge for 3-4 days. Before using, let it come to room temperature and whisk it well to make it creamy again.
Source Links
- Red Velvet Cream Cheese Cookies
- Red Velvet Cream Cheese Cookies
- Red Velvet Oreo Cake Cookies
- Delicious Red Velvet Cookies – The Food Flamingo

Ingredients
For the Cookie Dough:
- 1 ½ cups (190 g) all-purpose flour
- ¼ cup (25 g) unsweetened cocoa powder
- 1 tsp baking powder
- ¼ tsp salt
- ½ cup (115 g) unsalted butter, softened
- ¾ cup (150 g) granulated sugar
- 1 large egg
- 1 tsp vanilla extract
- 1 tsp red gel food coloring
- ½ cup (90 g) white chocolate chips (plus extra for topping)
For the Cheesecake Filling:
- 8 oz (225 g) cream cheese, softened
- ¼ cup (30 g) powdered sugar
- ½ tsp vanilla extract
Instructions
- Prepare the Cheesecake Filling:
- In a medium bowl, beat the cream cheese, powdered sugar, and vanilla extract until smooth.
- Scoop out 12 small spoonfuls of the mixture onto a lined baking sheet and freeze for at least 1 hour.
- Make the Cookie Dough:
- In a medium bowl, whisk together flour, cocoa powder, baking powder, and salt. Set aside.
- In a large bowl, cream the softened butter and sugar until light and fluffy.
- Add the egg, vanilla extract, and red food coloring. Mix until well combined.
- Gradually add the dry ingredients to the wet ingredients, mixing until a soft dough forms. Fold in the white chocolate chips.
- Assemble the Cookies:
- Preheat your oven to 350°F (175°C) and line two baking sheets with parchment paper.
- Divide the dough into 12 equal portions. Flatten each piece into a disk and place a frozen cheesecake ball in the center.
- Wrap the dough around the filling, ensuring it is completely sealed. Roll gently into a ball.
- Bake the Cookies:
- Place the cookie dough balls on the prepared baking sheets, spacing them about 2 inches apart.
- Press a few extra white chocolate chips on top of each cookie for decoration.
- Bake for 10-12 minutes, or until the edges are set but the centers are still soft.
- Cool and Serve:
- Allow the cookies to cool on the baking sheets for 5 minutes, then transfer them to a wire rack to cool completely.
- Serve warm or at room temperature for the ultimate gooey treat.
Notes
- For a brighter red hue, use gel food coloring instead of liquid.
- Ensure the cheesecake filling is fully frozen before assembling to avoid it melting during baking.
- Store cookies in an airtight container in the refrigerator for up to 5 days. Reheat briefly in the microwave for a gooey center.