

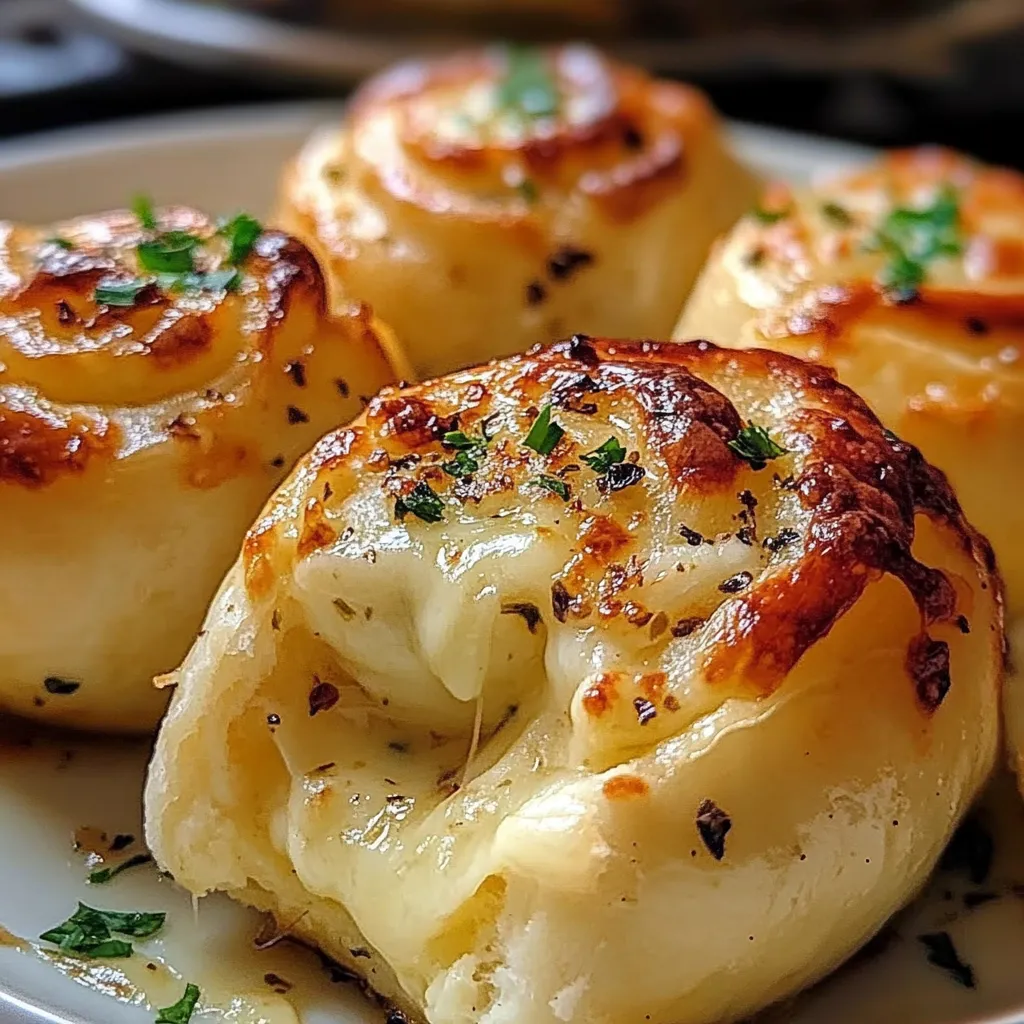
This irresistible Cheese-Stuffed Garlic Rolls recipe transforms simple ingredients into a showstopping side dish with its golden-brown exterior and dramatic cheese pulls that stretch with every bite. The rolls feature a perfect harmony of soft, pillowy dough encasing a molten cheese center that oozes deliciously when pulled apart. Each roll is topped with a savory garlic butter glaze that caramelizes during baking, creating a beautifully burnished crust. Fresh herbs sprinkled on top add a pop of color and bright flavor that contrasts with the rich, savory base. Every mouthful delivers the comforting combination of freshly baked bread and gooey melted cheese—a universally beloved pairing that satisfies deep cravings while exuding homemade warmth and care. Finished with a light dusting of herbs that adds visual appeal and aromatic complexity, these rolls exemplify indulgent comfort food at its finest—ideal for family dinners, holiday tables, or whenever you desire a bread basket option that doubles as a conversation-starting centerpiece.
Why You’ll Love This Recipe
- Show-stopping presentation: Creates dramatic cheese pulls that impress at any table
- Family favorite: Appeals to both adults and children with familiar, comforting flavors
- Make-ahead convenience: Can be prepared in advance and baked just before serving
- Versatile accompaniment: Pairs beautifully with soups, salads, pasta dishes, and more
- Customizable: Easily adapts to different cheese varieties and herb combinations
- Special occasion worthy: Elevates everyday dinners to memorable meals
- Crowd-pleaser: Guaranteed to disappear quickly at gatherings and potlucks
- Shareable fun: Interactive food that encourages communal dining experiences
- Simple ingredients: Creates spectacular results with everyday pantry staples
- Comforting classic: Satisfies cravings for both bread and cheese in one delightful package
Ingredients
For the Dough
- All-purpose flour – Creates the structured yet tender base for the rolls
- Active dry yeast – Provides leavening for soft, airy texture
- Warm milk – Activates yeast and creates rich flavor in the dough
- Granulated sugar – Feeds yeast and adds subtle sweetness to balance savory elements
- Butter – Enriches dough texture and contributes to golden color
- Eggs – Adds richness and helps create tender dough structure
- Salt – Enhances flavor and controls yeast activity
For the Cheese Filling
- Mozzarella cheese – Creates those perfect, Instagram-worthy cheese pulls
- Low-moisture string cheese – Alternative option that melts beautifully
- Provolone cheese – Optional addition for more complex flavor
- Cream cheese – Creates creaminess that complements stretchy mozzarella
- Italian blend cheese – Adds flavor complexity beyond mozzarella alone
For the Garlic Butter Topping
- Unsalted butter – Forms the rich base of the topping
- Fresh garlic – Provides aromatic flavor and savory depth
- Italian seasoning – Adds herbal complexity and aroma
- Salt – Enhances all other flavors in the topping
- Parsley – Creates fresh color contrast and subtle flavor
Optional Add-ins
- Parmesan cheese – Adds nutty, salty notes to the topping
- Red pepper flakes – Creates gentle heat that balances richness
- Fresh herbs – Incorporate rosemary, thyme, or basil for aromatic variations
- Roasted garlic – Offers sweeter, more mellow garlic flavor
- Sun-dried tomatoes – Adds tangy bursts of flavor when finely chopped and sprinkled inside
- Pesto – Creates flavor swirls when lightly brushed inside dough before adding cheese
- Everything bagel seasoning – Provides crunchy texture and savory flavor on top
Step-by-Step Instructions
Preparing the Dough
Begin by activating the yeast in warm milk (105-110°F) with a teaspoon of sugar. Allow it to sit for 5-10 minutes until foamy and fragrant, indicating active yeast ready to work its magic.
In a large bowl or stand mixer fitted with a dough hook, combine 4 cups of all-purpose flour with 2 tablespoons of sugar and 1 teaspoon of salt, mixing to distribute the dry ingredients evenly.
Add 2 eggs, 4 tablespoons of melted and cooled butter, and the activated yeast mixture to the dry ingredients. The eggs add richness while butter contributes tenderness to the final product.
Mix until a shaggy dough forms, then knead—either by machine for 5-7 minutes or by hand for 8-10 minutes—until the dough becomes smooth, elastic, and slightly tacky but not sticky. The proper kneading develops gluten, which gives the rolls their perfect texture.
Transfer the dough to a lightly oiled bowl, turning once to coat the surface with oil to prevent drying. Cover with plastic wrap or a damp kitchen towel.
Allow the dough to rise in a warm, draft-free place for 1 to 1.5 hours, or until doubled in size. This slow fermentation develops flavor and creates the airy texture essential for perfect rolls.
Shaping the Cheese-Stuffed Rolls
Once the dough has doubled, gently punch it down to release excess air bubbles. This prevents large air pockets that might separate the cheese from the dough during baking.
Transfer to a lightly floured surface and divide into 12-16 equal portions, depending on your preferred roll size. For consistent rolls, use a kitchen scale to weigh each portion.
Flatten each dough piece into a disk approximately 3-4 inches in diameter, creating a platform for the cheese filling. The center should be slightly thinner than the edges to accommodate the cheese.
Place a cube or stick of mozzarella (about 1 ounce) in the center of each dough disk. For the best cheese pulls, use low-moisture mozzarella or string cheese cut into portions.
Carefully fold the edges of the dough up and around the cheese, pinching firmly to seal completely. This tight seal prevents cheese from leaking during baking.
Roll each stuffed dough ball between your palms to create a smooth surface, then place seam-side down in a greased baking dish. Arrange the rolls with slight space between them—close enough to support each other as they rise but not so tight that they merge completely.
Cover the arranged rolls and allow them to rise again for 30-45 minutes, until puffy and nearly doubled. This second rise creates the light, airy texture that contrasts beautifully with the molten cheese center.
Creating the Garlic Butter Topping
While the rolls undergo their second rise, prepare the garlic butter topping that will create the irresistible golden crust and aromatic flavor.
In a small saucepan, melt 6 tablespoons of butter over medium-low heat, being careful not to brown it.
Add 4 cloves of minced garlic to the melted butter and cook gently for 1-2 minutes until fragrant but not browned. Browning the garlic can create bitter notes, so gentle heating is key.
Remove from heat and stir in 1 teaspoon of Italian seasoning and ½ teaspoon of salt, allowing the warm butter to bloom the dried herbs and extract their essential oils.
Let the mixture cool slightly before using, which prevents it from being absorbed too quickly into the dough. The butter should be warm and fluid but not hot enough to damage the risen dough.
Baking the Rolls
Preheat your oven to 375°F (190°C) to ensure it reaches the proper temperature for beautifully browned rolls with perfectly melted centers.
Just before baking, brush the risen rolls generously with half of the prepared garlic butter mixture, making sure to get some of the garlic and herb pieces onto each roll.
Bake in the preheated oven for 20-25 minutes, until the tops are deeply golden brown and the rolls have expanded. The internal temperature should reach approximately 190°F when tested with an instant-read thermometer.
For an extra golden finish, brush rolls with remaining garlic butter halfway through baking. This creates layers of flavor and helps achieve that picture-perfect bronzed appearance.
Once baked to perfection, remove from the oven and immediately brush with the remaining garlic butter mixture. The hot rolls will absorb the flavorful butter, creating an irresistible aroma and glistening appearance.
Sprinkle freshly chopped parsley over the hot rolls for a pop of color and fresh flavor that contrasts beautifully with the rich, buttery rolls.
Allow the rolls to cool for just 5-7 minutes before serving—enough time for them to set slightly but still maintain that perfect molten cheese center that stretches dramatically when pulled apart.
Serving
For maximum impact, serve these rolls while still warm, when the cheese is at its most stretchy and dramatic. The visual appeal of the cheese pull is part of what makes these rolls so special.
Pull rolls apart gently to reveal the stretchy cheese centers—this interactive element makes them particularly fun at the dinner table.
For special occasions, consider serving the entire baking dish at the table, allowing guests to experience the theatrical cheese pulls firsthand.
These rolls pair perfectly with marinara or pizza sauce for dipping, adding another dimension of flavor to the experience.
Complete the meal by serving alongside Italian dishes like lasagna or spaghetti, or with soups and stews that benefit from a hearty bread accompaniment.
Pro Tips
- Use bread flour instead of all-purpose for a chewier texture with even better cheese pulls
- Chill the cheese briefly in the freezer before stuffing for easier handling and less leakage
- Add a pinch of garlic powder to the dough itself for layered garlic flavor throughout
- Brush the baking dish with olive oil instead of greasing for a subtly different flavor profile
- For the best seal, moisten the edges of the dough with a little water before pinching closed
- Arrange rolls in a circular pattern in a round pan for an impressive pull-apart bread effect
- Use dental floss to cut the dough into equal portions cleanly without compression
- Proof the dough in a slightly warm oven (turned off) with a pan of water for perfect rising conditions
- Add a tablespoon of vital wheat gluten to the dough for extra-fluffy results
- Dust your work surface with semolina flour instead of all-purpose for a subtle texture enhancement
- For extra richness, add a tablespoon of milk powder to the dry ingredients
- Brush the dough balls with egg wash before the first butter application for additional shine
- Sprinkle sesame seeds or poppy seeds along with herbs for added texture and visual interest
- For a softer crust, cover rolls with foil for the first 15 minutes of baking
- Allow all refrigerated ingredients to come to room temperature before mixing for the most consistent dough
- Use cubed rather than shredded cheese for more dramatic cheese pulls
- Create an herbs de Provence butter variation by substituting the herb blend for Italian seasoning
- Rest the dough for 10 minutes after punching down before shaping for easier handling
- Place a pan of water on the bottom rack of the oven while baking for extra-soft rolls
- For brunch variations, add cooked bacon bits or breakfast sausage along with the cheese filling
Variations and Creative Ideas
Flavor Variations
Mediterranean Style: Add crumbled feta cheese along with the mozzarella, mix oregano and lemon zest into the butter topping, and sprinkle with fresh dill after baking.
Mexican Inspiration: Use pepper jack or Oaxaca cheese for filling, add taco seasoning to the dough, and finish with cilantro and lime zest in the butter topping.
Sweet Cinnamon Roll Hybrid: Fill with cream cheese mixed with a touch of sugar, and brush with cinnamon-butter instead of garlic butter for a sweet-savory fusion.
Pizza Rolls: Mix pepperoni pieces and Italian seasoning into the cheese filling, brush with butter mixed with pizza sauce, and serve with additional warm marinara.
Cheese Combinations
Triple Cheese Blend: Combine equal parts mozzarella, provolone, and fontina for complex flavor and excellent melting properties.
Blue Cheese Accent: Add a small amount of crumbled blue cheese to the center along with mozzarella for a flavor punch that’s sophisticated and unexpected.
Smoked Cheese Option: Use smoked mozzarella or gouda for a distinctive flavor profile that adds depth and complexity.
Herb-Infused Cheese: Mix fresh herbs directly into softened cream cheese before combining with mozzarella for the filling.
Structural Variations
Mini Versions: Make bite-sized rolls perfect for appetizers or party trays using smaller portions of dough and cheese.
Braided Loaf: Instead of individual rolls, create a braided loaf with cheese stuffed between the strands for a show-stopping centerpiece.
Muffin Tin Method: Bake individual rolls in a muffin tin for more consistent sizing and easier portioning.
Stuffed Focaccia Style: Press all the dough into a sheet pan, add cheese pockets throughout, then dimple the surface for a focaccia-inspired variation.
Topping Alternatives
Honey Butter Glaze: Replace some or all of the garlic with honey for a sweet-savory finish that’s especially appealing to children.
Herb Garden Medley: Create a fresh herb butter using whatever is abundant in your garden—chives, basil, rosemary, and thyme make excellent combinations.
Spicy Chili Oil: Drizzle finished rolls with homemade chili oil for heat that contrasts beautifully with the cheese.
Caramelized Onion Topping: Spread a thin layer of caramelized onions over the rolls before the final brush of butter for sweet depth.
Storage and Make-Ahead Advice
Complete Dish Storage:
- Store leftover rolls in an airtight container in the refrigerator for up to 3 days.
- The cheese will solidify when cold but will become stretchy again when reheated properly.
- For best texture, store rolls separated by parchment paper to prevent sticking.
Reheating Guidelines:
- Reheat individual rolls in the microwave for 15-20 seconds for quickest results.
- For better texture, reheat in a 350°F oven for 5-7 minutes, tented with foil to prevent drying.
- Add a light brush of fresh butter after reheating to restore the glossy appearance.
- For crispy exteriors, finish reheated rolls under the broiler for 1 minute, watching carefully.
Make-Ahead Strategy:
- Prepare the dough and complete the first rise, then refrigerate for up to 24 hours to develop flavor.
- Shape and stuff rolls, then refrigerate overnight covered tightly with plastic wrap.
- Allow refrigerated rolls to come to room temperature and complete their second rise before baking.
- Freeze unbaked, shaped rolls on a baking sheet, then transfer to a freezer bag for up to 1 month.
- When ready to bake from frozen, thaw in the refrigerator overnight, then allow to rise at room temperature before baking.
Freezing Guidelines:
- Fully baked rolls can be frozen for up to 2 months in an airtight container.
- Freeze individual rolls rather than the entire batch for easier portioning later.
- Thaw frozen rolls in the refrigerator overnight for best texture.
- Reheat thawed rolls in a 350°F oven for 10 minutes until warmed through.
- Consider slightly underbaking rolls destined for the freezer by 2-3 minutes, then finish baking when reheating.
Party Prep Tips:
- Complete all steps up to the second rise, then refrigerate rolls up to 8 hours before your event.
- Remove from refrigerator 1-2 hours before baking to complete the rise at room temperature.
- Prepare the garlic butter in advance and reheat gently before brushing on rolls.
- Keep warm after baking by wrapping the serving dish in foil and a thick kitchen towel.
Kid-Friendly Involvement
This approachable recipe offers several opportunities for children to participate in the kitchen:
Punching the Dough: Kids love the tactile experience of punching down risen dough—a perfect safe outlet for energy.
Shaping Cheese Balls: Children can help flatten dough pieces and wrap them around cheese, using their natural play instincts.
Butter Brushing: With supervision, kids can brush the butter mixture onto the rolls before baking.
Cheese Selection: Let children choose which cheeses to incorporate, fostering investment in the final product.
Seasoning Sprinkles: Allow kids to sprinkle herbs on top of the finished rolls like “food confetti.”
Rolling Competitions: Turn dough shaping into a game of who can make the roundest ball.
Science Lesson: Use this recipe to teach about yeast as a living organism and the science of bread rising.
Naming Creation: Involve children by letting them name their special version of the rolls based on ingredients they helped add.
Frequently Asked Questions
Why did my cheese leak out during baking? The most common reason is inadequate sealing of the dough around the cheese. Make sure to pinch the dough firmly and roll it between your palms to strengthen the seal. Using very cold cheese can also help, as it melts more slowly during baking, giving the dough time to set before the cheese liquefies completely.
Can I use pre-made dough to save time? Absolutely! Store-bought pizza dough or frozen bread dough works well as a shortcut. Let it come to room temperature according to package directions before proceeding with the stuffing steps. The flavor won’t be quite as rich as homemade, but the convenience makes this a practical weeknight option.
My dough didn’t rise properly—what went wrong? Check that your yeast is fresh and active by ensuring it foams in the warm milk step. If using instant yeast, it can be added directly to the flour. The environment might also be too cold—try creating a warm spot by turning your oven on low for 1-2 minutes, then turning it off and placing the covered dough inside to rise.
What’s the best cheese for maximum stretch? Low-moisture mozzarella or string cheese provides the best stretchy quality. Fresh mozzarella contains too much moisture and can make the rolls soggy. For even better results, combine mozzarella with a small amount of fontina or provolone, which melt beautifully while adding more flavor than mozzarella alone.
How can I prevent my garlic from burning in the butter? Cook the garlic on very low heat just until fragrant but not colored, which takes only 1-2 minutes. Alternatively, add the minced garlic directly to the warm melted butter without cooking and let it infuse as the butter cools slightly—the residual heat will release the garlic flavor without risking bitter burnt notes.
Can I make these dairy-free? Yes, though the cheese pull effect will be different. Use a plant-based butter alternative for the dough and topping, and dairy-free milk such as almond or oat milk for the dough. For the filling, several brands now make vegan mozzarella alternatives that melt relatively well, though they won’t stretch quite like traditional mozzarella.

Ingredients
For the Dough:
- 4 cups all-purpose flour
- 2¼ teaspoons (1 packet) active dry yeast
- 1 cup warm milk (105-110°F)
- 2 tablespoons granulated sugar
- 1 teaspoon salt
- 2 large eggs, room temperature
- 4 tablespoons unsalted butter, melted and cooled
For the Cheese Filling:
- 12-16 ounces mozzarella cheese, cut into 1-inch cubes or sticks
- Optional: 4 ounces cream cheese, softened (for creamier filling)
For the Garlic Butter Topping:
- 6 tablespoons unsalted butter
- 4 cloves garlic, minced
- 1 teaspoon Italian seasoning
- ½ teaspoon salt
- 2 tablespoons fresh parsley, chopped
Instructions
- Activate yeast in warm milk with a teaspoon of sugar until foamy, about 5-10 minutes.
- Combine flour, remaining sugar, and salt in a large bowl.
- Add eggs, melted butter, and yeast mixture; mix until a soft dough forms.
- Knead for 5-8 minutes until smooth and elastic.
- Place in oiled bowl, cover, and let rise 1-1.5 hours until doubled.
- Punch down dough and divide into 12-16 equal pieces.
- Flatten each piece, place cheese cube in center, and seal edges tightly.
- Arrange in greased baking dish, cover, and let rise 30-45 minutes.
- Preheat oven to 375°F (190°C).
- Prepare garlic butter by melting butter with garlic, herbs, and salt.
- Brush rolls with half the butter mixture.
- Bake for 20-25 minutes until golden brown.
- Brush hot rolls with remaining butter and sprinkle with parsley.
- Let cool 5-7 minutes before serving warm.
Notes
- Use block cheese and cut it yourself rather than pre-shredded for better melting
- For extra flavor infusion, let the garlic butter sit for 30 minutes before using
- Slightly warm your mixing bowl before making the dough for better yeast activation
- If your kitchen is cold, create a proofing box by placing a pan of hot water in the oven (turned off) with the dough
- Use weight measurements rather than volume for the most consistent results
- Add 1 tablespoon of vital wheat gluten for extra-fluffy rolls if available
- Brush the bowl with olive oil instead of vegetable oil for a subtle flavor enhancement
- Score a small X on top of each roll before baking to allow steam to escape and prevent bursting
- Place a small pan of water on the bottom rack of the oven while baking for bakery-style crust
- For picture-perfect presentation, arrange rolls in a circular pattern in a round pan
- Let the dough rest for 5 minutes after dividing but before shaping for easier handling
- Use a digital scale to ensure each dough portion is exactly the same size
- Dust your hands with olive oil instead of flour when shaping to prevent drying the dough
- For food safety, wash your hands thoroughly after handling raw dough containing eggs
- Create a parchment paper sling in your baking dish for easier removal of the entire batch
- Substitute some bread flour for all-purpose if you have it for enhanced structure
- If your oven runs hot, place the baking dish on the middle rack rather than the top rack
- For an extra-golden finish, add a tablespoon of honey to the butter mixture
- Always cool the melted butter slightly before adding eggs to prevent cooking them
- Reserve a small portion of cheese to sprinkle between rolls just before baking for extra cheese pull moments