
")
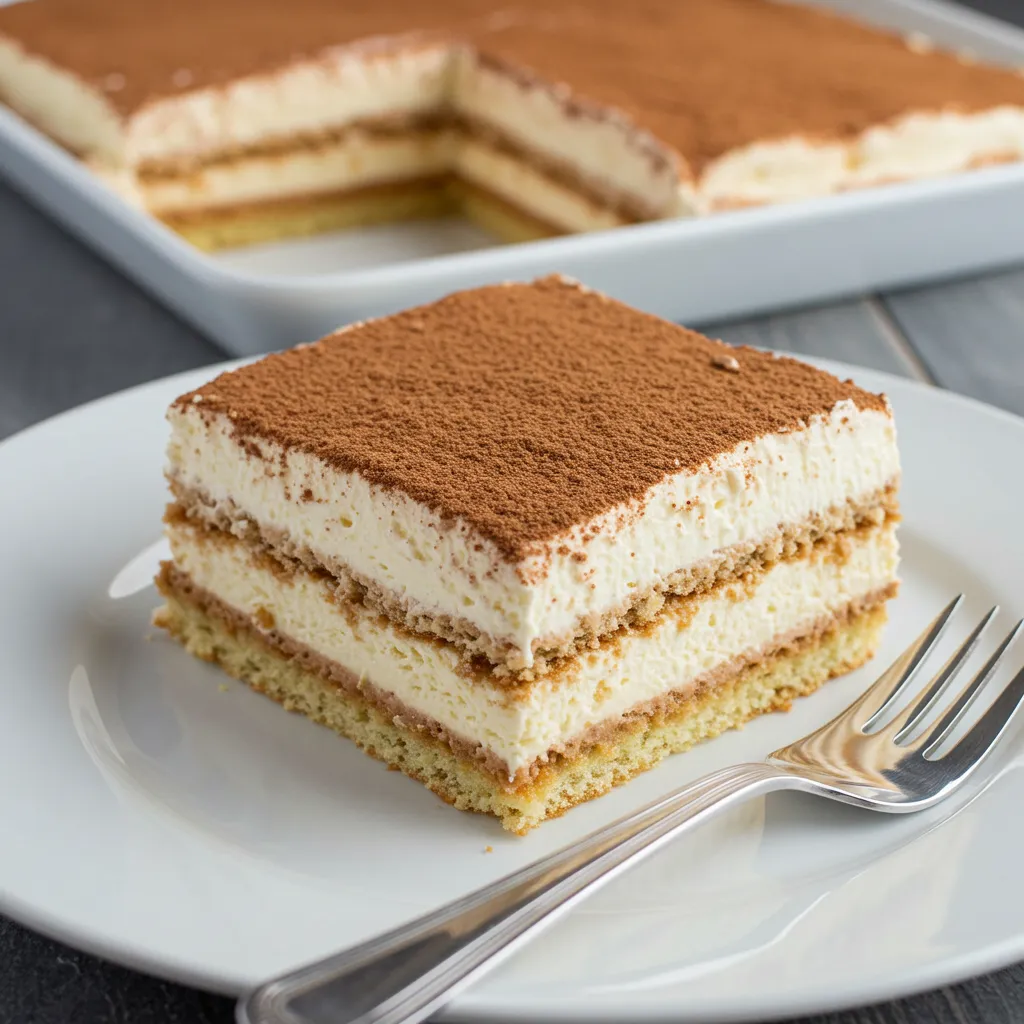
This elegant Cappuccino Icebox Cake transforms simple ingredients into a sophisticated dessert that captures the beloved flavors of your favorite coffee shop drink. Layers of delicate cookies soften between clouds of coffee-infused cream, creating a dessert that’s simultaneously light and indulgent. The beauty of this no-bake wonder is that it improves as it chills, making it the perfect make-ahead dessert for any occasion from casual gatherings to elegant dinner parties.
Why You’ll Love This Recipe
- No baking required: Perfect for hot weather or when you don’t want to use the oven
- Make-ahead convenience: Actually improves when prepared a day in advance
- Sophisticated flavor: Delivers coffee-shop taste in dessert form
- Simple ingredients: Uses readily available components for a gourmet result
- Impressive presentation: Looks like you spent hours, when assembly takes minutes
Ingredients
For the Coffee Cream Layers
- Heavy whipping cream – Creates the light, airy texture that defines this dessert
- Mascarpone cheese – Adds richness and stability to the whipped cream layers
- Powdered sugar – Sweetens without the grittiness of granulated sugar
- Instant espresso powder – Provides intense coffee flavor without adding excess liquid
- Vanilla extract – Enhances and rounds out the coffee notes
- Salt – A small pinch balances the sweetness and intensifies flavor
For the Cake Layers
- Graham crackers or tea biscuits – Form the “cake” layers that soften in the cream
- Coffee liqueur (optional) – Adds depth of flavor and helps soften the cookies
For the Topping
- Cocoa powder – Creates the classic cappuccino dusting
- Cinnamon – Adds warmth and complexity to the flavor profile
- Chocolate shavings (optional) – For an elegant decorative touch
Step-by-Step Instructions
Preparing the Coffee Cream
Begin by placing a large mixing bowl and beaters in the refrigerator for about 15 minutes. This chilling step is crucial for achieving the perfect whipped cream texture, as cold equipment helps the cream whip up faster and with more volume. Meanwhile, allow 8 ounces of mascarpone cheese to come to room temperature, which ensures it will blend smoothly without lumps.
In your chilled bowl, pour 2 cups of cold heavy whipping cream and begin beating on medium speed. When the cream starts to thicken slightly, gradually add 1 cup of powdered sugar while continuing to beat. The slow addition prevents clumps and ensures even sweetness throughout. Once incorporated, add 2-3 tablespoons of instant espresso powder (adjust according to your preference for coffee intensity), 1 teaspoon of vanilla extract, and a pinch of salt.
Continue beating until the mixture reaches soft peaks, then add the room-temperature mascarpone cheese. Beat on medium speed just until stiff peaks form and the mixture is smooth and stable. Be careful not to overbeat at this stage, as the mascarpone can cause the mixture to become grainy if mixed too vigorously. The ideal texture should be thick and spreadable, holding its shape when the beater is lifted.
For a more complex flavor profile, you can incorporate 2 tablespoons of coffee liqueur such as Kahlúa at this stage. This optional addition enhances the coffee notes and adds a subtle depth to the dessert. If you prefer to keep the dessert alcohol-free, you can substitute with 2 tablespoons of strongly brewed coffee that has been cooled to room temperature.
Assembling the Layers
Select a rectangular dish approximately 9×13 inches in size. Glass or ceramic works best as it allows you to see the beautiful layers. There’s no need to grease the dish, as the high fat content in the cream prevents sticking. Begin the assembly by arranging a single layer of graham crackers or tea biscuits on the bottom of the dish, breaking pieces as needed to create a complete layer that covers the entire surface.
If you’ve opted to use coffee liqueur, lightly brush each cookie layer with a small amount before adding the cream. This step isn’t strictly necessary but adds moisture and intensifies the coffee flavor throughout the dessert. For a non-alcoholic alternative, you can use a light brushing of strong, cooled coffee.
Using a spatula, spread approximately one-quarter of the coffee cream mixture evenly over the first layer of cookies. The layer should be about half an inch thick. Take care to spread it all the way to the edges to ensure every bite contains the perfect balance of cream and cookies. Place another layer of cookies on top of the cream, arranging them in the same pattern as the first layer.
Continue this pattern of alternating cookies and cream, finishing with a cream layer on top. Depending on the exact size of your dish and thickness of your layers, you should have about 3-4 layers of cookies and 4-5 layers of cream. The top cream layer should be slightly thicker than the interior layers for an attractive presentation.
Cover the dish carefully with plastic wrap, taking care not to let it touch the surface of the cream. Refrigerate for at least 6 hours, but preferably overnight. This resting period is essential, as it allows the cookies to absorb moisture from the cream and soften to a cake-like consistency. The flavors also meld and develop during this time, resulting in a more cohesive and complex taste.
Final Touches and Presentation
Just before serving, prepare the signature cappuccino topping. In a small bowl, combine 2 tablespoons of cocoa powder with 1 teaspoon of ground cinnamon. Using a fine-mesh sieve, dust this mixture evenly over the top of the cake, creating the classic cappuccino appearance. For an even more authentic look, you can use a cappuccino stencil to create a decorative pattern.
For an extra touch of elegance, add chocolate shavings on top. These can be made by using a vegetable peeler along the edge of a bar of high-quality dark chocolate. The warmth of your hand will slightly melt the chocolate, creating beautiful curls that add dimension and sophistication to the presentation.
To serve, cut the cake into squares with a sharp knife, wiping the blade clean between cuts for the neatest presentation. If you’ve used a glass dish, the sides will reveal the beautiful layering, adding to the visual appeal. For the cleanest cuts, dip your knife in hot water and dry it between slices.
This dessert is best served chilled but not ice-cold, so remove it from the refrigerator about 15 minutes before serving to allow the flavors to fully develop. The contrast between the soft, cake-like cookies and the airy, coffee-infused cream creates a textural experience that perfectly complements the rich flavor profile.
Pro Tips
- For the most stable whipped cream, use heavy cream with at least 36% fat content
- Chill your bowl and beaters before whipping cream for maximum volume
- Quality matters – use fresh mascarpone and good-quality espresso powder
- For clean slices, dip your knife in hot water between cuts
- Allow the dessert to sit at room temperature for 15 minutes before serving for the best flavor
Storage and Make-Ahead Advice
One of the greatest advantages of this Cappuccino Icebox Cake is that it’s specifically designed to be made ahead of time. In fact, it requires at least 6 hours of refrigeration to allow the cookies to soften and the flavors to develop, making it an ideal dessert for busy hosts. For optimal texture and flavor, prepare this dessert 12-24 hours before serving.
Once assembled, the icebox cake can be refrigerated for up to 3 days while maintaining excellent quality. The cookies will continue to soften slightly over time, but the structure will remain intact thanks to the stabilizing properties of the mascarpone cheese in the whipped cream.
If you need to prepare even further in advance, you can freeze the assembled cake before adding the cocoa/cinnamon topping. Wrap it well with plastic wrap followed by aluminum foil and freeze for up to 1 month. Thaw overnight in the refrigerator, then add the cocoa dusting just before serving.
For serving a smaller household, consider dividing the recipe between two smaller dishes. Enjoy one immediately and freeze the other for later enjoyment. Individual portions can also be assembled in small ramekins or glasses for an elegant presentation that’s perfectly portioned.
Customization Ideas
The beauty of this icebox cake is its adaptability to various flavor preferences and dietary needs. For a mocha variation, add 2 tablespoons of unsweetened cocoa powder to the cream mixture and increase the powdered sugar by 2 tablespoons to balance the bitterness. Chopped chocolate can also be sprinkled between the layers for pockets of intensity.
For a seasonal twist, consider adding a teaspoon of pumpkin pie spice to the cream mixture in fall, or a drop of peppermint extract during the winter holidays. A crushed candy cane topping can replace the cocoa dusting for a festive presentation.
Those avoiding caffeine can substitute the espresso powder with decaffeinated coffee or even chicory coffee alternative for a similar flavor profile without the stimulant effects.
For a dairy-free version, substitute the heavy cream with full-fat coconut cream (chilled overnight in the refrigerator) and use a plant-based cream cheese alternative in place of the mascarpone. While the texture will be slightly different, the result will still be delicious.
To accommodate various dietary restrictions, this recipe works well with gluten-free graham crackers or tea biscuits for those avoiding wheat. For a less sweet version, reduce the powdered sugar by up to half and intensify the coffee notes instead.
Special Technique: Perfect Whipped Cream Stability
What separates an exceptional icebox cake from a mediocre one is the stability of the whipped cream layers. Professional pastry chefs employ several techniques to ensure their cream maintains its structure over time without weeping or deflating.
The incorporation of mascarpone cheese is the primary stabilizer in this recipe. Unlike other stabilizing agents that can affect flavor, mascarpone adds richness while providing structural integrity. The key is proper temperature management – the mascarpone should be soft enough to incorporate smoothly, but not so warm that it melts the fat in the whipped cream.
Another professional technique is the controlled addition of powdered sugar. Beyond sweetening, the cornstarch present in powdered sugar helps absorb excess moisture, preventing the cream from weeping during extended refrigeration. This is why powdered sugar is preferred over granulated sugar in this application.
For those seeking additional stability, particularly in warmer environments, pastry chefs sometimes add a small amount of unflavored gelatin to the cream. This can be done by blooming 1 teaspoon of powdered gelatin in 1 tablespoon of cold water, then gently warming it until dissolved before gradually incorporating it into the partially whipped cream.
The temperature during assembly is also critical. Professional kitchens maintain a cool environment when working with whipped cream desserts. If your kitchen is warm, consider working in batches, keeping the cream mixture refrigerated between layers, and chilling the dish briefly between stages of assembly.
Finally, the method of spreading each layer affects the final texture. Rather than stirring or aggressively spreading the cream, which can deflate its volume, professionals use a gentle offset spatula technique, lightly depositing the cream and then smoothing it with minimal pressure in one direction only.
Frequently Asked Questions
Can I use regular instant coffee instead of espresso powder? Yes, though the flavor won’t be as intense. If using instant coffee, increase the amount by about 25% and consider selecting a dark roast variety for stronger flavor.
My cream became grainy when I added the mascarpone. What happened? This typically occurs when the mascarpone is too cold or when the mixture is overbeaten. Next time, ensure your mascarpone is at room temperature and beat just until stiff peaks form, no longer.
Can I make this in a different sized dish? Absolutely! Adjust the number of layers to suit your dish depth. A deeper dish might accommodate more layers, while a shallow dish may only allow for two or three. The key is to finish with a cream layer on top.
What can I substitute for mascarpone cheese? Cream cheese is the closest substitute, though it’s tangier than mascarpone. To make it work, beat room temperature cream cheese with 2 tablespoons of heavy cream and an extra tablespoon of sugar until very smooth before adding to the whipped cream.
How do I know when the cake is ready to serve? The cake is ready when the cookie layers have softened completely. Test by inserting a toothpick – it should go through the layers smoothly, without resistance from firm cookies.
")