
")
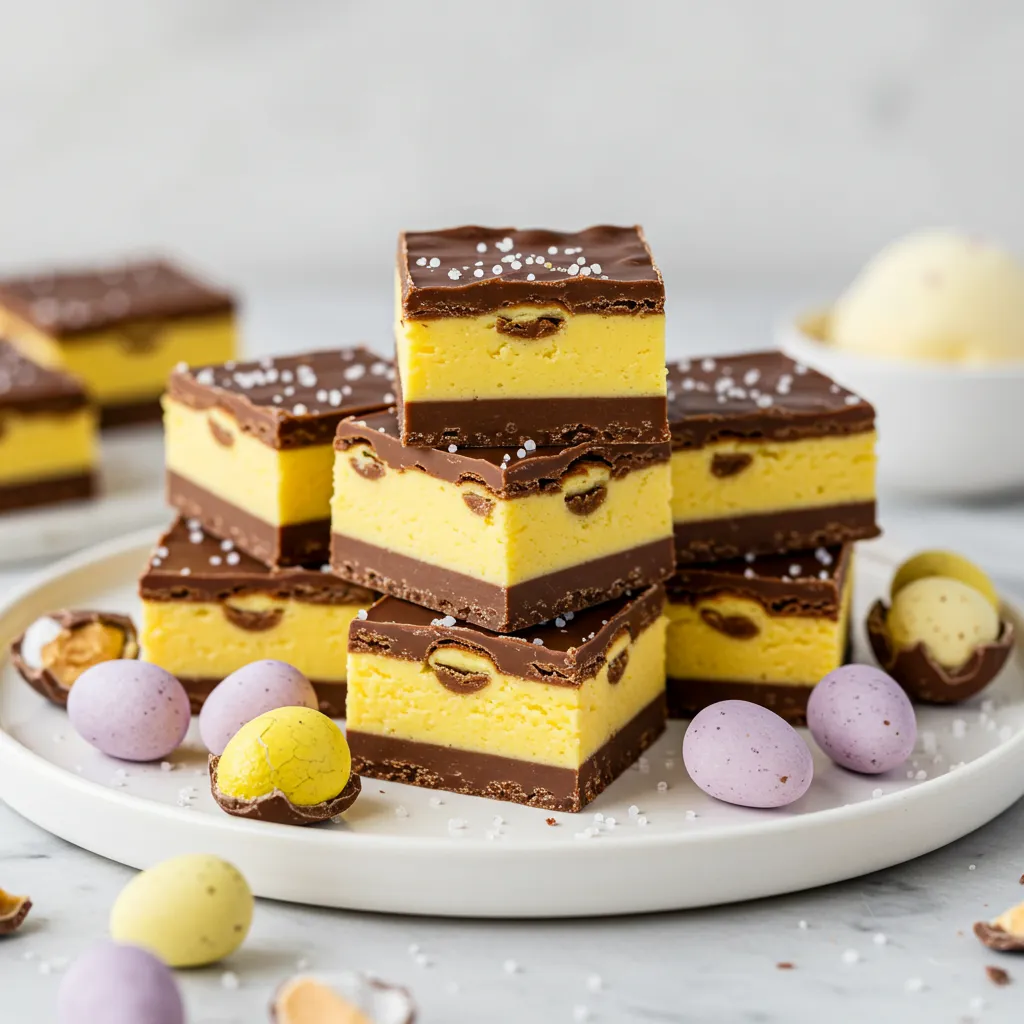
This Cadbury Egg Fudge is an irresistible treat that combines the melt-in-your-mouth texture of traditional fudge with the iconic flavors of Cadbury cream eggs. With its distinct layers of milk chocolate and creamy yellow filling, this dessert is sure to impress and delight all sweet lovers. Perfect for Easter celebrations or any special occasion, this simple recipe transforms a beloved British classic into a homemade delight that everyone will want to taste.
Why You’ll Love This Recipe
- Perfectly recreates the iconic flavor of Cadbury eggs in fudge form
- Spectacular presentation with distinct layers that will impress your guests
- More economical than buying specialty chocolate boxes
- Keeps well and can be prepared several days in advance
- Perfect as a homemade gourmet gift in a pretty box
Ingredients
For the Chocolate Layer
- Milk chocolate – Forms the melt-in-your-mouth base that replicates the coating of Cadbury eggs
- Sweetened condensed milk – Creates the smooth and melt-in-the-mouth texture characteristic of fudge
- Butter – Adds richness and creaminess while helping achieve the perfect texture
- Vanilla extract – Enhances the chocolate notes with its aromatic warmth
- Salt – Balances the sweetness and intensifies the chocolate flavors
For the “Egg Cream” Layer
- White chocolate – Serves as a creamy base to recreate the center of Cadbury eggs
- Sweetened condensed milk – Ensures the melting and creamy texture of the filling
- Yellow food coloring – Reproduces the characteristic color of the center of Cadbury eggs
- Vanilla extract – Brings the subtle aromatic note present in the original cream
- Butter – Contributes to the silky texture and richness of the filling
For Decoration (Optional)
- Mini Cadbury eggs – Add a festive touch and reinforce the theme
- Powdered sugar – Creates an elegant dusted effect that softens the visual appearance
- Chocolate sprinkles – Provide a contrasting texture and a decorative element
Step-by-Step Instructions
Preparing the Pan
Start by preparing an 8-inch (20 cm) square pan by lining it with parchment paper, leaving the paper overhanging on the sides to facilitate later removal. This step is crucial as fudge tends to stick, and proper pan preparation will save you frustration when unmolding. For optimal results, lightly grease the parchment paper with a little butter or neutral oil. This will allow the fudge to detach easily once solidified. If you don’t have a square pan, you can use a rectangular pan of similar size, which will simply give you squares of slightly different proportions.
Preparing the Chocolate Layer
In a thick-bottomed saucepan, combine the milk chocolate broken into pieces, half of the sweetened condensed milk, and a tablespoon of butter. Heat over low heat, stirring constantly to prevent the mixture from sticking to the bottom. The key to successful fudge is slow and uniform melting of the ingredients. Once the chocolate is completely melted and the mixture is homogeneous, remove from heat and incorporate half a teaspoon of vanilla extract and a pinch of salt. This touch of salt is the pastry chef’s secret to intensifying the chocolate flavor without adding additional sugar. Pour half of this mixture into the prepared pan, spreading it evenly to form the base of your fudge. Reserve the other half for the top layer. Place the pan in the refrigerator for about 20 minutes, just long enough for this first layer to begin to set but remain slightly sticky to the touch, which will ensure better adhesion with the next layer.
Preparing the “Egg Cream” Layer
While the first layer cools, prepare the filling that mimics the creamy center of Cadbury eggs. In a clean saucepan, melt the white chocolate broken into pieces with the remaining sweetened condensed milk and a tablespoon of butter, still over low heat and stirring constantly. As white chocolate is more delicate than milk chocolate, carefully monitor the temperature to prevent it from burning or becoming grainy. Once the mixture is smooth, remove from heat and add a few drops of yellow food coloring until you achieve the characteristic tint of the center of Cadbury eggs. Incorporate half a teaspoon of vanilla extract and stir until the color is perfectly uniform. Let this mixture cool slightly for 5 minutes, stirring occasionally to prevent a skin from forming on the surface. This short cooling period is important so that the yellow layer doesn’t melt the first chocolate layer when poured over it.
Assembling the Layers
Remove the pan from the refrigerator and check that the first chocolate layer has begun to set but is not completely hard. If it’s still too liquid, return it to the refrigerator for a few additional minutes. Gently pour the colored white chocolate preparation over the partially set chocolate layer, using the back of a spoon to spread it evenly without disturbing the lower layer. Gentle and patient movements are essential at this stage to maintain the clear separation of layers. Return the pan to the refrigerator for about 30 minutes, until the yellow layer is firm enough to support the final chocolate layer. Slightly reheat the remaining milk chocolate mixture if necessary, then gently pour it over the yellow layer, spreading it to create a smooth and uniform surface. This final step completes your three-layer imitation of the famous Cadbury eggs.
Finishing and Cutting
Place the pan in the refrigerator for at least 4 hours, ideally overnight, to allow the fudge to solidify completely. Patience is rewarded here, as adequate cooling ensures that your fudge will have the perfect texture and will cut cleanly. Once the fudge is firm, remove it from the pan using the overhanging parchment paper. Place it on a cutting board and, using a long, sharp knife previously dipped in hot water and wiped dry (which facilitates a clean cut), cut the fudge into equal-sized squares. For perfectly clean cuts, wipe and reheat the blade between each cut. If desired, decorate each square with a mini Cadbury egg, a light dusting of powdered sugar, or some chocolate sprinkles for a festive presentation that immediately evokes the Easter spirit.
Pro Tips
- Use quality baking chocolate for optimal texture and flavor
- Patience is essential – respect the cooling times between layers
- For clean cuts, dip the knife in hot water and wipe it between each cut
- Add a pinch of salt to the chocolate layer to intensify the flavor without adding sugar
- For softer fudge, slightly reduce the cooking time of the chocolate mixtures
Storage Tips
This Cadbury Egg Fudge keeps remarkably well, making it an excellent option for preparing treats in advance or for giving as a gourmet gift. Once cut into squares, store the fudge in an airtight container at room temperature, separating the layers with parchment paper to prevent them from sticking together. Under these conditions, it will keep perfectly for 1 to 2 weeks without losing its melting texture or flavor.
If your kitchen is particularly warm, or for longer storage, you can store the fudge in the refrigerator, where it will keep for up to 3 weeks. In this case, take it out about 15 minutes before serving so it regains its ideal melting texture. For an optimal experience, avoid serving it straight from the refrigerator, as the cold masks some of the subtle flavors and makes the texture too firm.
The fudge can also be frozen for long-term storage. Wrap it well in plastic wrap then in aluminum foil, and place it in an airtight container. It will keep for up to 3 months this way. To thaw, transfer it to the refrigerator overnight, then let it come to room temperature before serving.
To preserve the visual beauty of the squares, avoid stacking them directly on top of each other without separation, as the layers could stick together, especially in warm weather.
Customization Ideas
This Cadbury Egg Fudge lends itself wonderfully to variations and customization according to your tastes and the occasion. For a more sophisticated version, replace the milk chocolate with 70% dark chocolate in the outer layers, thus creating a more pronounced contrast with the sweetness of the central layer. This variation will particularly appeal to lovers of more intense chocolate.
If you prefer more complex flavors, add a teaspoon of instant coffee dissolved in a tablespoon of hot water to the chocolate layer. The coffee notes will enhance the depth of the chocolate without dominating the overall flavor profile. For a festive touch, incorporate a tablespoon of liqueur of your choice into either layer – Grand Marnier, Baileys, or Cointreau work particularly well.
The decoration options are endless: in addition to mini Cadbury eggs, try edible gold leaf for a luxurious version, or chocolate shavings for additional texture. For a themed presentation, cut the fudge using egg or bunny-shaped cookie cutters before it is completely hardened.
For a version adapted to dietary restrictions, milk chocolate can be replaced with vegan chocolate, and butter with vegetable margarine. Note, however, that the texture might be slightly different. For a lactose-free version, look for specifically formulated lactose-free chocolates and condensed milk, now available in many specialty stores.
Special Technique: The Secret of Perfectly Distinct Layers
The visual beauty of this Cadbury Egg Fudge lies in its three clearly defined layers that perfectly mimic the structure of the original treat. This precise separation of layers, which professional pastry chefs master, relies on a little-known technique that goes beyond simply cooling between steps.
The first secret is the temperature of the layers at the time of assembly. The initial chocolate layer must be cooled until it is tactile (you can place a finger on it without it sinking in) but not completely hardened. Technically, it must reach what confectioners call the “initial crystalline stage,” where the fat molecules have begun to realign but retain some malleability. This precise stage, generally reached after 15-20 minutes of refrigeration, allows the next layer to adhere sufficiently without mixing.
The second crucial aspect concerns the viscosity of the mixtures. The yellow “egg cream” layer must be slightly thicker than the chocolate layer to prevent any infiltration. To achieve this ideal consistency, let the white chocolate mixture cool until it begins to thicken slightly but remains pourable – about 100°F (38°C) if you’re using a kitchen thermometer. At this precise temperature, it will be neither too liquid to penetrate the lower layer, nor too thick to spread uniformly.
The application method constitutes the third secret. Instead of directly pouring the yellow mixture onto the chocolate layer, use the back of a large spoon to gently “slide” it, starting from the center and working toward the edges. This technique creates a minimal physical barrier that protects the lower layer from disturbances.
Finally, the cooling between layers must follow a specific progression: 20 minutes for the first layer, 30 minutes for the second, and a minimum of 4 hours for the final solidification. This precise schedule allows the fat crystals of each layer to stabilize sufficiently without becoming completely rigid, thus creating perfect adhesion between the layers while maintaining their distinct visual identities.
Frequently Asked Questions
Can I use other types of chocolate than those indicated in the recipe?
Yes, you can experiment with different chocolates, but keep in mind that the quality of the chocolate will directly affect the final texture and flavor. For white chocolate in particular, choose a product that actually contains cocoa butter and not vegetable substitutes.
My fudge is too soft, what happened?
Fudge that’s too soft is generally the result of insufficient cooking time for the mixtures or inadequate cooling. Make sure each mixture reaches a slightly thickened consistency before removing it from the heat, and strictly observe the cooling times.
Can I replace artificial food coloring with a natural alternative?
Absolutely! Turmeric powder (a pinch) or saffron infused in a teaspoon of hot water can produce a beautiful natural yellow color. Superfood powders like mango or passion fruit powder can also work, although their subtle flavors might add to the taste profile.
My white chocolate became grainy while melting, how can I avoid this?
White chocolate is particularly sensitive to excessive heat. To prevent it from becoming grainy, use the double boiler technique rather than direct heat, and stop heating once 3/4 of the chocolate is melted, letting the residual heat melt the rest while stirring.
Can I prepare this recipe without special equipment?
Yes, this recipe doesn’t require specialized equipment. A standard pan, a saucepan, and a spatula are the only essential tools. A kitchen thermometer can be useful but is not indispensable if you carefully follow the visual cues described in the recipe.
")
Ingredients
- 10.5 oz (300g) good quality milk chocolate, chopped
- 5.3 oz (150g) good quality white chocolate, chopped
- 1 can (14 oz/397g) sweetened condensed milk
- 4 tablespoons (60g) unsalted butter, divided
- 1 teaspoon vanilla extract, divided
- Yellow food coloring (or natural alternative)
- 1/4 teaspoon fine salt
- Mini Cadbury eggs for decoration (optional)
- Powdered sugar for dusting (optional)
Instructions
- Prepare an 8-inch (20 cm) square pan by lining it with parchment paper, leaving the paper overhanging on the sides to facilitate later removal.
- In a thick-bottomed saucepan, melt 5.3 oz (150g) of milk chocolate with half of the sweetened condensed milk (about 7 oz/200g) and 2 tablespoons (30g) of butter over low heat, stirring constantly.
- Once the mixture is smooth, remove from heat and add 1/2 teaspoon of vanilla extract and a pinch of salt. Divide this mixture into two equal parts.
- Pour one part of the chocolate mixture into the prepared pan, spread evenly, and place in the refrigerator for 20 minutes.
- Meanwhile, in another saucepan, melt the white chocolate with the remaining sweetened condensed milk and the remaining 2 tablespoons (30g) of butter over low heat, stirring constantly.
- Once the mixture is smooth, remove from heat, add a few drops of yellow food coloring until the desired tint is achieved, and incorporate the rest of the vanilla extract.
- Remove the pan from the refrigerator and gently pour the yellow preparation over the partially set chocolate layer. Spread evenly and return to the refrigerator for 30 minutes.
- Slightly reheat the remaining milk chocolate mixture if necessary, then pour it over the cooled yellow layer, spreading it to create a smooth surface.
- Refrigerate for at least 4 hours, ideally overnight.
- Once completely firm, unmold the fudge using the overhanging parchment paper, and cut it into squares using a knife dipped in hot water and wiped between each cut.
- Decorate with mini Cadbury eggs or lightly dust with powdered sugar if desired.
- Store in an airtight container at room temperature for up to 2 weeks, or in the refrigerator for longer storage.
Notes
- For an even more spectacular effect, create a marbled fudge by reserving a small portion of each color and swirling them slightly on top
- Silicone molds greatly facilitate unmolding the fudge
- If you don't have mini Cadbury eggs, any colorful Easter chocolate will do
- For gifts, wrap the individual squares in wax paper and present them in a pretty box