

Every kitchen has its own story. Today, yours is about to become the stage for a special butterscotch cheesecake adventure. Imagine making a creamy dessert that fills your home with warmth and the sweet smell of brown sugar.
This butterscotch cheesecake is more than just a sweet treat. It’s a journey that turns simple ingredients into something truly special. With each ingredient and technique, you’ll make a dessert that speaks to comfort and indulgence.
Table of Contents
Key Takeaways
- Master the art of creating a professional-quality butterscotch cheesecake at home
- Learn essential techniques for achieving a perfectly smooth and creamy texture
- Discover how to balance the rich butterscotch flavor with classic cheesecake elements
- Understand the importance of ingredient temperature and preparation
- Gain confidence in baking a show-stopping dessert for any occasion
Understanding the Magic of Butterscotch Cheesecake
Explore the world of butterscotch cheesecake, a treat that mixes rich flavors with creamy textures. It’s more than a dessert; it’s a journey for your taste buds. The caramelized flavors make it truly special.
What Makes Butterscotch Flavor Special
The butterscotch flavor is a mix of brown sugar and butter. It turns a simple cheesecake into a unique dessert. Its key traits are:
- Rich, deep caramel-like sweetness
- Smooth, buttery undertones
- Complex layered taste experience
The History of Butterscotch Desserts
Butterscotch has a rich history, starting in 19th-century England. It began as a hard candy and grew into a favorite dessert flavor. Bakers soon found it could make classic cheesecakes even better.
“Butterscotch is not just a flavor, it’s a nostalgic journey through culinary tradition.” – Pastry Chef International
Why This Recipe Stands Out
Our butterscotch cheesecake recipe is unique. It uses butterscotch chips and pudding mix for a deep flavor. This makes it stand out from other desserts.
| Key Ingredient | Quantity | Purpose |
|---|---|---|
| Butterscotch Chips | 1/2 cup | Intense flavor boost |
| Butterscotch Pudding Mix | 1 package | Depth of flavor |
| Brown Sugar | 1/4 cup | Caramelized notes |
Every ingredient is chosen for the perfect mix of sweetness and complexity. This makes every bite of our butterscotch cheesecake unforgettable.
Essential Ingredients for Perfect Results
Making the perfect butterscotch cheesecake starts with picking the right ingredients. Success comes from using top-notch parts that blend well. This mix creates a dessert that’s truly special.
Cream cheese is the core of a great cheesecake. For the best texture, pick full-fat, brick-style cream cheese. Make sure it’s room temperature before mixing. This makes the filling smooth and creamy.
- Cream cheese (full-fat, room temperature)
- Brown sugar (light or dark)
- Butterscotch chips
- Instant butterscotch pudding mix
- Eggs
- Heavy whipping cream
- Unsalted butter
Brown sugar is key for the butterscotch flavor. Dark brown sugar gives a deeper, richer taste. The pudding mix adds more butterscotch flavor, making it even more complex.
“The secret to an incredible butterscotch cheesecake lies in the quality of your ingredients.”
Pro baking tip: Use a kitchen scale for precise measurements. This helps you get consistent results every time.
| Ingredient | Purpose | Recommended Type |
|---|---|---|
| Cream Cheese | Base of cheesecake | Full-fat, room temperature |
| Brown Sugar | Flavor depth | Dark brown sugar preferred |
| Butterscotch Chips | Flavor intensity | High-quality baking chips |
| Pudding Mix | Additional flavor | Instant butterscotch |
Remember, the quality of your ingredients affects your dessert. Choose each carefully for a butterscotch cheesecake that will wow your guests.
Kitchen Tools and Equipment Needed
To make a tasty butterscotch cheesecake, you need the right tools. The right kitchen gear makes baking easier and more fun. Let’s look at the tools you’ll need for this yummy dessert.
Essential Baking Tools
For cheesecake success, you need some key tools. A 9-inch springform pan is a must. It lets you take out your cheesecake without breaking it. An electric mixer is also key. It mixes ingredients until they’re smooth and creamy.
- 9-inch springform pan
- Electric mixer
- Large mixing bowl
- Measuring cups and spoons
- Rubber spatula
- Aluminum foil
Optional but Helpful Equipment
Some tools are not essential but can make baking better. A food scale helps with exact measurements for better results. An oven thermometer checks your oven’s temperature. This prevents baking problems.
- Food scale
- Oven thermometer
- Parchment paper
- Kitchen timer
Measuring and Mixing Tools
Getting your measurements right is important for a great cheesecake. Use good measuring tools like nested cups for dry ingredients and clear cups for liquids. For the water bath, you’ll need a big roasting pan and a kettle or pot for boiling water.
“The right tools can transform an average baker into a pastry chef.” – Baking Enthuasiast
Preparing the Graham Cracker Crust
Making the perfect graham cracker crust is key for your butterscotch cheesecake. It adds a delightful crunch and flavor that makes the dessert even better.
The secret to a great crust is choosing the right ingredients and mixing them just right. You’ll need:
- 1 3/4 cups graham cracker crumbs
- 1/4 cup packed brown sugar
- 7 tablespoons melted butter
Here’s how to make your graham cracker crust:
- Crush graham crackers into fine crumbs
- Mix crumbs with brown sugar
- Add melted butter to the mix
- Stir until it looks like wet sand
- Press it firmly into your springform pan
“A great cheesecake starts with a perfectly prepared crust” – Baking Experts
Pro tip: Press the crust mixture evenly across the bottom and up the sides of the pan. This makes a strong base for your cheesecake.
Bake the crust at 325°F for 8-10 minutes. This step sets the crust and adds a toasted flavor. Let it cool completely before adding the cheesecake filling.
Creating the Creamy Butterscotch Filling
Making the perfect cream cheese filling is an art. It turns your cheesecake into something truly special. The key is in the preparation and mixing techniques.
When making your butterscotch cheesecake filling, pay close attention. Begin by softening your cream cheese to room temperature. This step is vital for a smooth texture.
Proper Cream Cheese Preparation
- Use 24 ounces of full-fat cream cheese
- Allow cream cheese to soften at room temperature for 30-45 minutes
- Use an electric mixer on low speed to prevent over-mixing
- Scrape down the bowl sides frequently for even incorporation
Incorporating Butterscotch Elements
Adding butterscotch chips and pudding mix to your cream cheese is where the magic happens. Melt the butterscotch chips with heavy cream. This creates a rich base that adds deep caramel flavors to your cheesecake.
Mixing Techniques for Smooth Results
- Blend cream cheese and sugar on low speed
- Add vanilla extract and sour cream
- Gradually mix in dry pudding mix
- Incorporate eggs one at a time
- Stir in melted butterscotch chips
Pro tip: Always mix on low speed to prevent air bubbles that can cause cracks in your cheesecake.
The result is a decadent butterscotch cheesecake that will wow anyone. With the right preparation, your cream cheese filling will be smooth, rich, and full of butterscotch flavor.
Mastering the Water Bath Method
To get the perfect cheesecake texture, you need the water bath method. This technique stops cracks and makes sure your butterscotch cheesecake cooks evenly. It’s key for a great cheesecake.
The water bath is like a warm hug for your cheesecake. It surrounds the springform pan with warm water. This creates a moist cooking space that keeps the filling safe from direct heat.
Water Bath Preparation Steps
- Select a large roasting pan larger than your springform pan
- Wrap the exterior of the springform pan completely in aluminum foil
- Place the foil-wrapped pan inside the roasting pan
- Pour warm water halfway up the sides of the springform pan
Pro tip: Use warm water to prevent temperature shock to your cheesecake and maintain a consistent baking environment.
“The water bath is the secret weapon for a crack-free, silky smooth cheesecake.” – Professional Pastry Chef
Water Bath Techniques
- Ensure foil is tightly sealed to prevent water seepage
- Use oven mitts when handling hot water
- Place the pan carefully in the preheated oven
- Avoid splashing water into the cheesecake batter
Mastering the water bath method takes your cheesecake to the next level. It makes a dessert with perfect texture that will wow everyone.
Baking Time and Temperature Guidelines
To make the perfect butterscotch cheesecake, you need to get the baking temperature right. Paying close attention to when it’s done is also key. This will make your baking at home look like a pro’s work.
Your butterscotch cheesecake needs a special baking setup for that creamy feel. Bakers say to use a low temperature to avoid cracks and cook evenly.
Understanding Doneness Indicators
Figuring out when your cheesecake is done is important. Here are the signs to watch for:
- Edges should be set and slightly pulled away from the pan
- Center remains slightly jiggly but not liquid
- Surface appears matte, not glossy
- Internal temperature reaches 150°F when tested with a digital thermometer
Cooling Process Steps
Cooling slowly is key to avoid cracks and get a smooth texture. Here’s how to do it right:
- Bake at 300°F for about 1 hour and 30-35 minutes
- Turn off oven after baking
- Leave cheesecake inside with door slightly open for 30 minutes
- Remove from oven and cool at room temperature
- Refrigerate for 5-6 hours or overnight
“Patience is the secret ingredient in creating the perfect cheesecake.” – Professional Pastry Chef
| Baking Stage | Temperature | Time |
|---|---|---|
| Initial Baking | 300°F | 1 hour 30-35 minutes |
| Oven Rest | Turned Off | 30 minutes |
| Room Temperature Cooling | 70-75°F | 1-2 hours |
| Refrigeration | 40°F | 5-6 hours |
Mastering baking temperature, checking for doneness, and cooling slowly will make your butterscotch cheesecake top-notch.
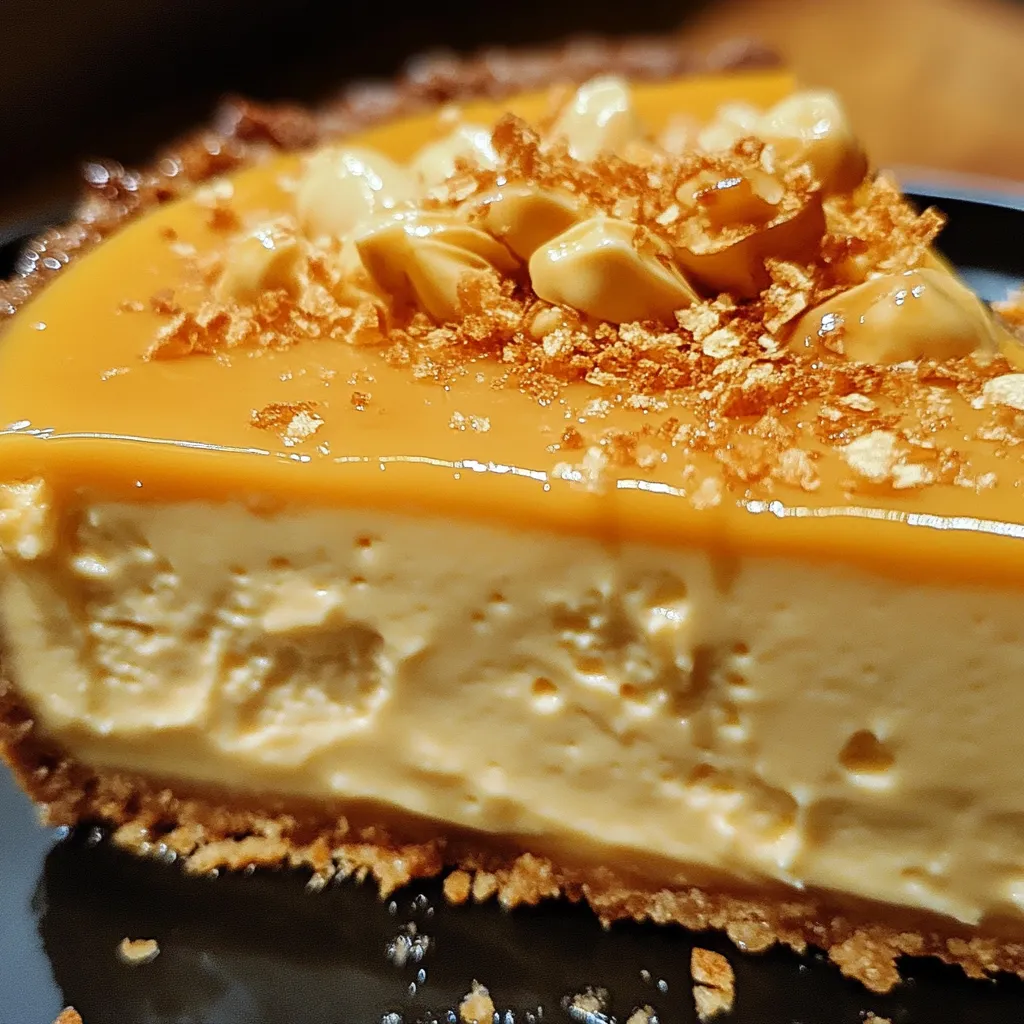
Butterscotch Ganache Topping
Creating the ultimate butterscotch ganache topping makes your cheesecake stand out. It adds rich flavor and stunning visual appeal. Your dessert masterpiece will look amazing.
The secret to great butterscotch ganache is choosing the right ingredients and technique. Use high-quality butterscotch chips and heavy cream for that smooth, luxurious texture.
Ingredients for Butterscotch Ganache
- ¾ cup butterscotch chips
- 5 tablespoons heavy cream
- Optional: Additional butterscotch chips for garnish
Simple Preparation Steps
- Combine butterscotch chips and heavy cream in a microwave-safe bowl
- Microwave in 15-second intervals, stirring between each
- Whisk until completely smooth
- Allow ganache to cool for 5 minutes
- Pour evenly over chilled cheesecake
For an extra touch of elegance, sprinkle some chopped butterscotch chips across the top of your ganache. This creates a delightful textural contrast and adds visual interest to your cheesecake topping.
Pro Tip: Ensure your cheesecake is completely cooled before applying the butterscotch ganache for the most professional-looking result.
The butterscotch ganache isn’t just a topping – it’s the crowning glory of your homemade cheesecake. It brings together rich flavors and professional-level presentation in one irresistible layer.
Decoration and Presentation Tips
Creating the perfect cheesecake presentation is an art. It turns your dessert from delicious to spectacular. After baking your butterscotch cheesecake, show it off in the best way.
Start by putting your cheesecake on a beautiful serving plate. Choose one that matches its rich butterscotch color. The right plate can make it look even better.
- Drizzle warm butterscotch ganache across the top
- Create elegant whipped cream topping patterns
- Sprinkle additional butterscotch chips for texture
For a pro whipped cream topping, follow these tips:
- Stabilize whipped cream by adding a pinch of gelatin
- Use a piping bag with a star tip for decorative edges
- Chill the cream and mixing bowl beforehand for better consistency
“The beauty of a cheesecake is in its details” – Pastry Chef Wisdom
Garnish around the edges with whole and crushed butterscotch chips. This adds visual interest without overdoing it.
Your butterscotch cheesecake will taste amazing and look like it came from a bakery. It will impress everyone.
Conclusion
Your journey to make the perfect homemade butterscotch cheesecake is a fun adventure. It shows your baking skills and love for making sweet memories. This dessert is more than just a treat; it’s a sign of your hard work and dedication.
Creating a great butterscotch cheesecake is all about balance. Start with a good graham cracker crust and a smooth butterscotch filling. Each step is important to make a dessert that will wow everyone. Don’t rush it—let it cool slowly and chill well for the best taste and texture.
Serving this cheesecake is like sharing a special moment. The butterscotch and cheesecake mix is a treat that makes any event special. Enjoy it within 2-3 days for the best flavor and texture.
Keep practicing and you’ll get even better at baking. Your desserts will bring happiness and sweetness to your home.
FAQ
What makes butterscotch flavor unique?
Butterscotch flavor comes from heating brown sugar and butter together. This creates a rich, caramel taste. It’s a unique sweetness that makes your cheesecake both nostalgic and indulgent.
Can I use different types of pudding mix in this recipe?
Yes, you can use either instant or cook-and-serve butterscotch pudding mix. Both enhance the butterscotch flavor and make the cheesecake filling creamy and smooth.
How long can I store the butterscotch cheesecake?
Store your butterscotch cheesecake in the fridge for 4-5 days. Cover it tightly with plastic wrap or in an airtight container. This keeps it fresh and prevents odors.
What type of cream cheese should I use?
Use full-fat, brick-style cream cheese at room temperature. This ensures a smooth, creamy texture. Avoid low-fat or whipped cream cheese for the best results.
Why is a water bath important when baking cheesecake?
A water bath prevents cracking and ensures a smooth texture. It cooks the cheesecake slowly and evenly. This results in a perfect, crack-free dessert.
Can I make the butterscotch ganache topping in advance?
Yes, you can make the butterscotch ganache ahead of time. Melt the butterscotch chips with heavy cream, cool, and refrigerate. Reheat or let it come to room temperature before using.
How do I know when the cheesecake is fully baked?
The cheesecake is done when the center is set but slightly jiggly. The edges should be firm. The internal temperature should be about 150°F for perfection.
Can I freeze butterscotch cheesecake?
Absolutely! Freeze the cheesecake for up to 1-2 months. Wrap it tightly in plastic wrap and foil. Thaw in the fridge overnight before serving, and add the ganache topping after thawing.
Source Links
- Loaded Butterscotch Cheesecake | Best. Cheesecake. Recipe. EVER.
- butterbeer cheesecake
- Vanilla Cheesecake with Butterscotch Sauce
- Harry Potter Inspired Butterbeer Cheesecake Recipe
- Magic Bars Are Stepping Up Into Cheesecake Territory
- 10-minute butterscotch sauce

Ingredients
For the Crust:
- 1 ½ cups graham cracker crumbs
- 1/4 cup light brown sugar
- 1/3 cup unsalted butter, melted
For the Cheesecake Filling:
- 24 oz (3 blocks) cream cheese, softened
- 1 cup light brown sugar
- 3 large eggs
- 1/3 cup sour cream
- 2 tbsp cornstarch
- 1 tsp vanilla extract
- 1/2 cup butterscotch chips, melted and cooled
For the Butterscotch Topping:
- 1/2 cup butterscotch chips
- 1/4 cup heavy cream
- 1/4 tsp vanilla extract
Instructions
Prepare the Crust:
- Preheat your oven to 325°F (160°C). Grease a 9-inch springform pan and line the bottom with parchment paper.
- In a bowl, mix the graham cracker crumbs, light brown sugar, and melted butter. Press the mixture firmly into the bottom of the pan.
- Bake for 8-10 minutes. Remove from the oven and set aside to cool.
Make the Cheesecake Filling:
- In a large mixing bowl, beat together the softened cream cheese and light brown sugar until smooth and creamy.
- Add the eggs, one at a time, blending well after each addition.
- Mix in the sour cream, cornstarch, and vanilla extract until just combined.
- Gently fold in the melted butterscotch chips. Be careful not to overmix.
- Pour the filling over the cooled crust.
Bake the Cheesecake:
- Bake in the preheated oven for 60 minutes, or until the edges are set and the center is slightly jiggly.
- Turn off the oven and let the cheesecake cool inside with the door slightly ajar for 1 hour to prevent cracks.
- Remove from the oven and refrigerate for at least 4 hours or overnight.
Prepare the Butterscotch Topping:
- Combine the butterscotch chips, heavy cream, and vanilla in a microwave-safe bowl. Microwave in 20-second intervals, stirring after each, until smooth and creamy. Let cool slightly before pouring over the cheesecake.
Assemble the Cheesecake:
- Remove the chilled cheesecake from the springform pan and place it on a serving plate.
- Drizzle the butterscotch topping over the cheesecake, allowing it to drip down the sides for a decorative effect.
Serve:
- Slice and serve chilled. Garnish with whipped cream or additional butterscotch chips if desired.
Notes
- Ensure all filling ingredients (cream cheese, eggs, sour cream) are at room temperature to create a smooth texture.
- If you want extra crunch, add 1/4 cup crushed pecans or walnuts to the crust mixture.
- Leftover cheesecake can be stored in an airtight container in the refrigerator for up to 5 days.
2 comments
[…] a dessert that not only satisfies your sweet tooth but also tells a story. The apple crisp cheesecake is more than a recipe. It’s an experience that brings people together, creating moments of […]
[…] This tropical dessert is a classic favorite. It has a caramelized pineapple topping and a tender cake base. When you flip it, you see a golden landscape of juicy pineapple and cherries. Each bite is a burst of flavor. […]