
")
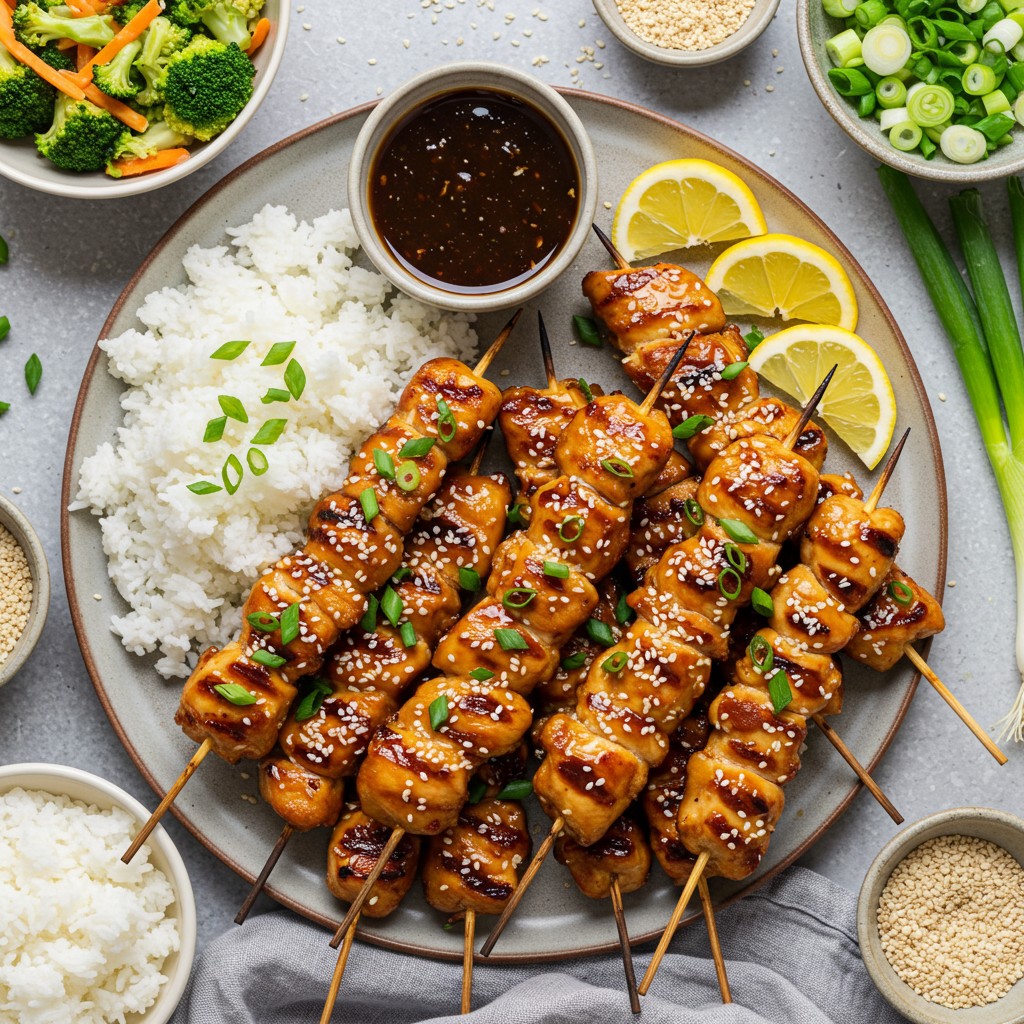
These irresistible Sweet & Sticky Honey Garlic Chicken Skewers deliver the perfect balance of sweet, savory, and tangy flavors in every bite. Featuring tender, juicy chicken chunks glazed with a glossy honey garlic sauce and garnished with fresh green onions, these skewers are as visually stunning as they are delicious. Perfect for summer cookouts, game day gatherings, or weeknight dinners, these skewers offer an impressive presentation with minimal effort that will have everyone reaching for seconds.
Why You’ll Love This Recipe
- Quick preparation: Ready in under 30 minutes from start to finish
- Versatile cooking methods: Can be grilled, baked, or pan-seared
- Crowd favorite: Appealing to both adults and children alike
- Make-ahead friendly: Marinade can be prepared in advance
- Bold flavor impact: Delivers complex taste with simple ingredients
- Impressive presentation: Looks professional with minimal effort
- Customizable heat level: Can be adjusted from mild to spicy
Ingredients
For the Chicken Skewers
- Boneless, skinless chicken breasts or thighs – Provides the perfect canvas for the flavorful glaze
- Wooden or metal skewers – Essential for the kebab presentation
- Salt and pepper – Enhances the chicken’s natural flavor
- Olive oil – Helps prevent sticking and promotes browning
- Garlic powder – Adds depth to the chicken’s flavor before glazing
- Sesame seeds – Provides visual appeal and subtle nutty flavor
- Green onions – Adds fresh color, flavor, and texture contrast
For the Honey Garlic Sauce
- Honey – Creates the signature sweetness and glossy coating
- Soy sauce – Provides savory umami flavor and balanced saltiness
- Fresh garlic – Delivers aromatic pungency that defines the dish
- Brown sugar – Deepens the sweetness and helps with caramelization
- Rice vinegar – Adds brightness and balances the sweetness
- Sesame oil – Contributes distinctive nutty aroma and flavor
- Ginger – Adds warmth and complexity to the sauce
- Red pepper flakes – Provides optional heat that complements the sweetness
- Cornstarch – Thickens the sauce to create the perfect clingy glaze
- Water – Helps achieve ideal sauce consistency
Step-by-Step Instructions
Preparing the Skewers and Chicken
If using wooden skewers, begin by soaking them in water for at least 30 minutes. This crucial step prevents the skewers from burning during cooking, especially if you’re planning to grill the chicken.
Pat the chicken breasts or thighs dry with paper towels. This ensures proper browning and helps the marinade adhere better to the meat.
Cut the chicken into uniform 1-inch cubes. Consistency in size is important for even cooking—pieces that are too large will remain raw in the center while smaller pieces may overcook and become dry.
Place the chicken cubes in a medium bowl and season with 1 teaspoon salt, ½ teaspoon black pepper, and 1 teaspoon garlic powder. Drizzle with 1 tablespoon olive oil and toss to coat evenly. This pre-seasoning ensures the chicken has flavor throughout, not just from the external glaze.
Thread the seasoned chicken pieces onto the prepared skewers, leaving a small space between each piece to ensure even cooking. Depending on the size of your skewers, you’ll fit about 4-5 pieces per skewer. Avoid overcrowding as this will affect how evenly the chicken cooks.
Creating the Honey Garlic Sauce
In a small saucepan, combine ½ cup honey, ¼ cup soy sauce (low-sodium preferred), 4 cloves minced garlic, 2 tablespoons brown sugar, 1 tablespoon rice vinegar, 1 teaspoon sesame oil, and 1 tablespoon freshly grated ginger. For heat, add ¼-½ teaspoon red pepper flakes according to your spice preference.
Whisk the ingredients together until well combined, then place the saucepan over medium heat. Bring the mixture to a gentle simmer, stirring occasionally to prevent burning. The sauce will begin to bubble and the sugar will dissolve as it heats.
In a small bowl, create a slurry by mixing 1 tablespoon cornstarch with 2 tablespoons cold water until smooth. This will help thicken the sauce without creating lumps.
Once the sauce is simmering, slowly pour in the cornstarch slurry while whisking continuously. Continue to cook for 2-3 minutes until the sauce thickens to a glaze-like consistency that will coat the back of a spoon.
The sauce should be thick enough to cling to the chicken but still pourable. If it becomes too thick, thin with a small amount of water; if too thin, simmer a bit longer to reduce.
Remove from heat and set aside about one-third of the sauce for serving. The remainder will be used for glazing during cooking.
Cooking the Chicken Skewers
Grilling Method
Preheat your grill to medium-high heat (around 375-400°F). Properly preheating ensures beautiful grill marks and prevents sticking.
Lightly oil the grill grates to prevent the chicken from sticking. You can use a folded paper towel dipped in oil and held with tongs to safely oil the hot grates.
Place the skewers on the preheated grill and cook for 3-4 minutes per side until grill marks appear and the chicken begins to cook through.
After the first flip, begin brushing the chicken generously with the honey garlic sauce. Continue to turn and brush with sauce every 1-2 minutes until the chicken is fully cooked (internal temperature reaches 165°F) and nicely caramelized, about 8-10 minutes total.
Be attentive during this process as the sugar in the sauce can burn quickly if the heat is too high.
Oven Method
Preheat your oven to 425°F and line a baking sheet with foil or parchment paper for easy cleanup.
Place the skewers on the prepared baking sheet, ensuring they’re not touching.
Bake for 10 minutes, then remove from the oven and brush generously with the sauce. Return to the oven and bake for another 5-7 minutes.
For additional caramelization, switch the oven to broil for the last 1-2 minutes, watching carefully to prevent burning.
Stovetop Method
Heat 1 tablespoon of oil in a large skillet or grill pan over medium-high heat.
Add the skewers to the hot pan, working in batches if necessary to avoid overcrowding.
Cook for 3-4 minutes per side until golden brown.
Reduce heat to medium-low and brush the skewers with sauce. Continue cooking, turning and brushing with more sauce every 1-2 minutes until the chicken is cooked through and the sauce has caramelized, about 8-10 minutes total.
Finishing and Serving
Once the chicken skewers are fully cooked, transfer them to a serving platter. Immediately brush with another layer of the reserved sauce for maximum flavor and shine.
Sprinkle with sesame seeds while the glaze is still hot so they adhere to the sauce.
Garnish generously with sliced green onions, focusing on the light green and dark green parts for the most vibrant presentation.
For an extra pop of color and freshness, you can also add chopped cilantro or a sprinkle of red pepper flakes.
Arrange the remaining reserved sauce in a small bowl for dipping or drizzling as desired.
These skewers pair wonderfully with:
- Steamed jasmine or coconut rice
- Asian slaw or cucumber salad
- Grilled vegetables
- Stir-fried noodles
- Lettuce cups for a low-carb option
For optimal enjoyment, serve immediately while the glaze is still warm and glistening.
Pro Tips
- For the juiciest results, use chicken thighs instead of breasts as they’re more forgiving and less likely to dry out
- To prevent wooden skewers from burning, wrap the exposed ends with aluminum foil
- For easier threading, partially freeze the chicken for about 20 minutes
- Keep a close eye on the sauce while cooking—the high sugar content can burn quickly
- Double the sauce recipe to have plenty for serving on the side or using with other dishes
- For deeper flavor, marinate the chicken cubes in some of the sauce for 2-3 hours before skewering
- For a more caramelized exterior, brush on multiple thin layers of sauce rather than one thick layer
- Test doneness with a meat thermometer to ensure chicken reaches 165°F without overcooking
- For party presentation, use shorter skewers to create easy-to-manage appetizer portions
- If making ahead, slightly undercook the chicken, then reheat and apply fresh glaze before serving
Variations and Creative Ideas
Flavor Variations
Spicy Honey Garlic: Double the red pepper flakes and add 1 tablespoon of sriracha or gochujang to the sauce for a fiery kick that complements the sweetness.
Citrus Honey Garlic: Add the zest and juice of one orange or lemon to the sauce for a bright, tangy variation that cuts through the richness.
Pineapple Honey Garlic: Alternate chicken pieces with fresh pineapple chunks on the skewers and add 2 tablespoons of pineapple juice to the sauce for a tropical twist.
Bourbon Honey Garlic: Add 2 tablespoons of bourbon to the sauce and simmer until slightly reduced for a sophisticated adult version with complex caramel notes.
Dietary Adaptations
Gluten-Free Version: Substitute tamari or coconut aminos for the soy sauce to make the recipe completely gluten-free.
Lower Sugar Option: Reduce honey and brown sugar by half and add a dash of stevia or monk fruit sweetener to maintain sweetness with fewer calories.
Paleo-Friendly: Use coconut aminos instead of soy sauce, omit the brown sugar, and ensure your cornstarch is grain-free or substitute with arrowroot powder.
Keto Adaptation: Replace honey and brown sugar with a brown sugar substitute and add a tablespoon of sugar-free maple-flavored syrup to maintain the sticky texture.
Presentation Variations
Party Appetizers: Use shorter skewers or toothpicks for bite-sized appetizers perfect for grazing tables.
Chicken and Veggie Combo: Alternate chicken with bell peppers, onions, and zucchini for a more colorful presentation and complete meal on a stick.
Lettuce Wrap Style: Remove cooked chicken from skewers and serve with butter lettuce leaves, shredded carrots, and extra sauce for interactive lettuce wraps.
Rice Bowl Conversion: Serve the glazed chicken pieces (removed from skewers) over a bowl of steamed rice with stir-fried vegetables for a hearty meal.
Storage and Make-Ahead Advice
Refrigerator Storage: Store leftover cooked skewers in an airtight container in the refrigerator for up to 3 days. The glaze may absorb into the chicken when stored.
Freezer Storage:
- Cooked chicken can be frozen for up to 2 months. Remove from skewers before freezing for best results.
- The honey garlic sauce can be frozen separately in ice cube trays, then transferred to a freezer bag for up to 3 months.
- Raw, marinated chicken can be frozen on or off skewers for up to 1 month.
Make-Ahead Options:
- Prepare the sauce up to 5 days ahead and store in the refrigerator.
- Cut chicken and thread onto skewers up to 24 hours ahead, storing covered in the refrigerator.
- Partially cook skewers, then finish with sauce just before serving for the freshest results.
- For meal prep, cook completely, then reheat gently in the microwave or oven with a fresh brush of sauce.
Reheating Tips:
- Reheat in a 350°F oven for 7-10 minutes until warmed through, adding a fresh brush of sauce halfway through.
- For microwave reheating, use medium power in 30-second intervals to prevent the chicken from becoming tough.
- A quick sear in a hot skillet can revive the caramelized exterior when reheating.
Not Recommended: Preparing the fully sauced skewers more than a few hours ahead, as the sauce can break down the meat’s texture over time.
Kid-Friendly Involvement
This recipe offers several opportunities for children to help in the kitchen:
Measuring Ingredients: Kids can help measure honey, soy sauce, and other sauce ingredients, learning about different kitchen measurements.
Mixing the Sauce: Children can whisk the sauce ingredients together (before heating) to see how different components combine.
Threading Skewers: Older children can help thread pre-cut chicken onto skewers, developing fine motor skills (using blunt-tipped skewers for safety).
Sauce Brushing: Kids can help brush the sauce onto the cooked chicken using a child-safe pastry brush (when the skewers have cooled slightly).
Garnishing: Children of all ages can sprinkle sesame seeds and green onions on the finished skewers.
Learning Opportunity: Use this recipe to teach about caramelization, discuss how sweeteners like honey work in cooking, or explore Asian cuisine and flavors.
Frequently Asked Questions
Why are my chicken skewers dry? This typically happens from overcooking. Chicken breast in particular can dry out quickly. Use a meat thermometer to cook precisely to 165°F, consider using thigh meat instead, or try a quick brine (1 tablespoon salt dissolved in 2 cups water for 30 minutes) before cooking.
How can I prevent the sauce from burning? Apply the sauce later in the cooking process, reduce the heat slightly, and turn the skewers frequently. The high sugar content in honey causes quick caramelization, which can progress to burning if not watched carefully.
Can I make these skewers without a grill? Absolutely! The oven method or stovetop method both work excellently. You’ll still get great caramelization and flavor, especially if you finish under the broiler for a minute or two.
My sauce isn’t thickening properly, what went wrong? Make sure to bring the sauce to a simmer before adding the cornstarch slurry, and whisk constantly while adding it. If it’s still not thickening, you can create and add a bit more slurry, but remember it will thicken further as it cools.
Can I use this sauce on other proteins? Yes! This honey garlic sauce works wonderfully with pork, salmon, shrimp, or tofu. Just adjust cooking times accordingly for the different proteins.
")
Ingredients
For the Chicken Skewers:
- 2 pounds boneless, skinless chicken breasts or thighs
- 1 teaspoon salt
- ½ teaspoon black pepper
- 1 teaspoon garlic powder
- 1 tablespoon olive oil
- 12-15 wooden or metal skewers
- 1 tablespoon sesame seeds
- 4 green onions, thinly sliced
For the Honey Garlic Sauce:
- ½ cup honey
- ¼ cup soy sauce (low-sodium preferred)
- 4 cloves garlic, minced
- 2 tablespoons brown sugar
- 1 tablespoon rice vinegar
- 1 teaspoon sesame oil
- 1 tablespoon fresh ginger, grated
- ¼-½ teaspoon red pepper flakes (optional)
- 1 tablespoon cornstarch
- 2 tablespoons cold water
Instructions
- If using wooden skewers, soak in water for at least 30 minutes.
- Cut chicken into 1-inch cubes and season with salt, pepper, garlic powder, and olive oil.
- Thread chicken onto skewers, leaving small spaces between pieces.
- In a saucepan, combine honey, soy sauce, garlic, brown sugar, rice vinegar, sesame oil, ginger, and red pepper flakes.
- Heat sauce over medium heat until simmering.
- Mix cornstarch and water to create a slurry, then whisk into the simmering sauce.
- Cook sauce for 2-3 minutes until thickened, then reserve one-third for serving.
- Cook skewers using your preferred method (grill, oven, or stovetop) until chicken reaches 165°F.
- Brush with sauce during cooking, applying multiple layers for best flavor.
- Transfer to serving platter, brush with reserved sauce, and garnish with sesame seeds and green onions.
- Serve immediately with extra sauce on the side.
Notes
- Ensure the grill or pan is properly preheated before adding skewers to get the best caramelization
- Apply sauce in multiple thin layers rather than one thick coat for better adhesion and caramelization
- When using a grill, keep the lid open while basting and cooking glazed skewers to monitor browning
- For even cooking, ensure all chicken pieces are similar in size
- Let the chicken rest at room temperature for 10-15 minutes before cooking for more even cooking
- Keep a water spray bottle handy when grilling to tame any flare-ups from dripping sauce
- For extra flavor, lightly toast the sesame seeds in a dry pan before sprinkling
- Cut green onions on the diagonal for a more attractive presentation
- For easier cleanup when using the oven method, line your baking sheet with foil before adding skewers
- Reserve at least one-third of the sauce before brushing on raw chicken to avoid cross-contamination