
")
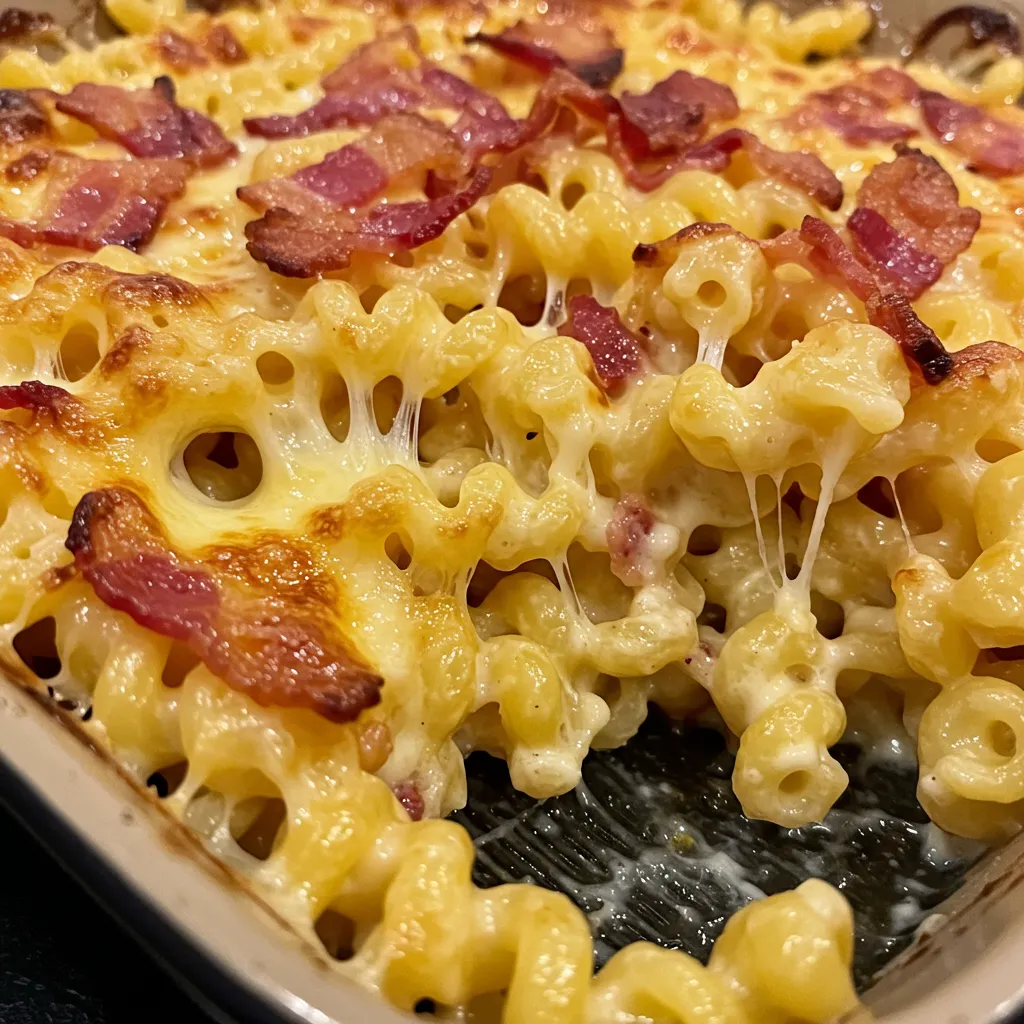
This comforting Cavatappi with Cheese and Bacon dish is an upgraded version of traditional mac and cheese, elevated to a superior level thanks to its spiral pasta, creamy cheese sauce, and crispy bacon topping. An explosion of flavors and textures that makes this baked dish a family favorite, perfect for both weeknight meals and special occasions.
Why You’ll Love This Recipe
- The shape of cavatappi pasta perfectly holds the creamy sauce in each fold
- Bacon provides a crispy and smoky contrast to the smoothness of the cheese
- The golden, gratinated crust offers an irresistible texture
- Easy to prepare in advance and reheat for busy evenings
- Customizable according to your tastes and available ingredients
Ingredients
For the Pasta
- Cavatappi – These spiral-shaped pasta are ideal for capturing sauce in their curves
- Salt – To properly season the cooking water and flavor the pasta from the start
For the Cheese Sauce
- Butter – Forms the rich base for the béchamel, providing creaminess and flavor
- Flour – Combines with butter to create a roux that will perfectly thicken the sauce
- Whole milk – Creates a creamy sauce with ideal richness
- Cream – Adds extra velvety texture and indulgent richness
- Aged cheddar – Brings a pronounced flavor and beautiful golden color to the sauce
- Mozzarella – Provides perfect elasticity and that irresistible cheese stretch
- Parmesan – Adds a savory and slightly salty dimension
- Nutmeg – Subtly enhances flavors without dominating
- White pepper – Brings mild warmth without the black specks of black pepper
For the Topping
- Crispy bacon – Offers a texture contrast and irresistible smoky flavor
- Buttered breadcrumbs – Creates a golden and crunchy crust when baked
- Grated Parmesan – Adds a salty and umami note to the topping
- Fresh parsley – Brings a touch of freshness and color
Step-by-Step Instructions
Preparation of Ingredients
Start by preheating your oven to 350°F (180°C). Cook the bacon in a pan over medium heat until perfectly crispy, then drain on paper towels to remove excess fat. Once cooled, crumble it into small pieces and set aside. This step can be done in advance to save time. Next, bring a large pot of heavily salted water to a boil for the pasta. The water should taste as salty as seawater to properly season the pasta from the inside. Meanwhile, grate your cheeses if you’re not using pre-grated cheese and measure all your ingredients so they’re ready to use.
Cooking the Pasta
Add the cavatappi pasta to the boiling salted water and cook them about 2 minutes less than the time indicated on the package. The pasta should be al dente as they will continue cooking in the oven. Stir occasionally to prevent them from sticking. Before draining the pasta, reserve a cup of cooking water, which can be used later to adjust the consistency of the sauce. Drain the pasta and quickly rinse under cold water to stop the cooking, then drain again.
Preparing the Cheese Sauce
In a large thick-bottomed pot, melt the butter over medium heat. Add the flour and whisk continuously for 1-2 minutes to form a golden roux, without letting it brown. This roux will serve to thicken your sauce. Gradually pour in the hot milk while constantly whisking to avoid lumps, then add the cream. Continue whisking until the mixture thickens, about 3-5 minutes. The sauce should coat the back of a spoon. Remove from heat and incorporate the grated cheeses in small amounts, stirring until they are completely melted before adding more. Season with salt, white pepper, and a pinch of nutmeg, then taste and adjust seasoning if necessary.
Assembly and Baking
Mix the drained pasta with the cheese sauce, ensuring that each pasta is well coated. If the sauce seems too thick, add a bit of reserved cooking water to lighten it. Pour this mixture into a buttered 9×13 inch (23×33 cm) baking dish. Evenly distribute three-quarters of the bacon crumbles on top. In a small bowl, mix the breadcrumbs with the grated Parmesan and the remaining crumbled bacon. Sprinkle this mixture on top of the dish to create a flavorful crust. Bake at 350°F (180°C) for 25-30 minutes, until the edges are bubbling and the top is golden and crispy. For an even more golden crust, place the dish under the broiler for the last 2-3 minutes, watching carefully to avoid burning.
Pro Tips
- Use several types of cheese for a more complex and rich flavor
- Keep some pasta cooking water to adjust the consistency of the sauce
- For a lighter version, use reduced-fat milk and decrease the amount of cheese
- Pre-cook your bacon in the oven on a tray to minimize splatter
- Melt the cheeses over low heat to prevent them from becoming grainy
Storage Tips
This Cavatappi with Cheese and Bacon keeps perfectly in the refrigerator for up to 3-4 days in an airtight container. To reheat, add a small amount of milk to revive the sauce and cover with aluminum foil before placing in the oven at 320°F (160°C) for about 20 minutes, or until the dish is hot. Remove the foil during the last 5 minutes to restore crispness to the topping.
To freeze, prepare the dish up to the step before baking, omitting the breadcrumbs and bacon on top. Cover tightly with plastic wrap then aluminum foil and freeze for up to 2 months. To cook from frozen, remove the plastic wrap, cover with aluminum foil, and cook at 320°F (160°C) for about 1 hour. Then remove the foil, add the breadcrumb and bacon topping, and continue cooking for an additional 15-20 minutes until the top is golden and the dish is bubbling.
Individual portions can also be frozen in microwave-safe containers for quick meals. Thaw in the refrigerator the night before and reheat in the microwave at medium power, stirring halfway through to ensure even reheating.
Customization Ideas
The versatility of this dish allows for numerous variations to satisfy all tastes and adapt the recipe to available ingredients. For a more substantial version, add diced grilled chicken or ham. Seafood lovers will appreciate the addition of sautéed shrimp or crab meat.
To increase nutritional value, incorporate vegetables such as peas, blanched broccoli, or fresh spinach. These additions not only provide nutrients but also color and texture. Oven-roasted cherry tomatoes add a tangy sweetness that wonderfully contrasts with the richness of the cheese.
Cheese variations are endless: try gruyère for a nutty note, blue cheese for a pronounced character, or smoked gouda for a complex aroma. For a Mediterranean touch, incorporate olives, sun-dried tomatoes, and feta cheese.
The topping can also be customized: fried onions, crushed nuts, or fresh herbs such as chives or thyme can replace or complement the bacon. For a vegetarian option, substitute the bacon with mushrooms sautéed until golden and crispy.
Special Technique: The Perfect Sauce
The key to exceptional Cavatappi with Cheese and Bacon lies in preparing a perfectly smooth and creamy cheese sauce. This technique, often called “nappe” in professional cooking, requires a bit of attention but makes all the difference in the final result.
The secret begins with creating a quality roux – the combination of butter and flour that forms the base of the sauce. The butter must be completely melted before adding the flour, and the mixture should cook just long enough to eliminate the taste of raw flour, but without browning, which would alter the delicate flavor.
Incorporating the liquid is the most critical step. The milk should be hot but not boiling when added to the roux. A liquid that’s too cold will create lumps that are difficult to eliminate, while a liquid that’s too hot could cook the flour too quickly. Pour the milk gradually while whisking vigorously and constantly, forming a figure-eight motion to reach all corners of the pot.
Once the milk is incorporated, patience is essential – the sauce must simmer gently until thickened, which can take 5-7 minutes. The ideal texture is achieved when the sauce “coats” the back of a spoon – if you run your finger through it, the trace should remain clear without the sauce flowing to fill it.
For adding the cheese, always remove the pot from the heat to prevent the cheese from becoming stringy or grainy. Incorporate it in small amounts, stirring until completely melted before adding more. This gradual method ensures a perfect emulsion of the cheese fats into the sauce.
A final chef’s tip: before mixing with the pasta, strain the sauce through a fine sieve to eliminate any potential lumps and achieve an absolutely silky texture. This small extra effort significantly elevates the quality of your final dish, making it worthy of the finest tables.
Frequently Asked Questions
Can I use other types of pasta?
Yes, although cavatappi are ideal thanks to their spirals that hold the sauce, you can substitute penne, conchiglie (shells), or fusilli with excellent results.
How can I prevent my sauce from becoming grainy?
Make sure to remove the pot from the heat before adding the cheese, add it gradually in small amounts, and use freshly grated cheese rather than pre-grated which contains anti-caking agents.
Can I prepare this dish in advance?
Perfectly! Assemble the dish without baking, cover and refrigerate for up to 24 hours. Add 5-10 minutes to the cooking time if starting with a refrigerated dish.
How can I make this dish lighter?
Use reduced-fat milk instead of whole milk, reduce the amount of cheese by 25%, and opt for leaner turkey bacon or roasted mushrooms as a topping.
Can my gratin be prepared gluten-free?
Absolutely. Substitute traditional pasta with gluten-free pasta (watch their cooking carefully as they may cook faster) and use gluten-free flour for the roux.
")
Ingredients
- 1 lb (500g) cavatappi pasta
- 8 slices of bacon (approximately 7 oz or 200g)
- 3.5 tbsp (50g) butter, plus a little to grease the dish
- 1/3 cup (50g) all-purpose flour
- 2 cups (500ml) whole milk, heated
- 1 cup (250ml) heavy cream
- 10.5 oz (300g) aged cheddar, grated
- 5.3 oz (150g) mozzarella, grated
- 1.8 oz (50g) Parmesan, grated (plus 0.9 oz or 25g for the topping)
- 1/4 teaspoon freshly grated nutmeg
- 1/2 teaspoon white pepper
- 1 teaspoon salt (plus more for the pasta water)
- 3.5 oz (100g) fresh breadcrumbs
- 2 tablespoons fresh chopped parsley (optional, for serving)
Instructions
- Preheat your oven to 350°F (180°C) and lightly butter a 9x13 inch (23x33 cm) baking dish.
- Cook the bacon in a pan over medium heat until crispy. Drain on paper towels, then crumble once cooled.
- Bring a large pot of generously salted water to a boil. Add the cavatappi pasta and cook them 2 minutes less than the time indicated on the package. Drain, reserving 1 cup of cooking water.
- In a large thick-bottomed pot, melt the butter over medium heat. Add the flour and cook while whisking for 1-2 minutes to form a roux.
- Gradually pour in the hot milk while constantly whisking to avoid lumps. Add the cream and continue to cook while stirring until thickened, about 3-5 minutes.
- Remove from heat and incorporate the cheeses little by little, mixing until they are completely melted. Season with salt, white pepper, and nutmeg.
- Combine the drained pasta with the cheese sauce, adding a bit of reserved cooking water if necessary to achieve the desired consistency.
- Pour the mixture into the prepared baking dish and sprinkle three-quarters of the crumbled bacon on top.
- In a small bowl, mix the breadcrumbs with the additional Parmesan and the remaining bacon. Evenly distribute this mixture on the gratin.
- Bake for 25-30 minutes until the top is golden and the edges are bubbling.
- Let rest 5 minutes before serving. Garnish with chopped fresh parsley if desired.
Notes
- For optimal results, use cheeses that you grate yourself - they melt better than pre-grated versions
- If the sauce seems too thick after adding the cheeses, thin it with the reserved pasta cooking water
- For a perfectly golden crust, place the dish under the broiler for the last 2-3 minutes
- To serve as a complete meal, accompany with a simple green salad dressed with a light vinaigrette